AI Assistant
Hand the back-and-forth of scheduling to an assistant that emails on your behalf. Forward or CC it on any thread and it replies with times drawn from your real availability, follows the rules you write in plain English, and books the meeting onto the calendar you pick. This guide walks every setting on the AI Assistant page — setup, availability, video conferencing, the rules textbox, the Try it out tester, conversations, and the assistant list.
Assistant basics
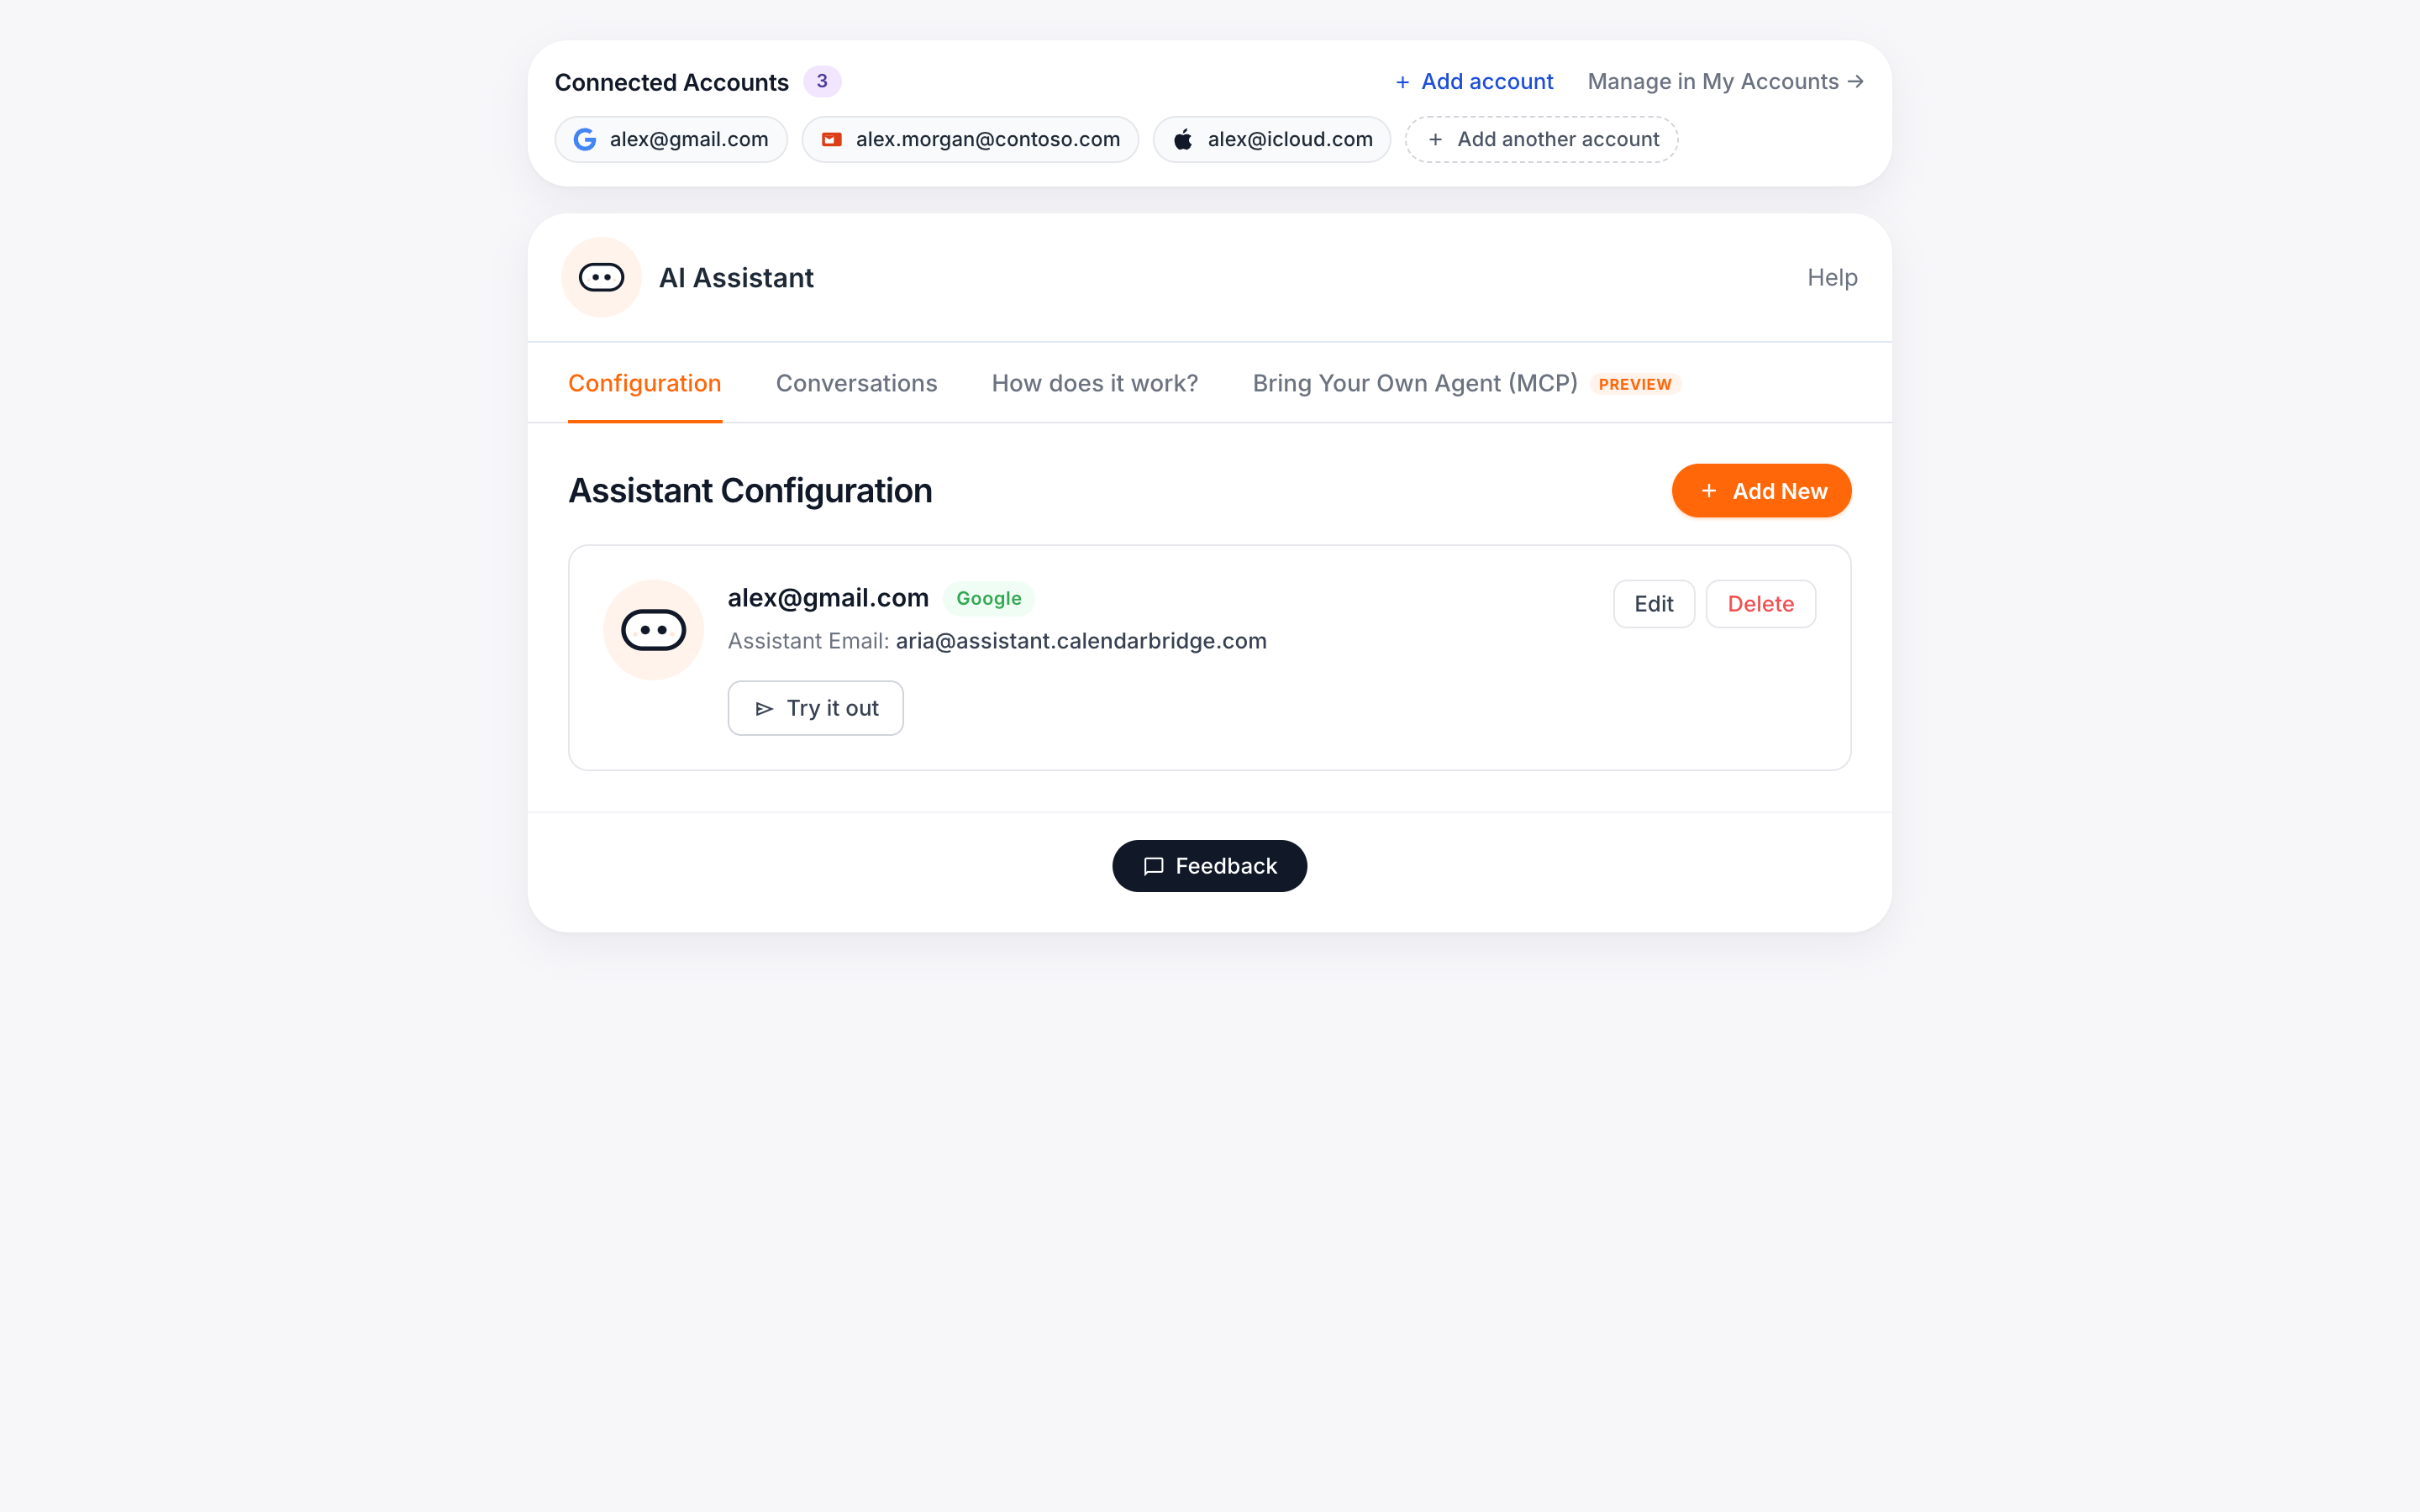
Open AI Assistant from the side rail. The page is one card with four tabs at the top: Configuration, Conversations, How does it work?, and Bring Your Own Agent (MCP). Above the card sits the same Connected Accounts panel you’ll see on Schedulers — you need at least one calendar account connected before the assistant has anything to schedule against.
Prefer to use your own AI? The Bring Your Own Agent (MCP) tab lets you connect Claude, ChatGPT, Cursor, and other MCP clients directly to your CalendarBridge account.
What the assistant does
Your CalendarBridge assistant is reachable at an email address that looks like assistant@ai.calendarbridge.com. Forward a thread to it — or CC it on a reply — and it:
- Reads free/busy from your primary calendar (and any extra calendars you’ve marked as availability-only).
- Suggests times that respect your working hours, timezone, and the plain-English rules in your User Configuration.
- Replies in the thread from your assistant address, so the other person can keep emailing as if they were talking to a human EA.
- Once everyone agrees on a time, books the meeting — with a video link, if you set a default provider — and writes it to your calendar.
The three tabs at a glance
| Tab | What it’s for |
|---|---|
| Configuration | Pick your primary email account, availability-only calendars, timezone, default video conferencing, and the plain-English rules the assistant follows. Also where you add a second configuration or delete an existing one. |
| Conversations | Every email thread the assistant has handled, with status (waiting on reply / booked / declined) and a transcript view. |
| How does it work? | A four-step walkthrough of the assistant — useful for new users and shareable with teammates who are about to be CC’d. |
Set up your assistant
The first time you visit Configuration, you’ll see a centered empty state — the mascot, three bullets describing what the assistant can do, and a Configure my assistant button. Click it to open the configuration form.
-
Step 1 — Pick the email account the assistant responds from
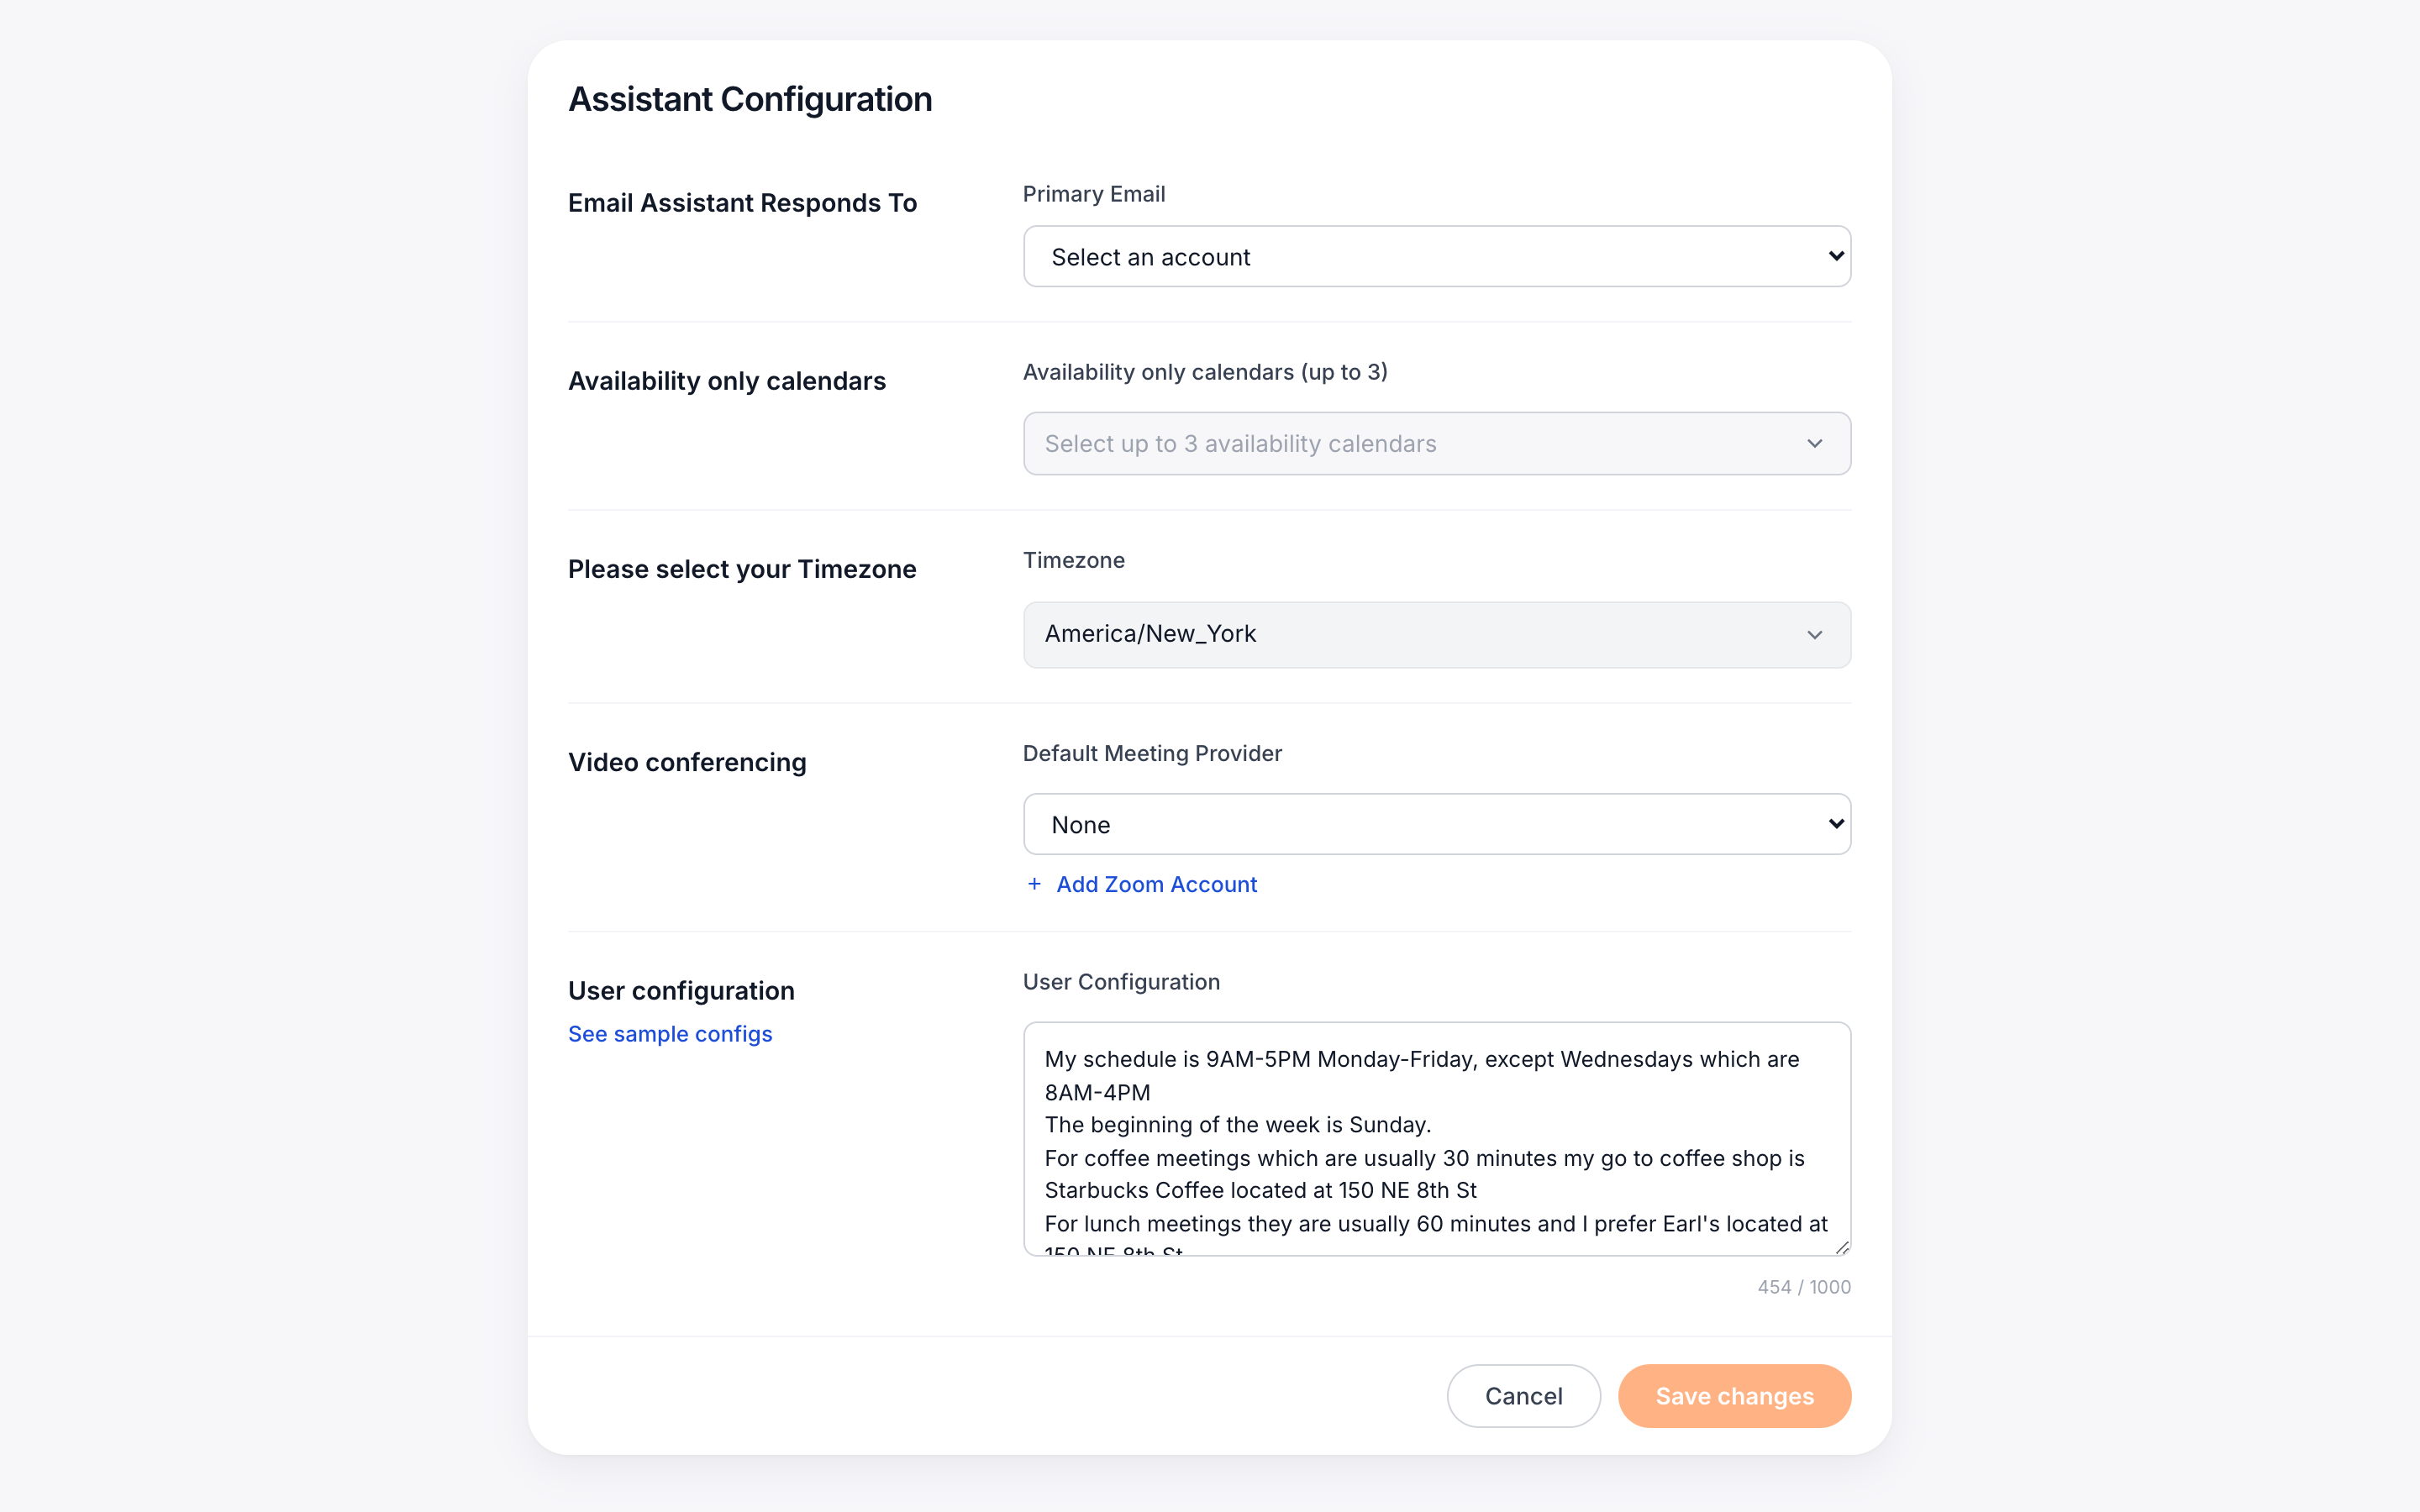
Under Email Assistant Responds To, choose Google, Microsoft, or Apple. This is the account whose calendar the assistant will read free/busy from and write bookings to. If the provider you want isn’t listed yet, click Add an account to select a primary calendar to jump to My Accounts and connect it.
Your assistant address is generated from this choice — for example
assistant@ai.calendarbridge.com. It’s visible in the Configuration list once you save, and it’s the address people will see in the CC line of any thread the assistant joins. -
Step 2 — Add availability-only calendars (optional)
Use the Availability only calendars dropdown to add secondary calendars whose events should block time but where you don’t want bookings written. Personal calendars, shared team calendars, and out-of-office calendars are the usual picks here.
Use + Add more accounts to connect another account and surface its calendars in the same dropdown.
-
Step 3 — Confirm your timezone
Pick your timezone from the Timezone dropdown — it defaults to whatever your browser reports. The assistant uses it to translate times in its replies (“how about Wednesday at 10am ET?”) and to interpret incoming times that don’t have an explicit zone.
-
Step 4 — Set a default video conferencing provider
Pick one of None, Zoom, Google Meet, or Microsoft Teams as the default. We cover this in detail in Default video conferencing.
-
Step 5 — Write your scheduling rules and save
The User Configuration textbox is where the assistant gets most of its personality — see Scheduling rules. Click Save changes when you’re done. The form closes and you land on the Configuration list with the new assistant card.
Availability & timezone
The assistant uses the same availability model as your schedulers, with a couple of differences worth knowing.
Primary calendar (writable)
The calendar attached to the account you picked in Step 1 is the booking calendar. Bookings the assistant confirms are written here; busy events here block availability.
Availability-only calendars (read-only)
Calendars added under Availability only calendars are read for free/busy but never written to. Use them to:
- Block personal commitments without exposing them — only busy/free is shared, not titles.
- Honor a team or shared calendar without giving the assistant write access.
- Layer in a vacation/out-of-office calendar so the assistant won’t propose times during a trip.
Timezone
The timezone you pick here is the assistant’s “home” zone — it’s how it phrases times in outgoing replies. If a counterparty writes in a different zone (“how about 3pm CET?”), the assistant translates to yours when proposing alternatives.
Default video conferencing
The Default Meeting Provider dropdown sets the kind of link the assistant attaches to bookings unless the email thread asks for something specific.
- None — no link is added. Use this if most of your bookings are in-person or use a location your assistant should leave alone.
- Zoom — generates a Zoom link from the Zoom account connected to your CalendarBridge profile. If you haven’t connected one yet, the + Add Zoom Account link under the dropdown launches that flow.
- Google Meet — generates a Meet link. Requires a Google primary account; if your primary is Microsoft or Apple, the option is still selectable but the assistant will fall back to a written prompt asking the counterparty for their preferred conferencing tool.
- Microsoft Teams — same as Meet, but for Teams. Best paired with a Microsoft primary account.
Scheduling rules (User Configuration)
The User Configuration textbox is the assistant’s personality. It’s a free-form, plain-English block (up to 1,000 characters) that the assistant consults on every reply. The character counter on the bottom-right of the field updates as you type.
What to put in it
Anything you’d tell a human EA on day one. The defaults we seed for new users cover the common categories — replace them with your own:
- Working hours — e.g. “My schedule is 9AM–5PM Monday–Friday, except Wednesdays which are 8AM–4PM.”
- Preferred meeting windows — e.g. “The best times for meetings are mid-morning or mid-afternoon.”
- Hard blackouts — e.g. “Never book anything on holidays or weekends.”
- Default duration — e.g. “Default meetings to 30 minutes unless the thread says otherwise.”
- Buffers — e.g. “Leave 15 minutes between back-to-back meetings.”
- Tone — e.g. “Be brief and professional; sign off with ‘— Sam (via assistant).’ ”
Check the sample configuration
The Check sample configuration link above the textbox opens a known-good example you can copy and edit down. It’s the fastest way to see how granular you can get without overshooting the 1,000-character limit.
How rules are applied
Rules are applied on every reply — there is no separate “publish” step. Save your changes and the next thread the assistant handles uses the new wording. If you’re mid-thread when you change a rule, the next reply in that thread already follows it.
Try it out
Every configured assistant has a Try it out button on its card. Clicking it opens the sample-email tester — a real email composed to your assistant, but pre-filled with one of four canned scenarios so you can preview the kind of reply you’ll get.
Inside the modal
- From — your primary email address (the address attached to the configuration).
- To — type the address you’d like the assistant to reply to. This is the only field you fill in.
- CC — pre-set to your assistant address. Removing it would send a regular email, so the field is shown but locked.
- Title — the scenario subject line.
- Body — the scenario message.
Pick a scenario
Use the ‹ / › chevrons (or the pagination dots) to flip between four built-in samples:
- General meeting request — “Looking for 30 minutes next week.”
- Find a specific time — “Does Tuesday at 2pm work?”
- Reschedule an existing meeting — “Can we move our call?”
- Out-of-office check — “Are you free the week of the 14th?”
Send it
Click Send. A spinner runs for about a second, then a green confirmation strip appears at the top of the modal — “Sample sent. Check your inbox.” A real reply lands in the recipient inbox within a minute or two, and the thread shows up under the Conversations tab.
Conversations
The Conversations tab is a feed of every email thread the assistant has touched, grouped by status.
Thread states
- Waiting on reply — the assistant has proposed times and is waiting on the other side.
- Booked — a time was agreed and the event is on your calendar. The card links to the event.
- Declined or cancelled — the counterparty backed out, or the meeting was cancelled after booking.
- Needs your input — the assistant flagged the thread for human review. Usually triggered by an ambiguous request or a rule conflict it couldn’t resolve. Open the thread to see the assistant’s note and reply manually if needed.
Reading a transcript
Click any thread to expand the full back-and-forth. Each message is timestamped and tagged with who sent it (you, the assistant, or the counterparty). The right rail of the transcript shows the proposed and chosen times.
Empty states
Before anyone has emailed your assistant, the tab shows a centered mascot with No conversations yet — forward or CC your assistant on any scheduling email and replies will show up here. Send a sample from Try it out to seed your first row.
Manage existing assistants
The Configuration tab’s default view is a list of assistant cards. Each card shows the primary email address (with a provider chip — Outlook, Google, or iCloud), the assistant email address generated for it, and three actions.
| Action | Where it lives | What it does |
|---|---|---|
| Try it out | Outlined pill on the card body | Opens the sample-email tester — see Try it out. |
| Edit | Top-right of the card | Reopens the configuration form with every field pre-filled. Saving overwrites the existing assistant — the assistant email address stays the same. |
| Delete | Red Delete button next to Edit | Removes the assistant card. The assistant email address stops accepting new mail immediately; threads in progress are closed with a note from the assistant explaining it’s been retired. |
| Add New | Top-right of the Configuration tab | Launches the configuration form with empty fields so you can add a second (or third) assistant tied to a different primary account. |
| Feedback | Dark pill at the bottom of every card | Opens a quick form to send a note about the assistant’s replies to the CalendarBridge team. Helpful when the assistant misreads a request or you want it to handle a new scenario. |