Connecting Calendar Accounts
To set up syncing you must connect at least one Google, Microsoft, or iCloud account to be used as the destination calendar. This guide walks through connecting each account type.
To setup syncing you will have to connect at least one Google, Microsoft, or iCloud account to be used as the destination calendar.
If the source calendar is an ICS URL an account does not need to be added for the ICS URL — you will enter the ICS URL during the sync create process.
Connecting a Google Account
Follow this section to connect a personal Gmail or paid GSuite account.
-
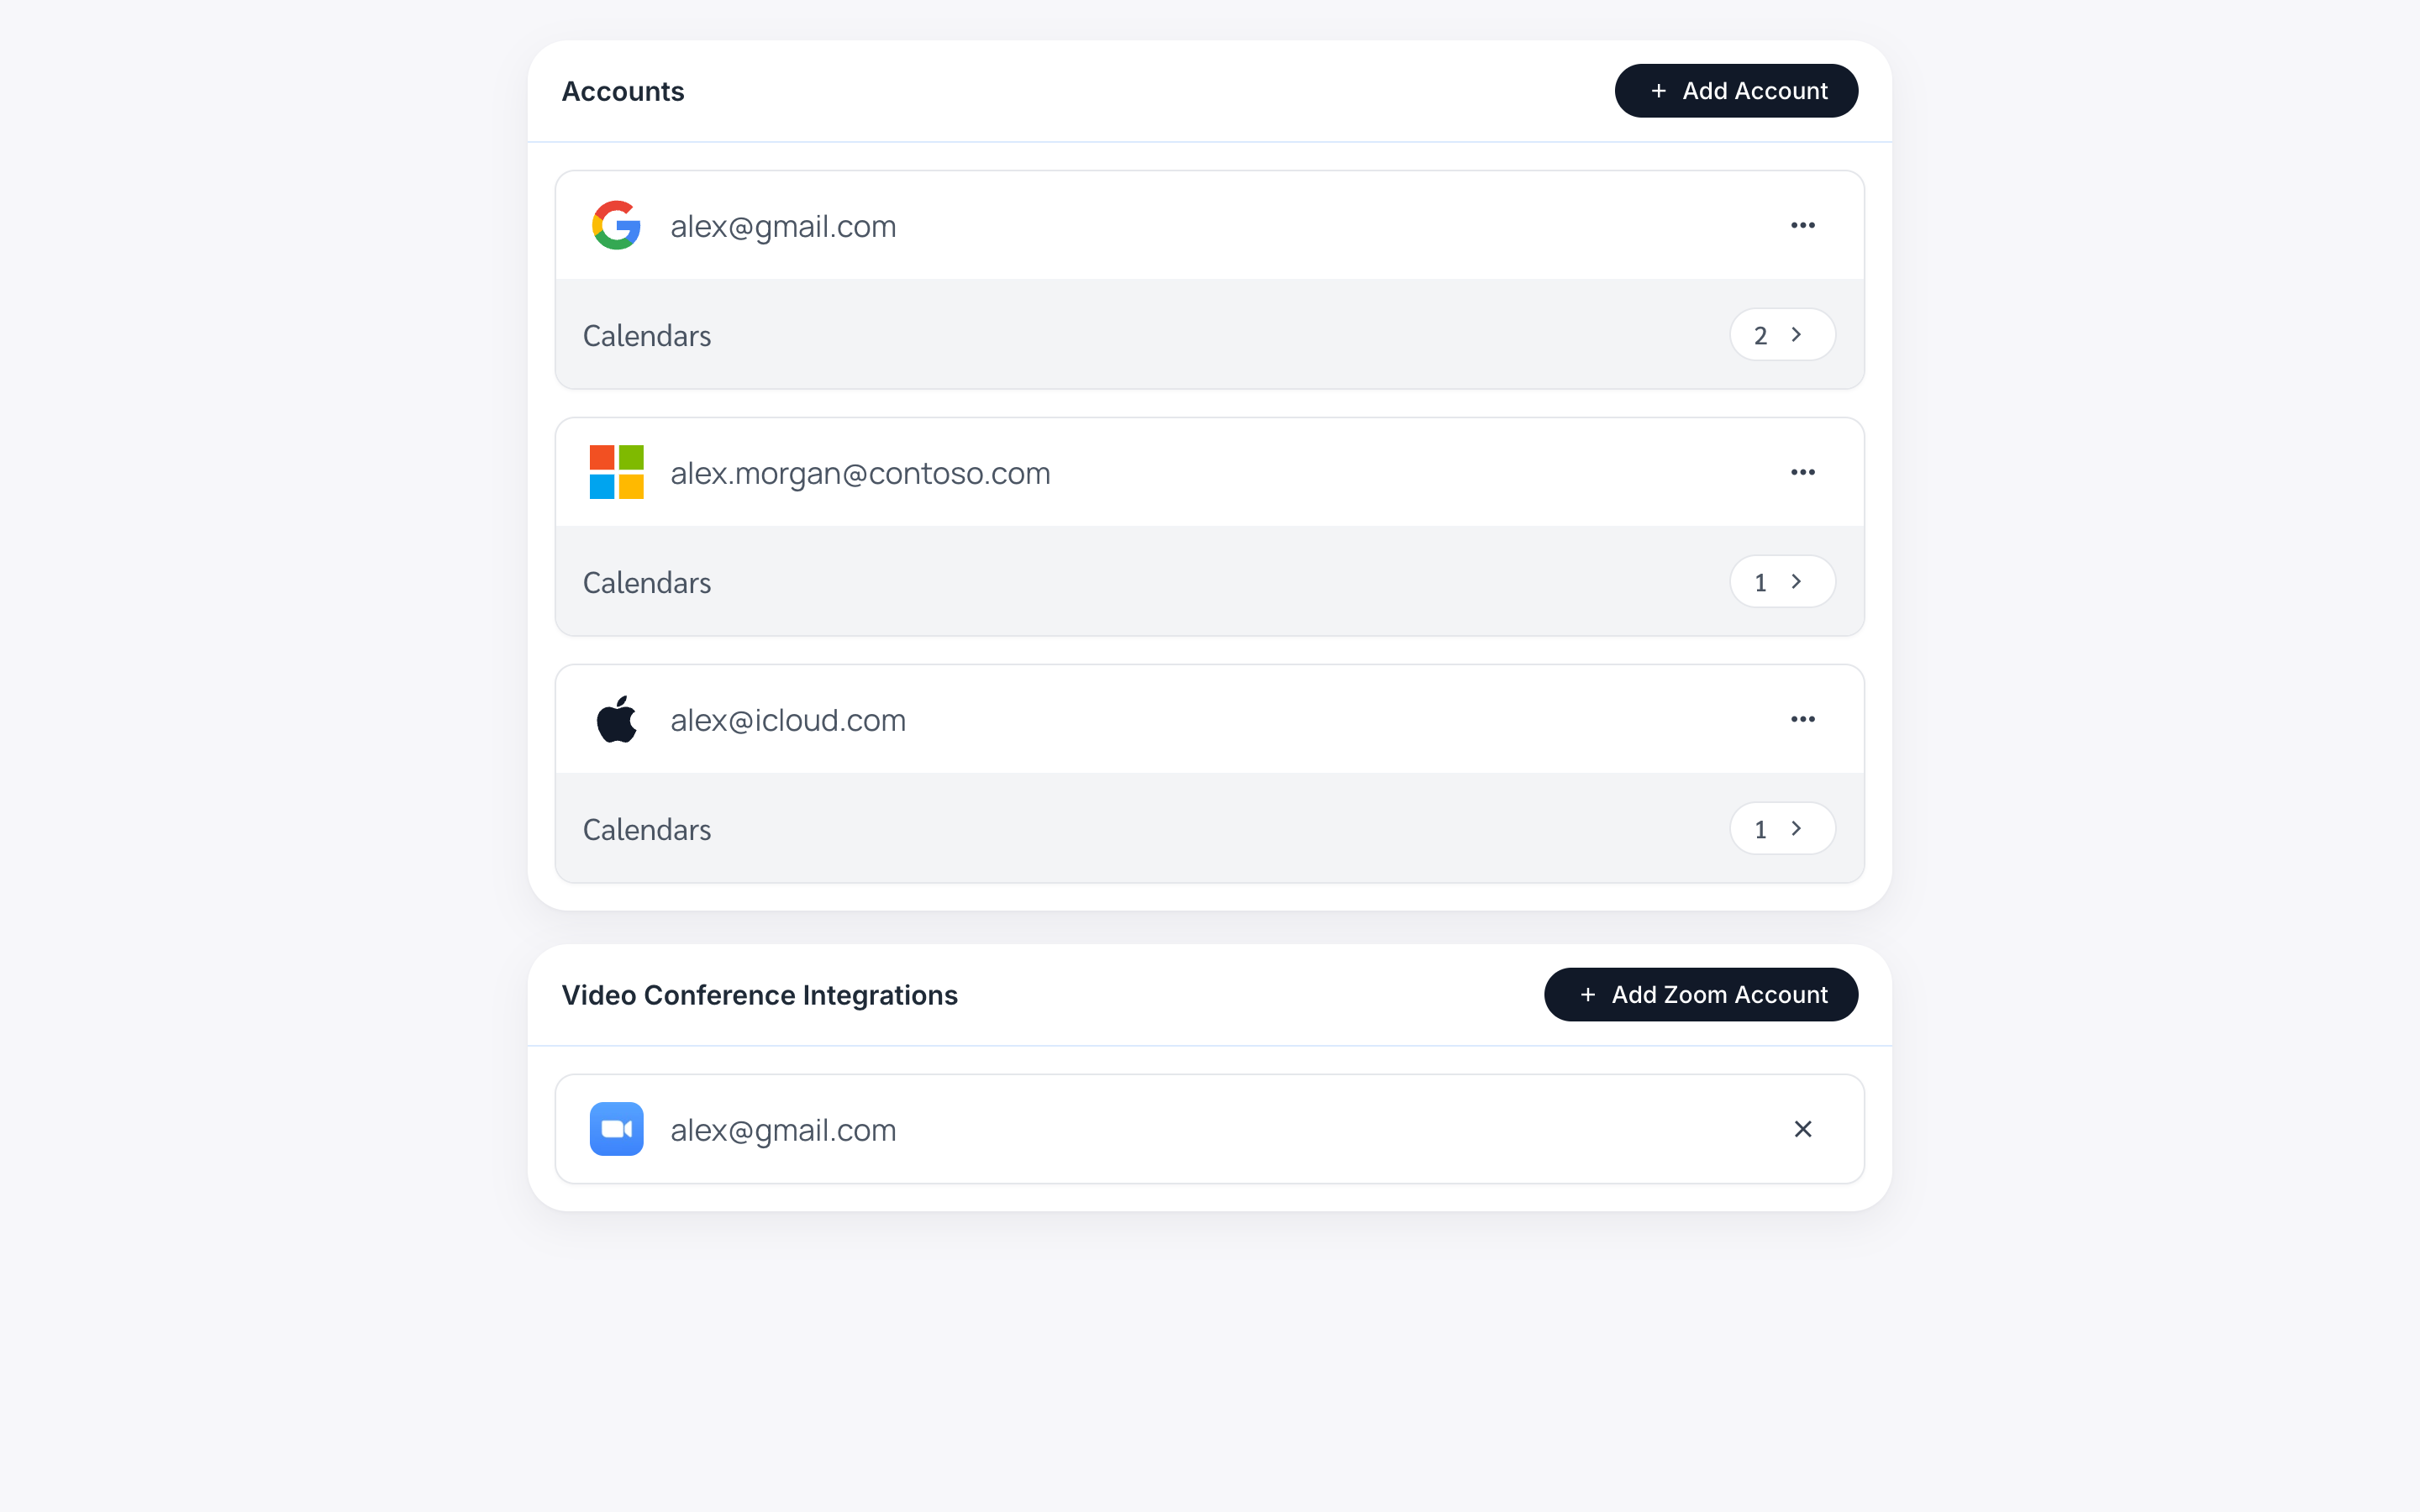
Go to your Accounts page.
Click the “Accounts” link in the left navigation bar, or enter https://calendarbridge.com/dashboard/accounts into your browser. The accounts page will look like this:
-
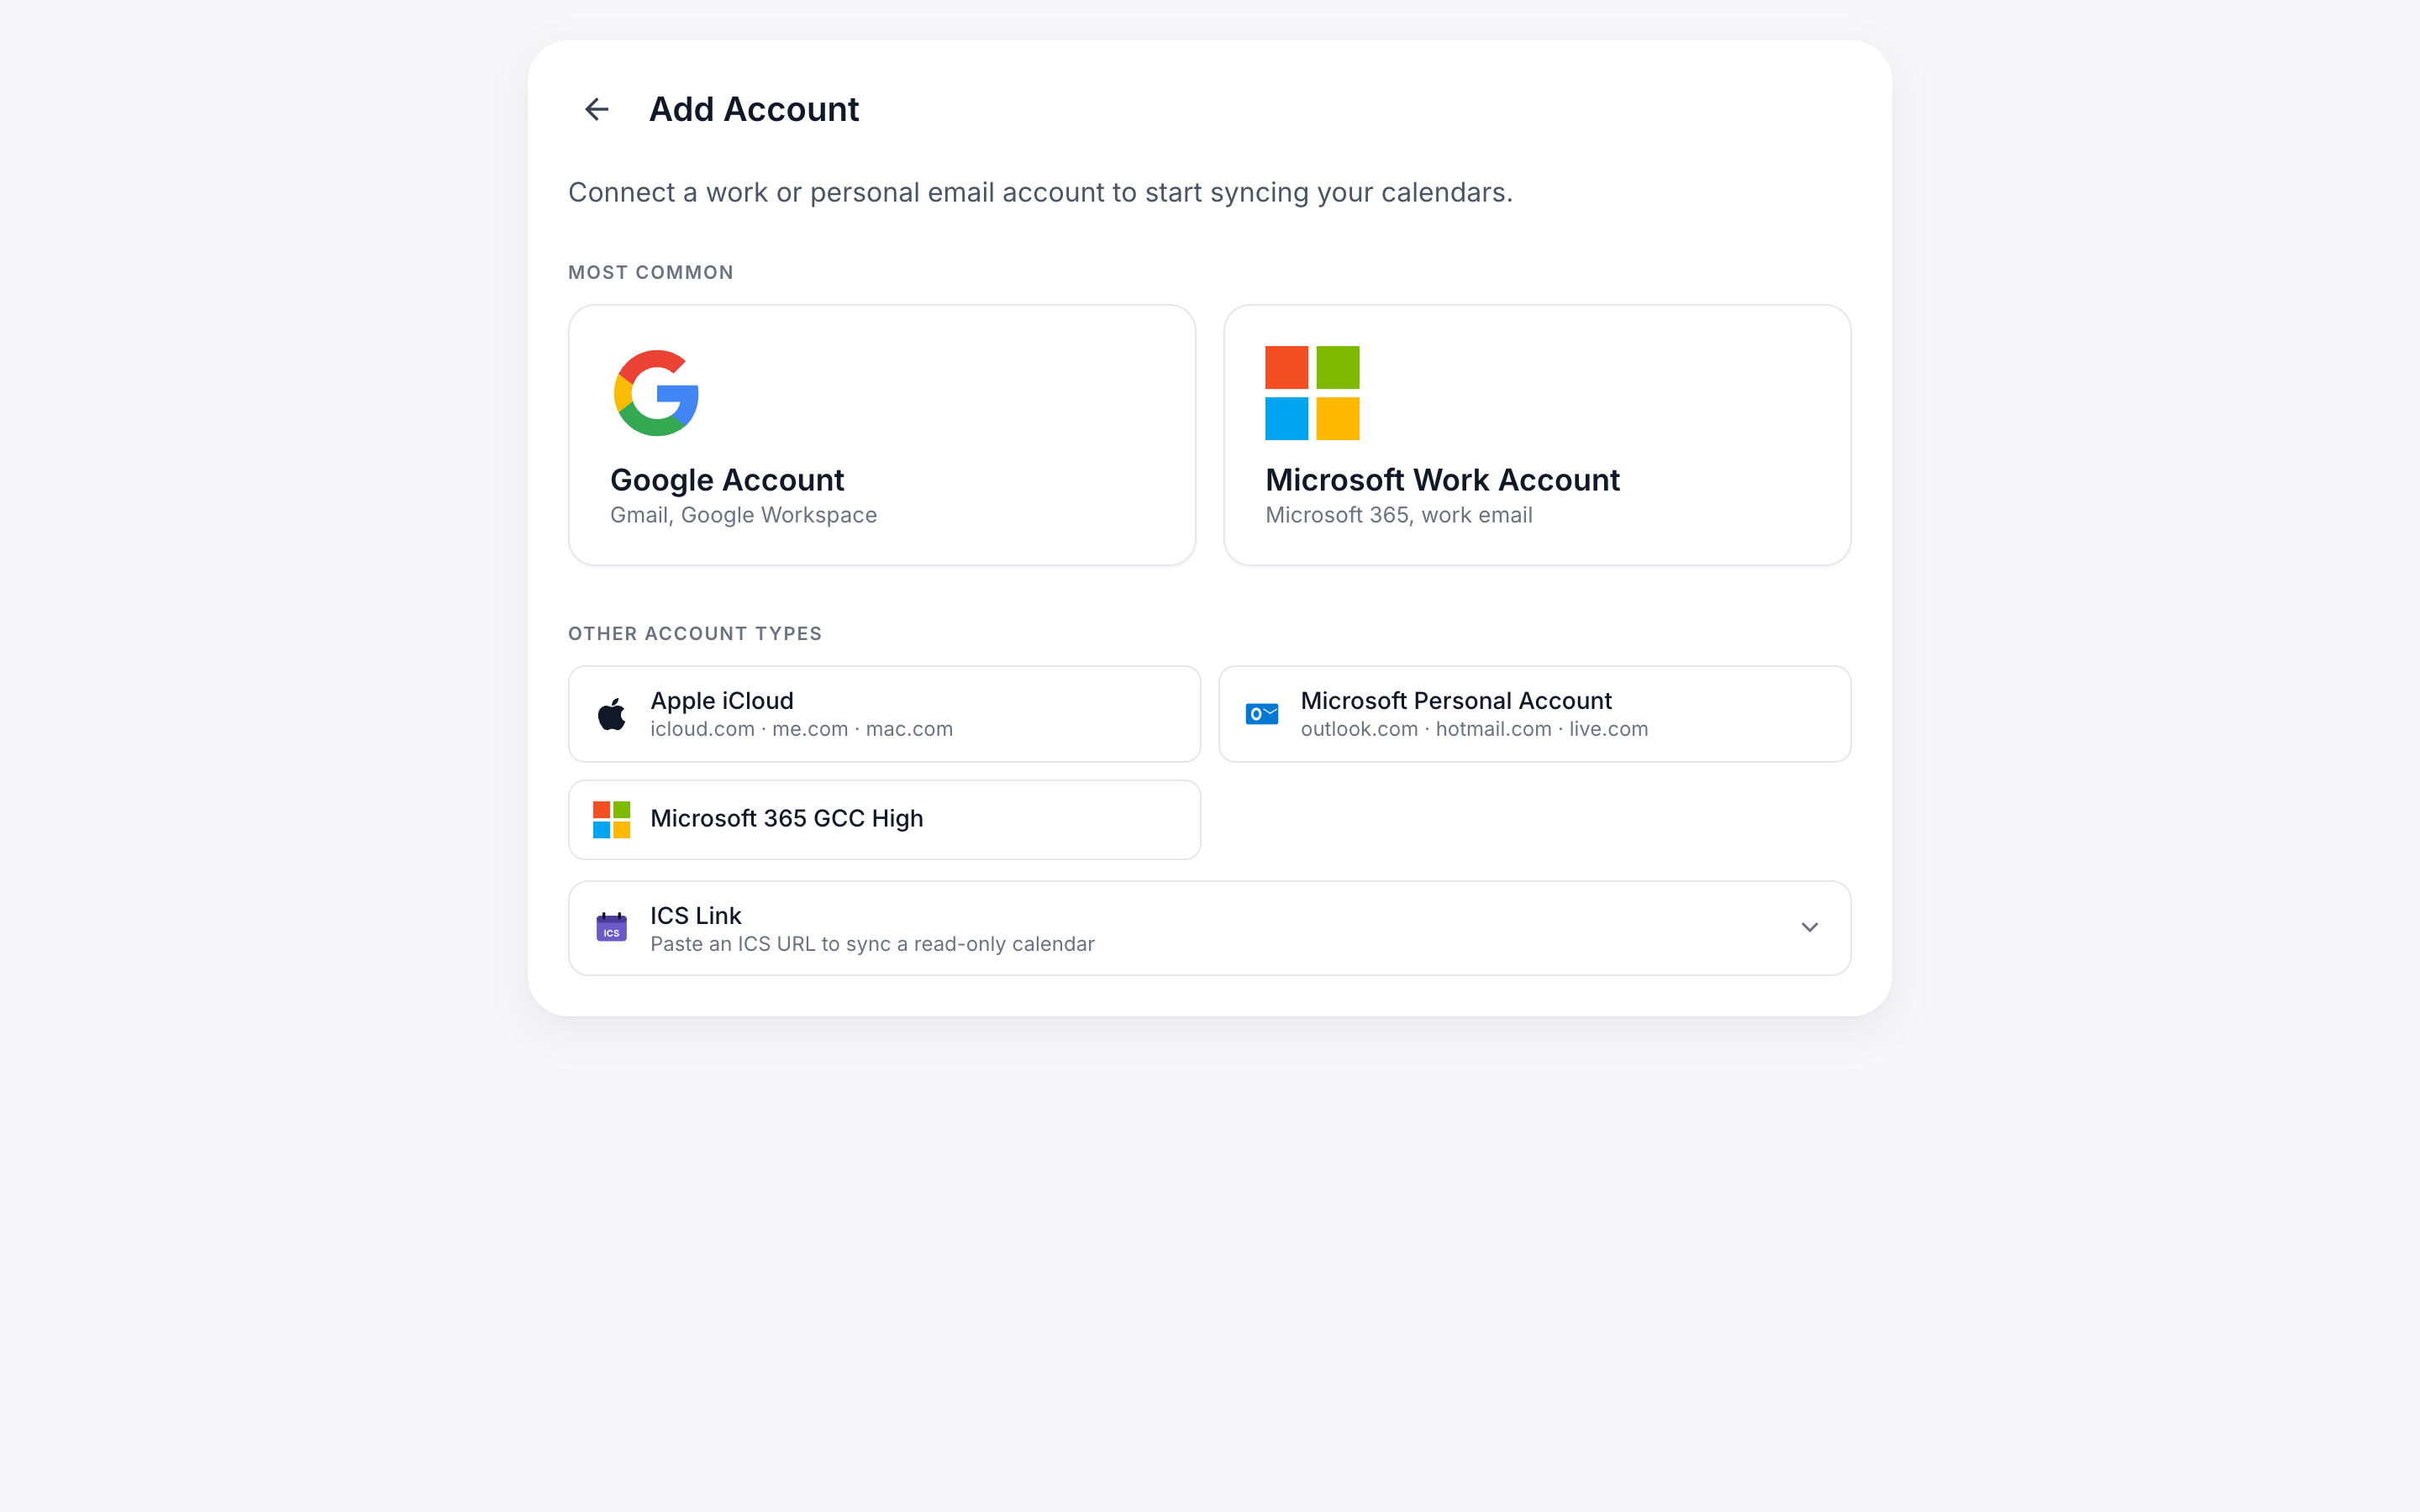
Click the “ADD ACCOUNT +” button.
This will bring up the account type selection page:
-
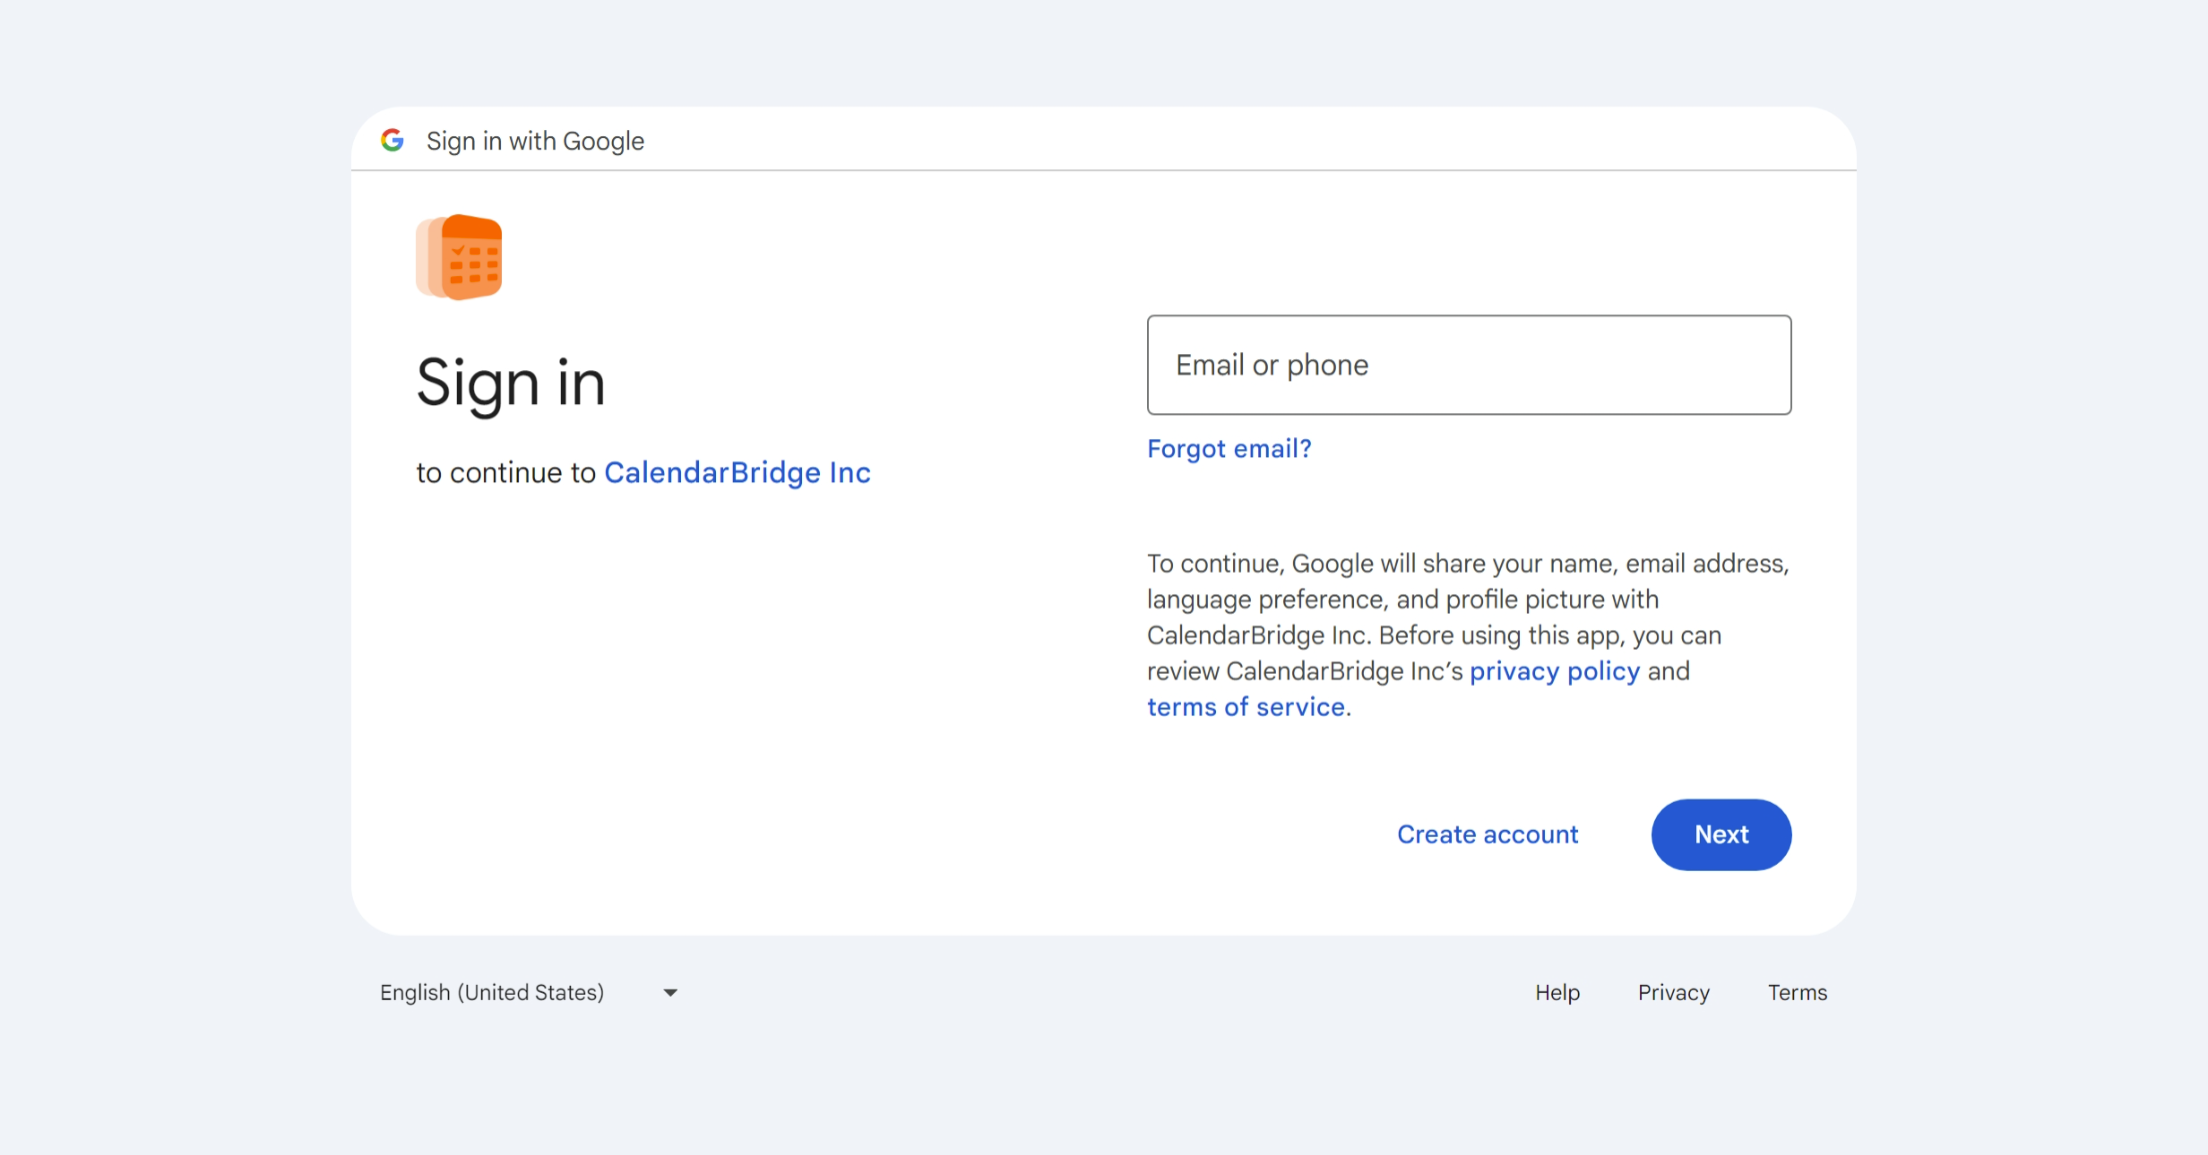
Click the “Google” button.
This will redirect you to Google’s website where you can sign in to your Google account credentials and authorize CalendarBridge to access your Google calendar.
-
Enter the email address associated with the calendar you want to connect.
-
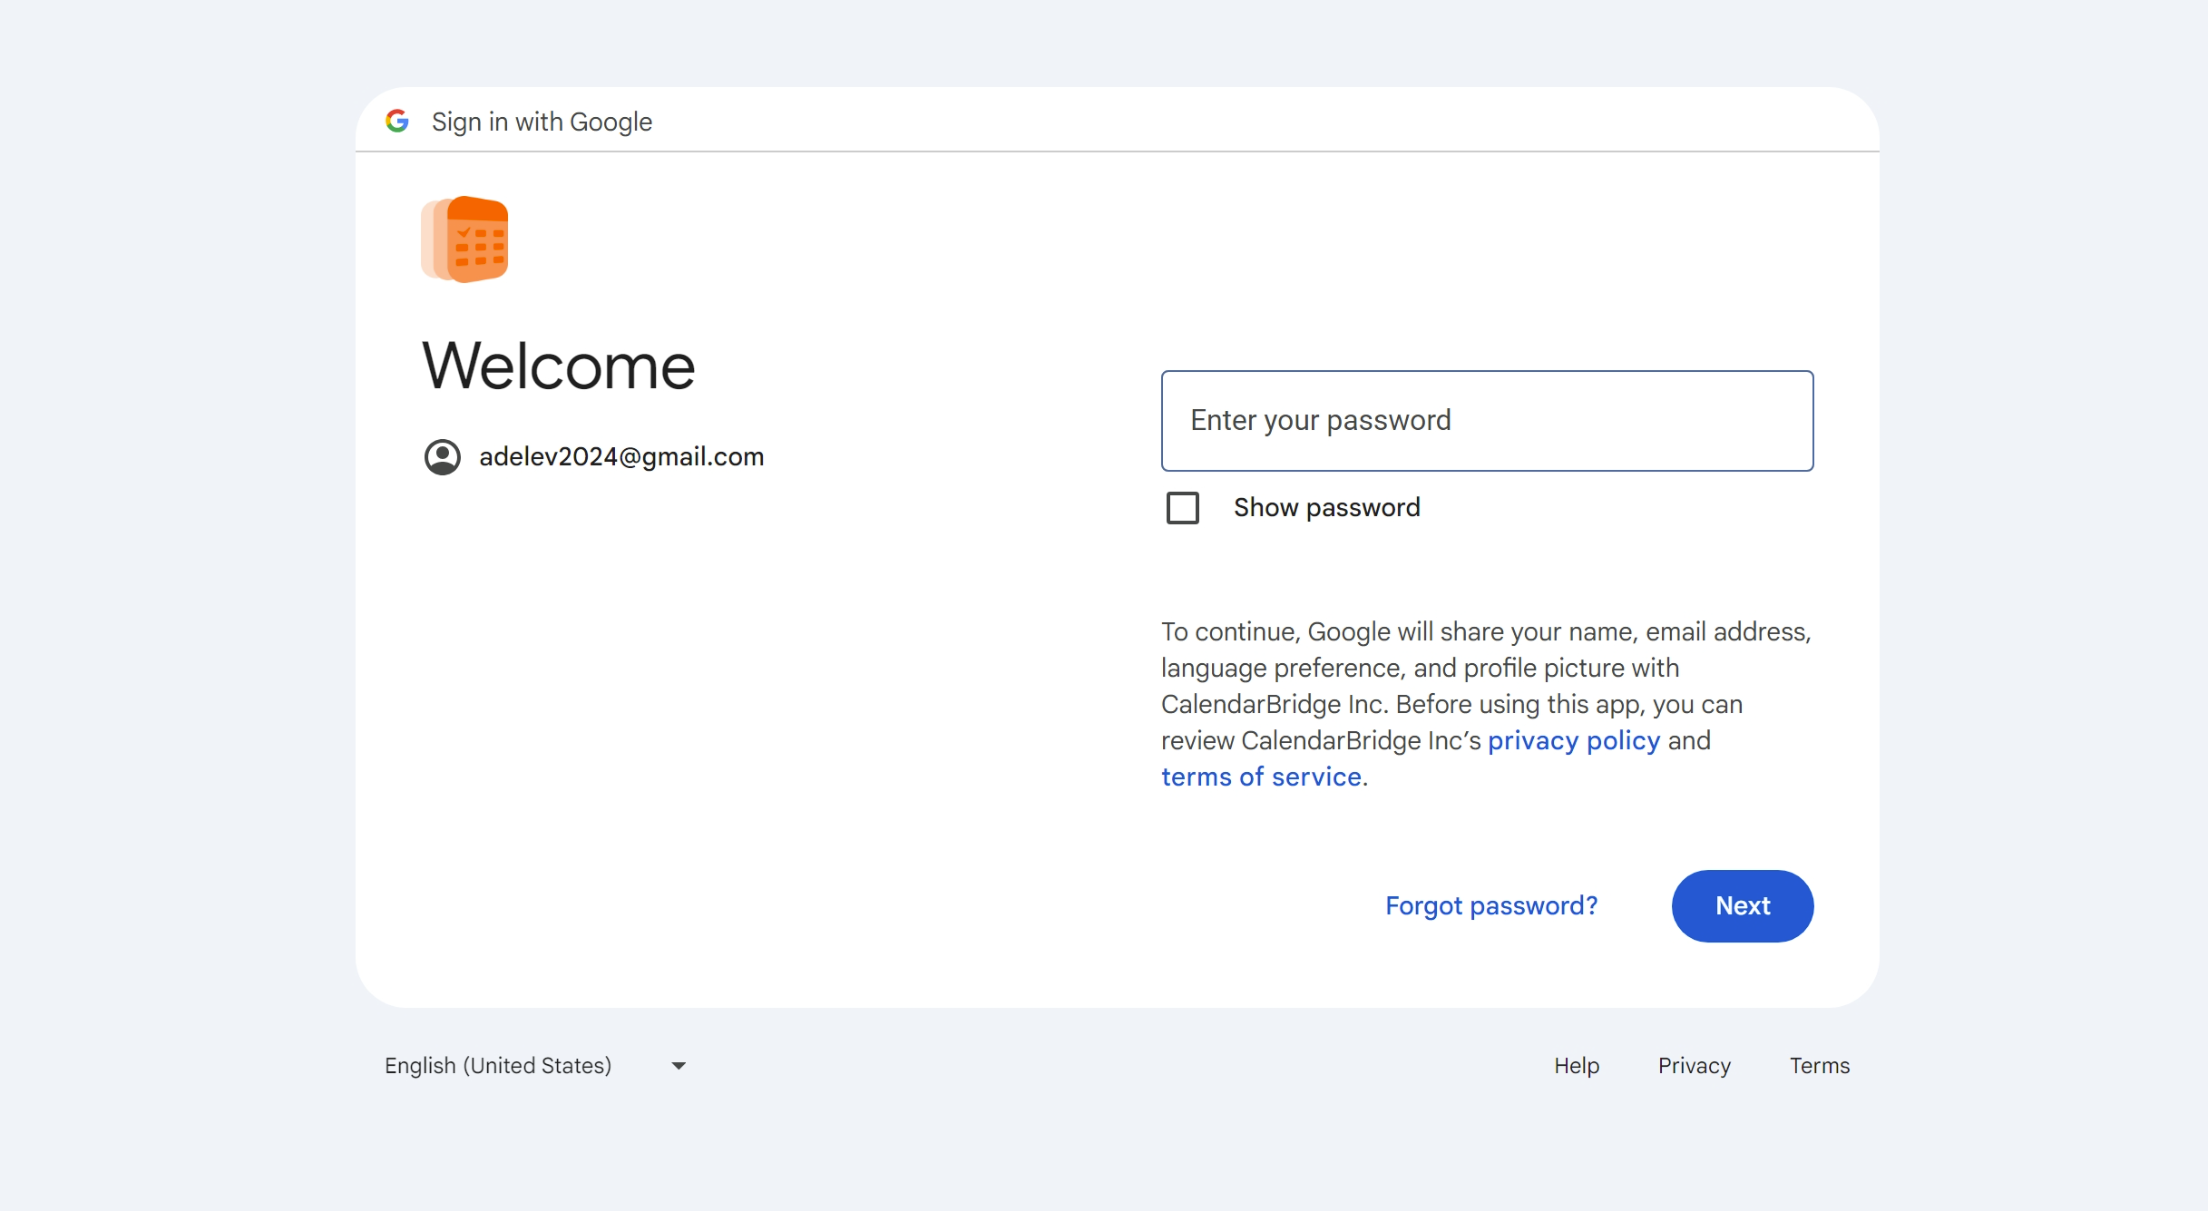
Enter the password for the calendar you want to connect.
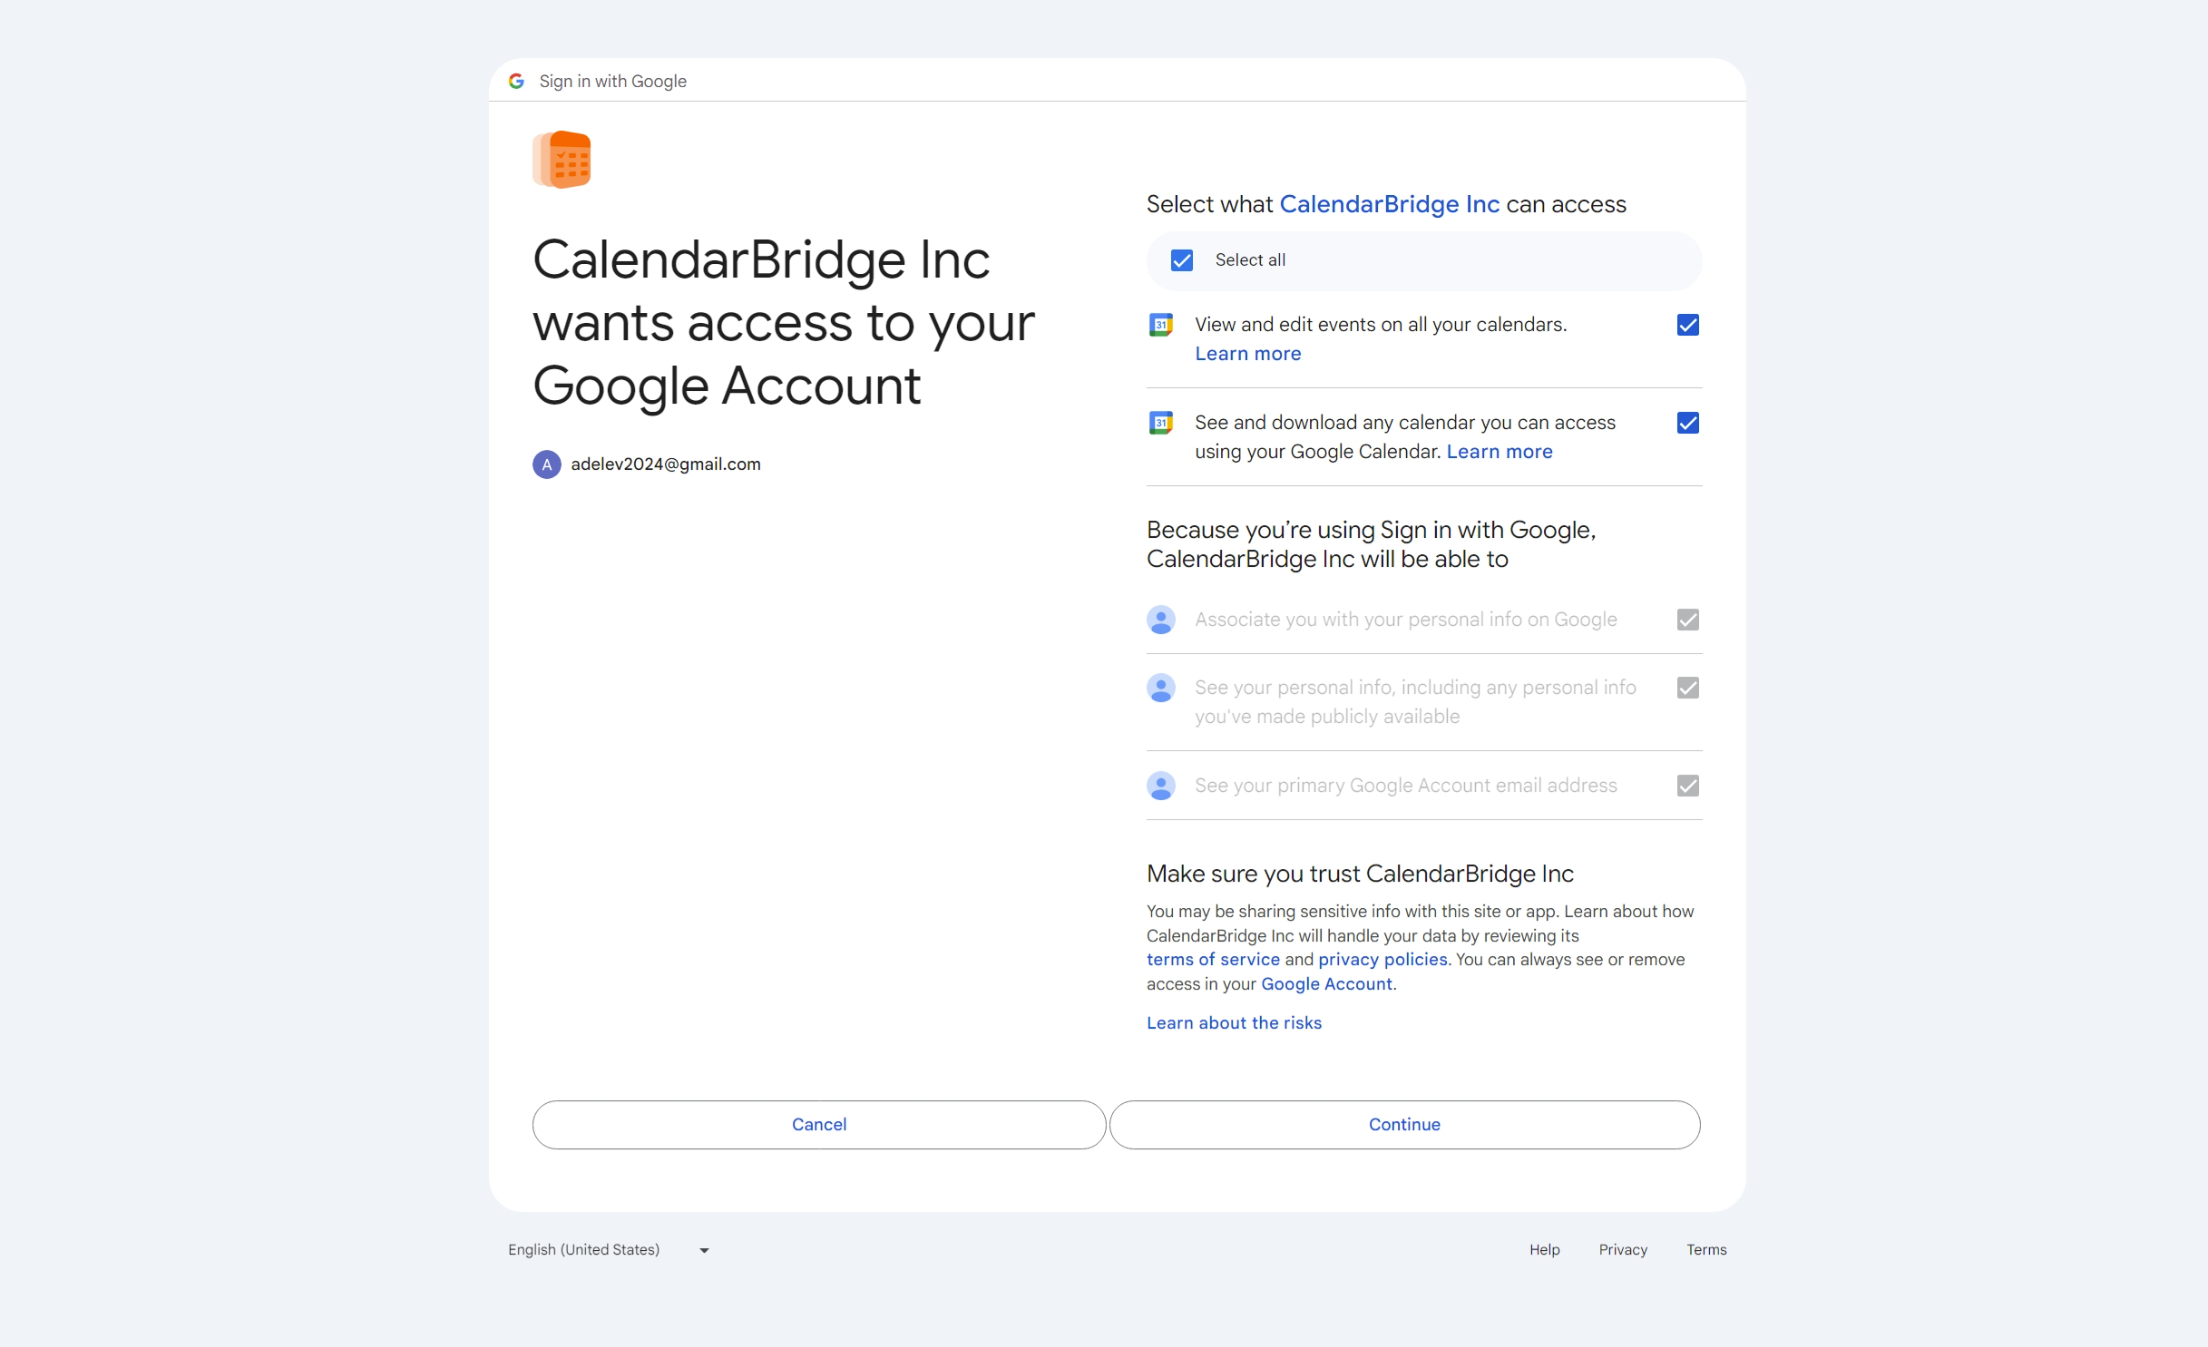
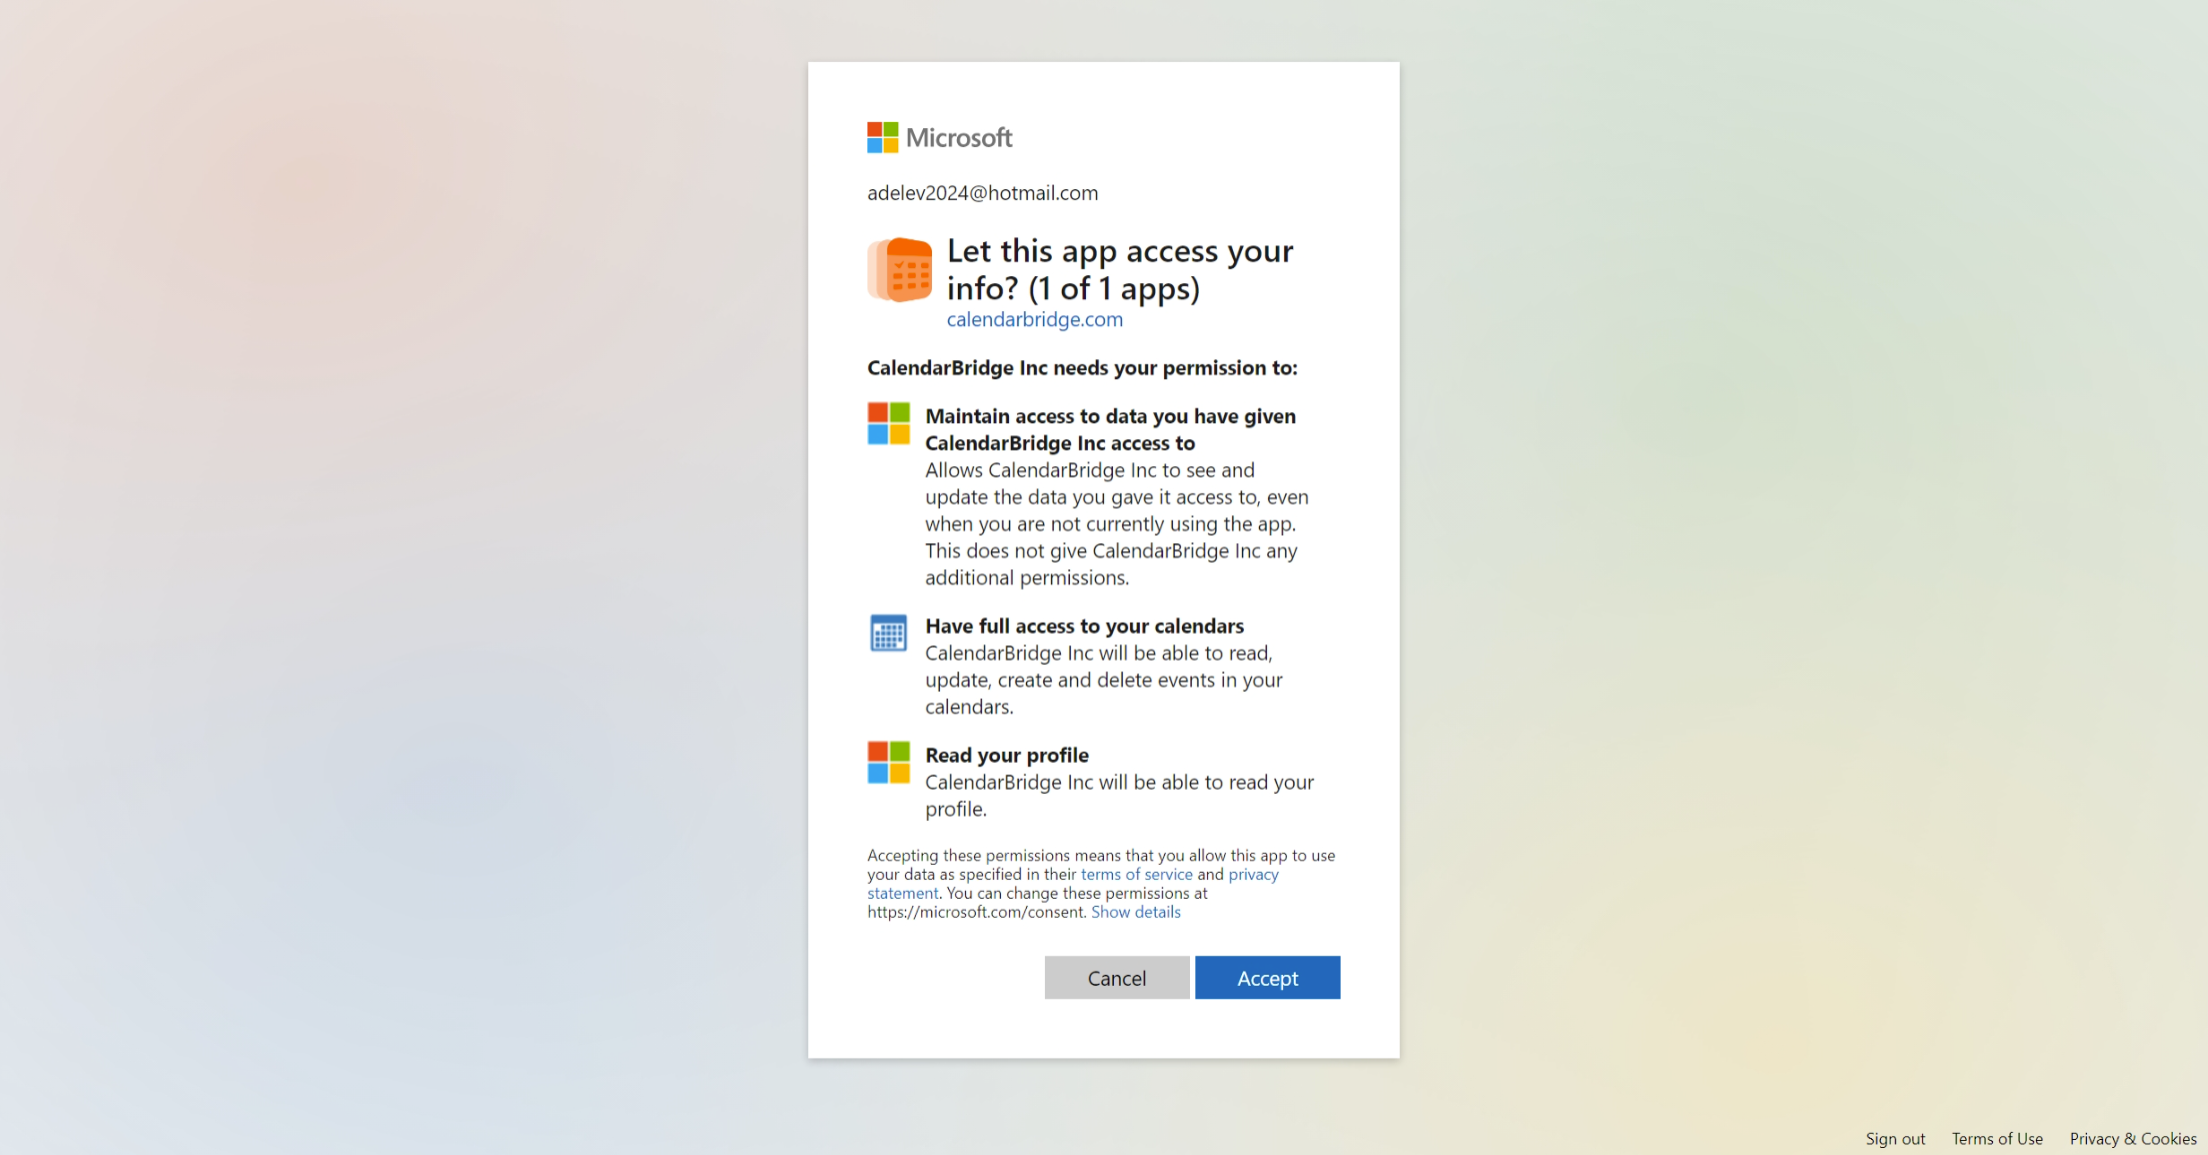
Upon successful login, this will take you to the permissions grant screen.
-
Approve CalendarBridge’s access to your basic Google account information.
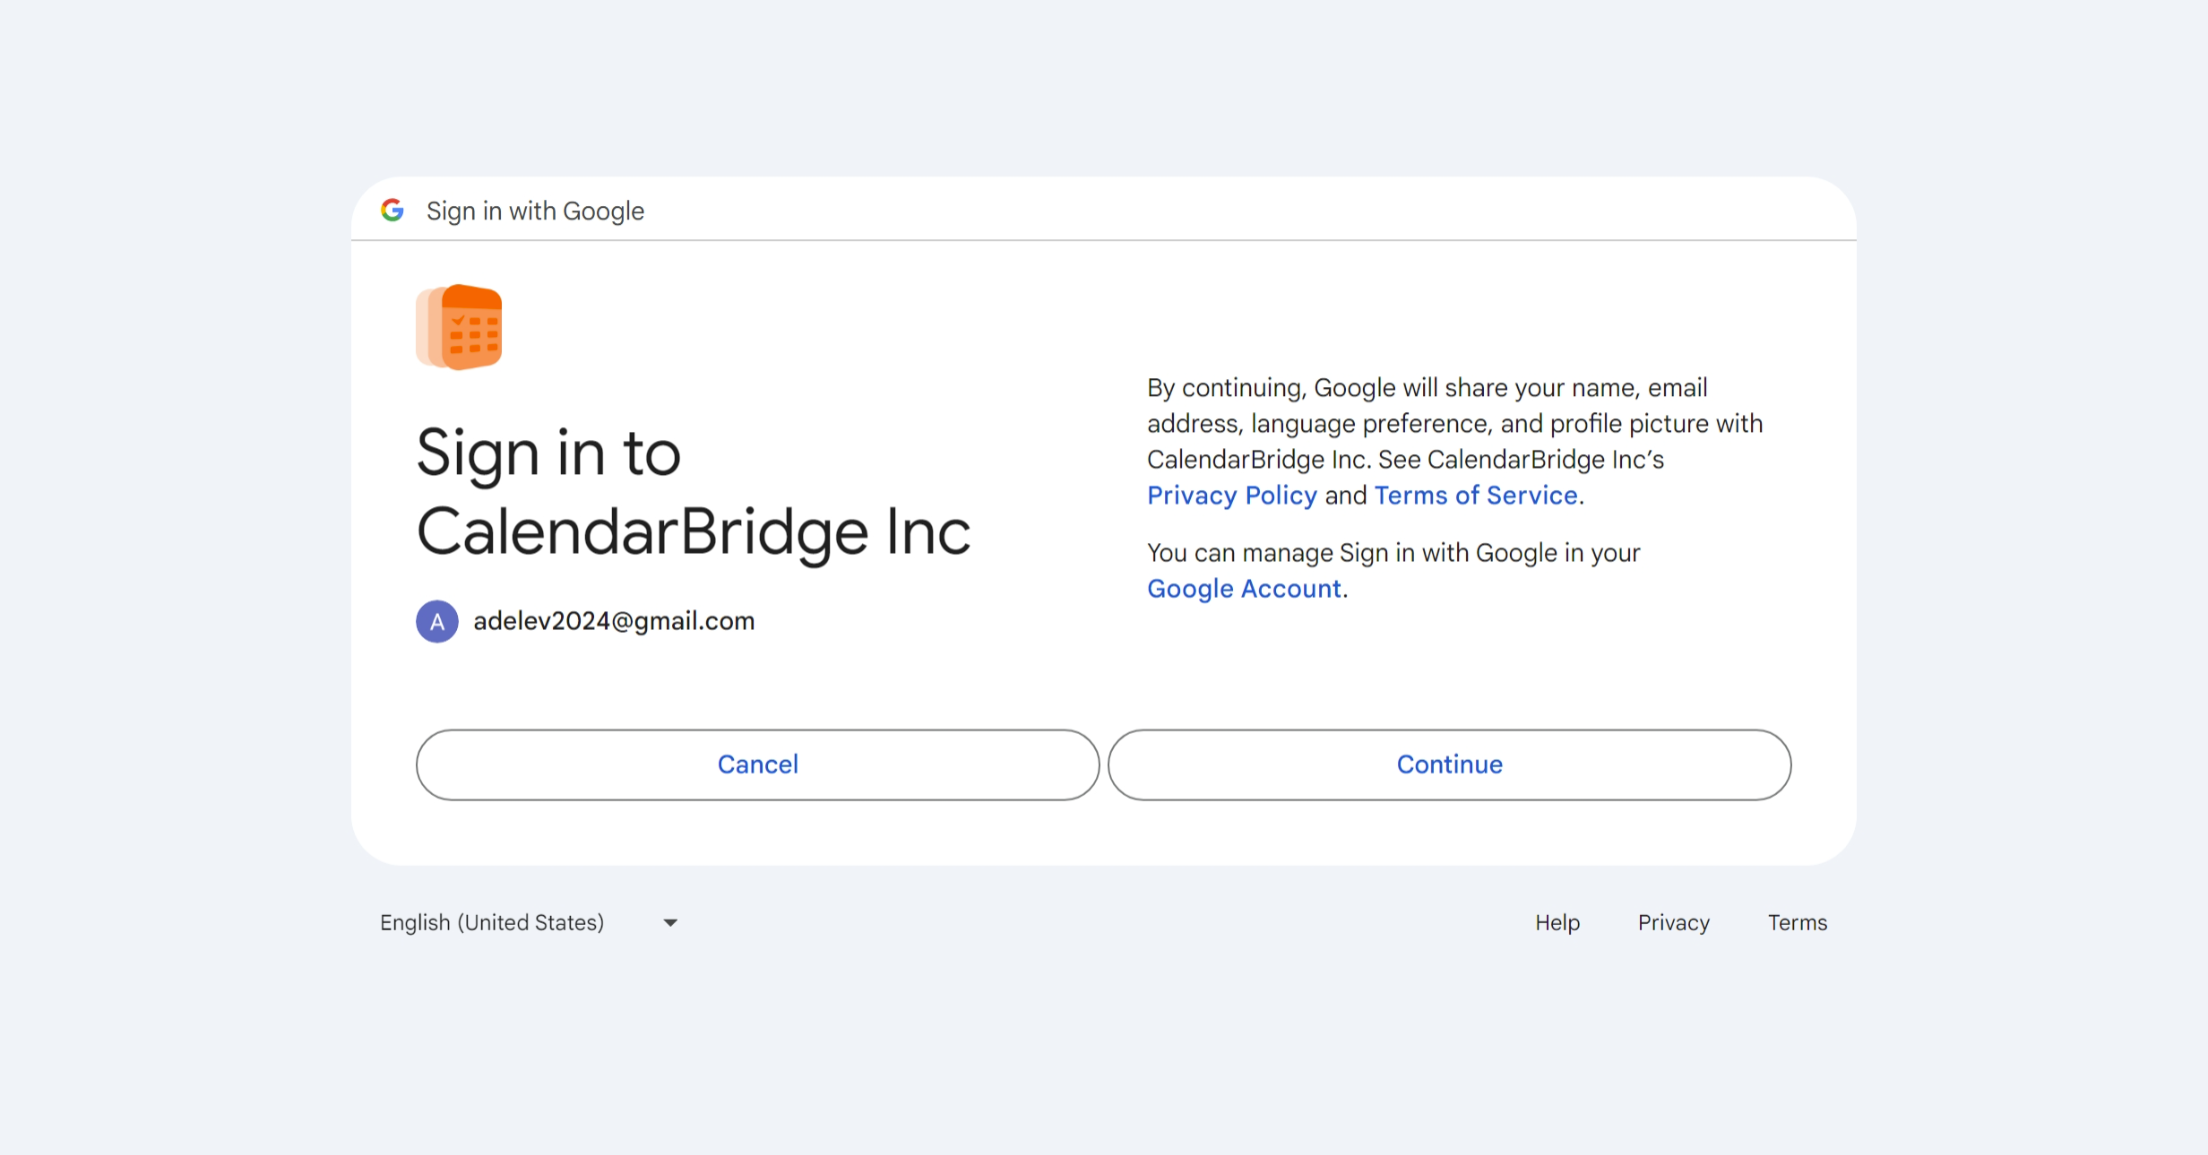
-
Check the two boxes and then click ‘Continue’ to enable CalendarBridge to connect to your calendar.
Failure to accept the permissions will prevent CalendarBridge from being able to provide any services to you. If you have concerns about these permissions, please check out our terms of service (in short we only use these permissions to carry out the syncs and scheduling links that you configure.)
After accepting the permissions, Google will redirect you back to the CalendarBridge website and you should see this screen:
infoIf you don’t see this screen, please check out the troubleshooting section.
Repeat these steps for each Google account that has calendars you would like to connect to CalendarBridge.
Connecting a Microsoft Account
Follow this section to connect an Office365, Microsoft365, or Outlook.com account (which includes hotmail, live, and msn accounts).
-
Go to your Accounts page.
Click the “Accounts” link at the top navigation bar, or enter https://calendarbridge.com/dashboard/accounts into your browser. The accounts page will look like this:
-
Click the “ADD ACCOUNT +” button.
This will bring up the account type selection page:
-
Select your Microsoft account type.
Select “Microsoft 365” for a work or school account, “Microsoft outlook.com” for a personal Microsoft account, or “Microsoft 365 GCC High” for a GCC high account. This will redirect you to Microsoft’s website where you can sign in to your Microsoft account and authorize CalendarBridge to access your calendar.
-
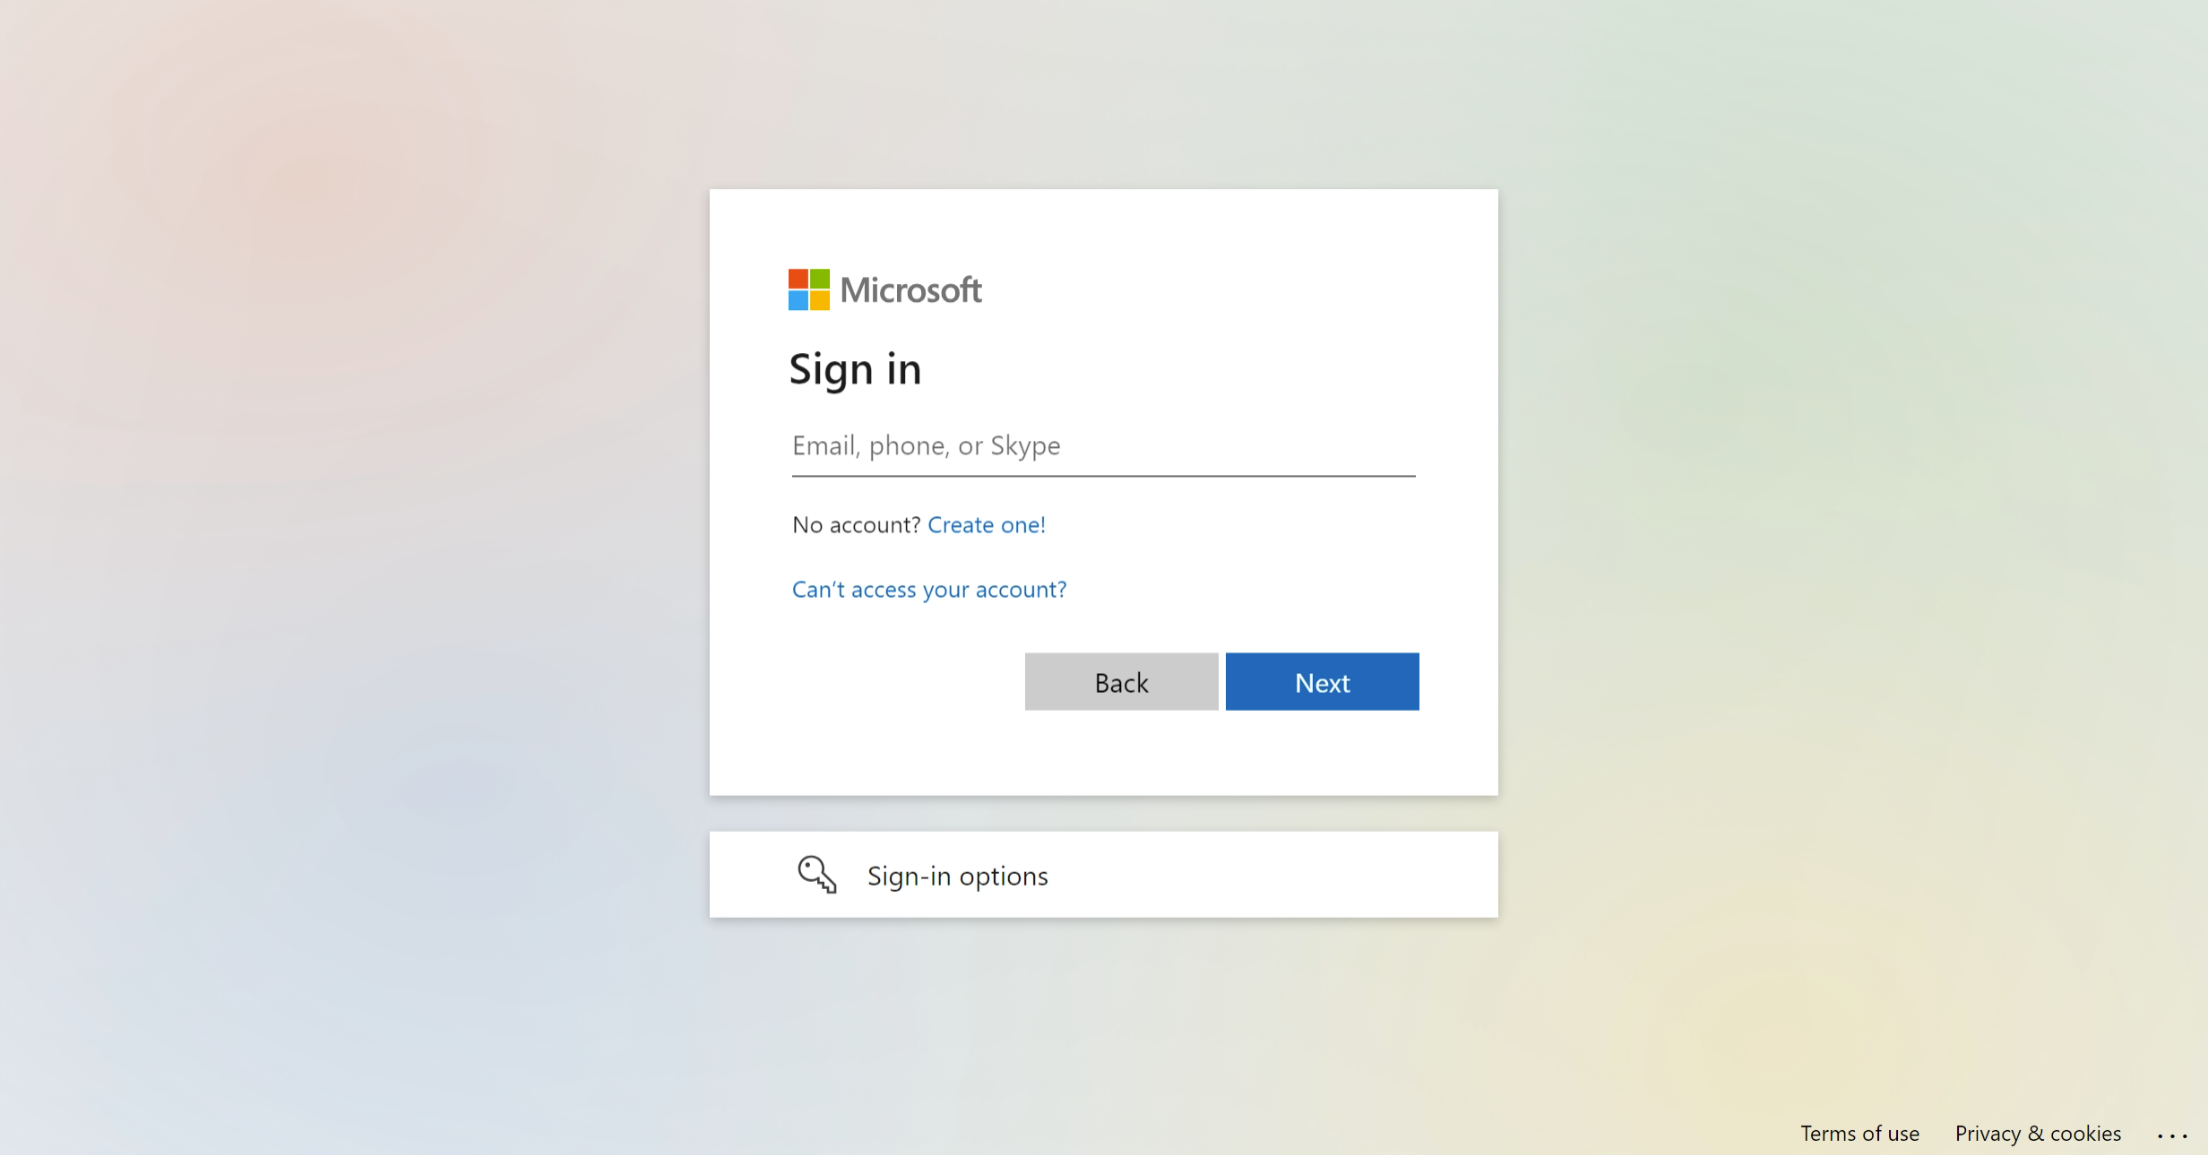
Enter the email address associated with the calendar you want to connect.
If you are already logged into Microsoft, the email field may be pre-filled for you. If you have multiple Microsoft accounts please be sure you are logging into the correct one.
-
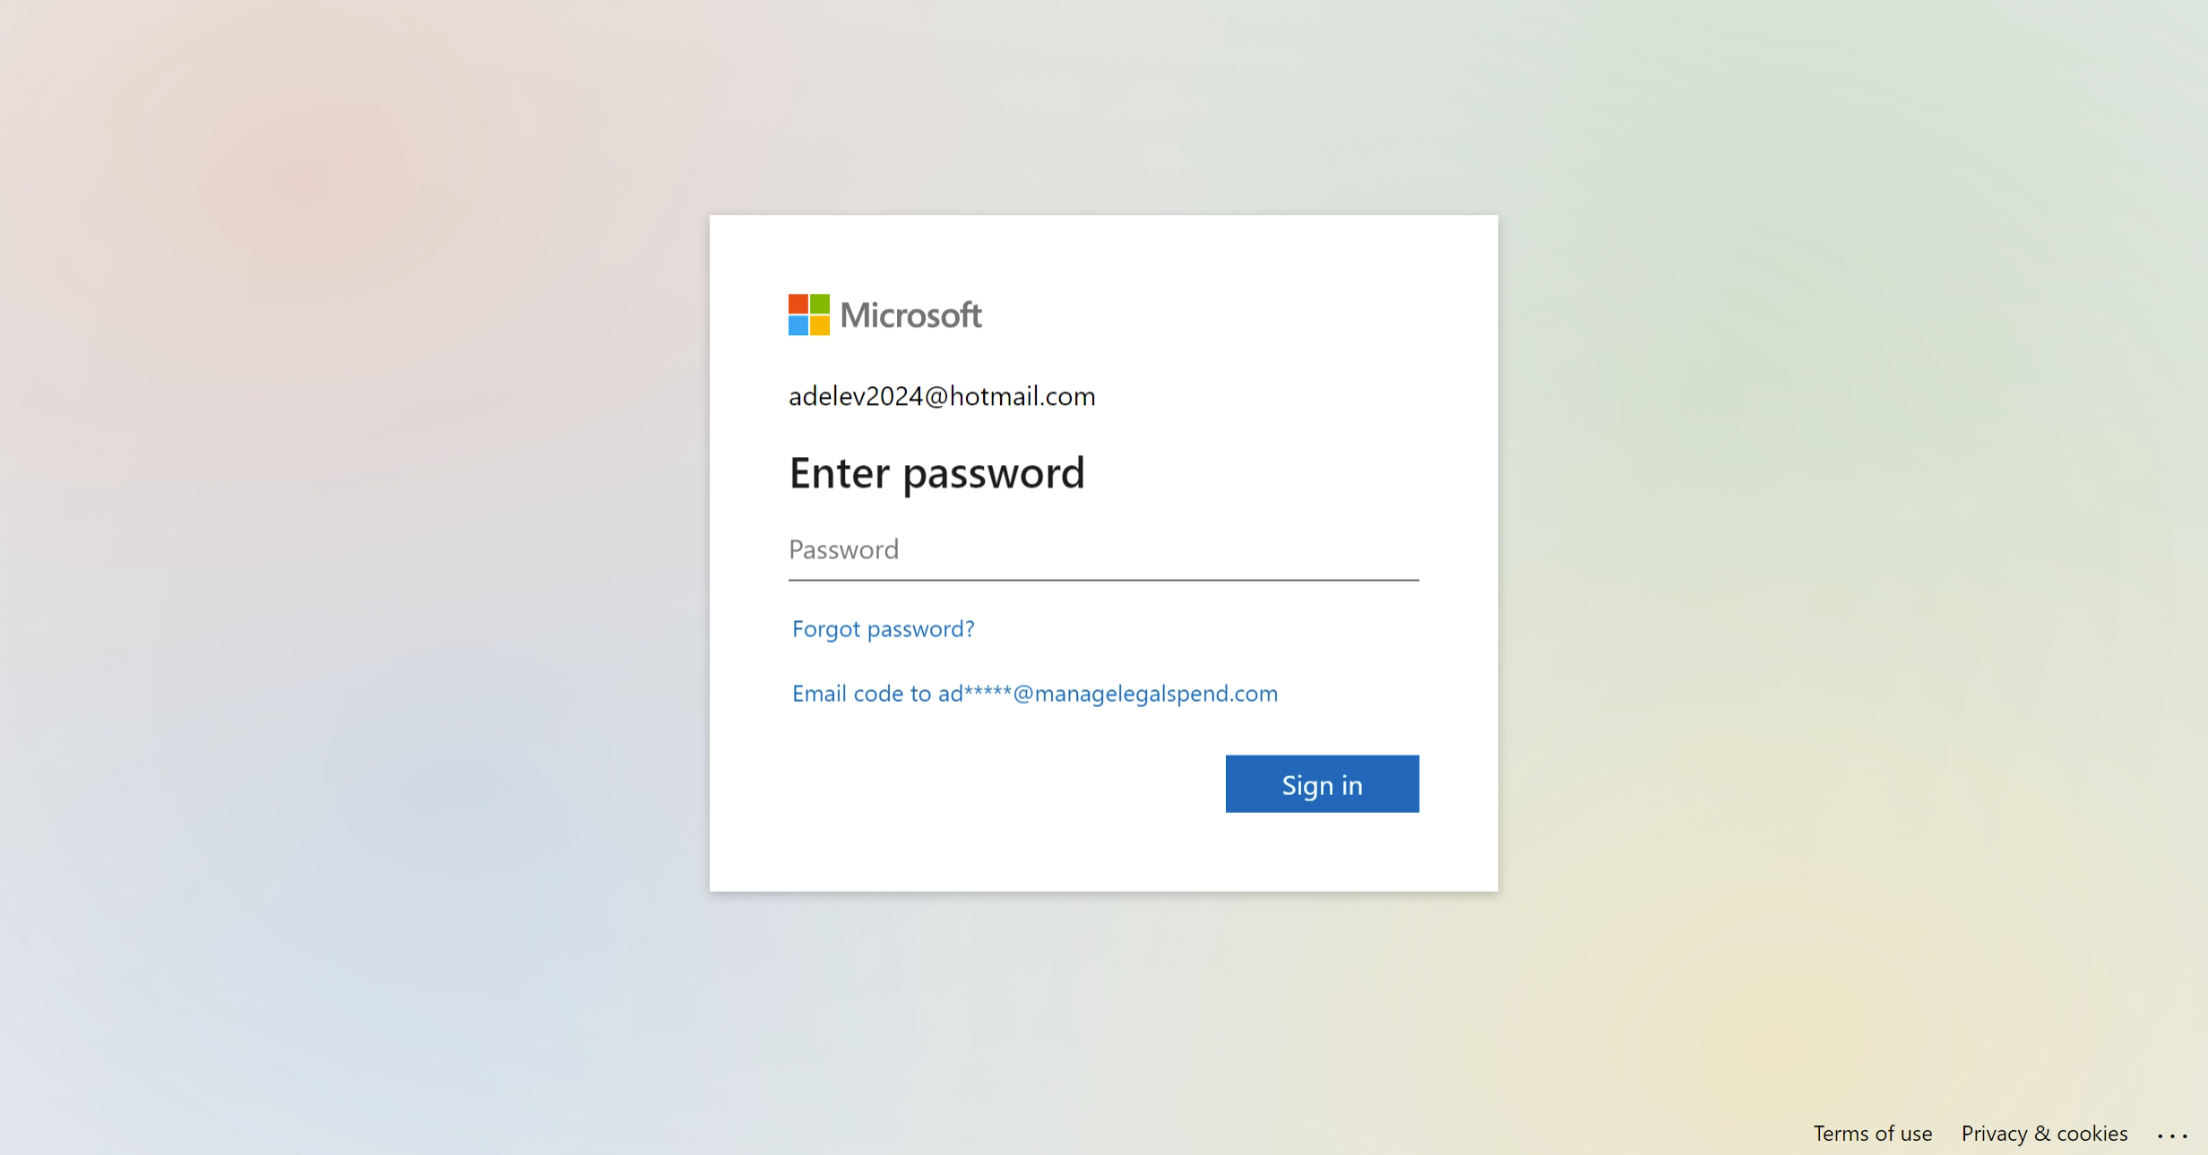
Enter the password for the calendar you want to connect.
Upon successful login, this will take you to the permissions grant screen.
-
Choose whether to stay signed in.
You can select yes or no here, it will not affect CalendarBridge.
-
Click “Accept” to enable CalendarBridge to connect to your calendar.
Failure to accept the permissions will prevent CalendarBridge from being able to provide any services to you. If you have concerns about these permissions, please check out our terms of service (in short we only use these permissions to carry out the syncs and scheduling links that you configure.)
-
You’re redirected back to CalendarBridge.
After accepting the permissions, Microsoft will redirect you back to the CalendarBridge website and you should see this screen:
infoIf you don’t see this screen, please check out the troubleshooting section.
Repeat these steps for each Microsoft account that has calendars you would like to connect to CalendarBridge.
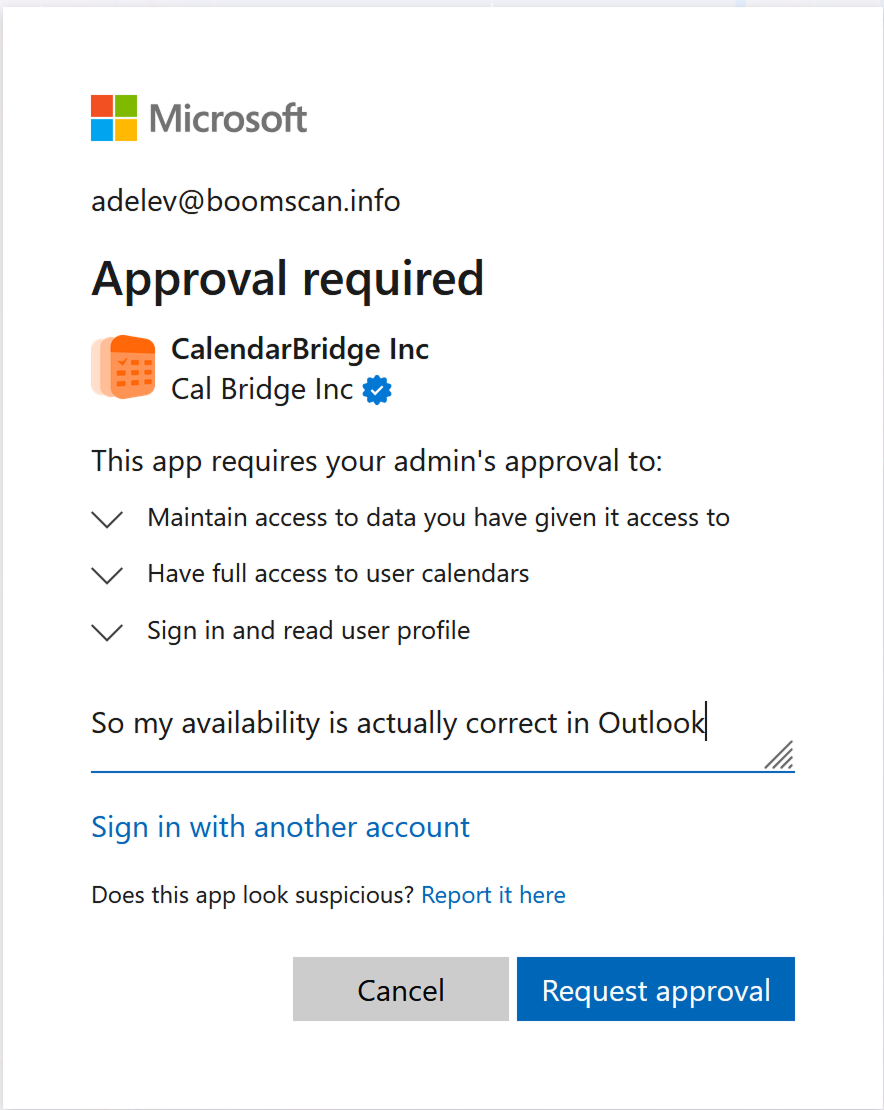
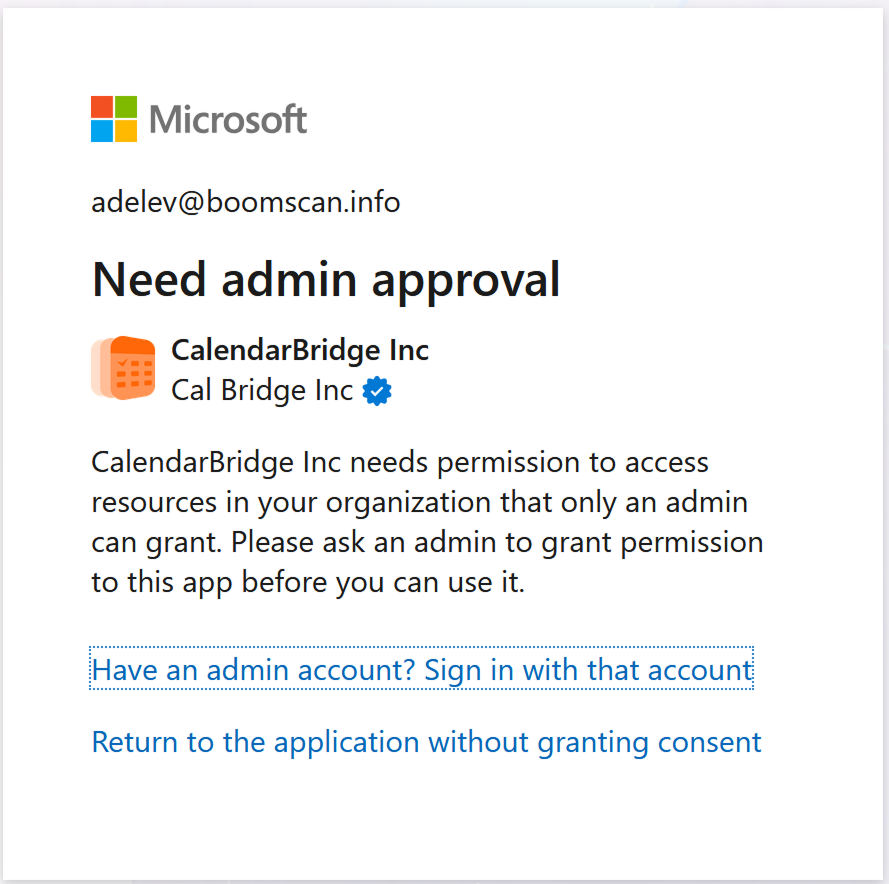
Microsoft 365: “Need admin approval” when connecting
Instead of the permissions screen, Microsoft may show a message saying that CalendarBridge needs approval from your administrator before it can access your calendar. This is normal and expected: in November 2025 Microsoft changed the default settings in Entra ID so that all third-party apps require administrator consent before they can access your organization’s calendars.
Depending on how your organization’s Microsoft 365 tenant is configured, you will see one of two screens:
- “Approval required” — your organization allows you to submit an approval request to your admins directly from the Microsoft screen.
- “Need admin approval” — Microsoft blocked the sign-in because your admin must approve CalendarBridge first, and there is no option to submit a request.
What to do next
-
If the Microsoft screen offers an approval request, submit it.
You only need to submit the request once. If you already submitted one, do not submit it again.
-
Contact your Microsoft 365 administrator (IT).
Even if you submitted an approval request, email or message your admin directly — many admins are not familiar with where Microsoft surfaces approval requests. Include the links in the section below.
-
After your admin approves CalendarBridge, try connecting again.
Note that it can take an hour or more for the approval to propagate within Microsoft before the approval-required screen stops appearing.
What to give your IT department
Your admin will want to review CalendarBridge before approving it. Send them these two links:
- Approve Delegated Permissions for CalendarBridge for Microsoft 365 — step-by-step approval instructions for admins, including exactly which permissions CalendarBridge requests and what they allow.
- CalendarBridge Trust Portal (trust.calendarbridge.com) — our security and compliance documentation for vendor reviews, including our SOC 2, GDPR, and HIPAA certifications, policies, and subprocessors.

You can copy and paste this message to your admin:
Hi — I’m trying to connect my Microsoft 365 calendar to CalendarBridge so that my calendar will be accurate and I can more easily coordinate with coworkers. Microsoft is requiring administrator approval.

Can you please review and approve CalendarBridge for our tenant?

Approval instructions: https://help.calendarbridge.com/group-admin-docs/approve-delegated-permissions-for-calendarbridge-for-microsoft-365/

Security and compliance documentation (trust portal): https://trust.calendarbridge.com
If you are unsure who your Microsoft 365 admin is, your IT helpdesk is usually the fastest place to ask.
Connecting an iCloud Account
This section will walk you through connecting an Apple iCloud account to CalendarBridge. The iCloud setup is different than Microsoft and Google as it uses an app password, rather than oAuth (“Login with Apple”).
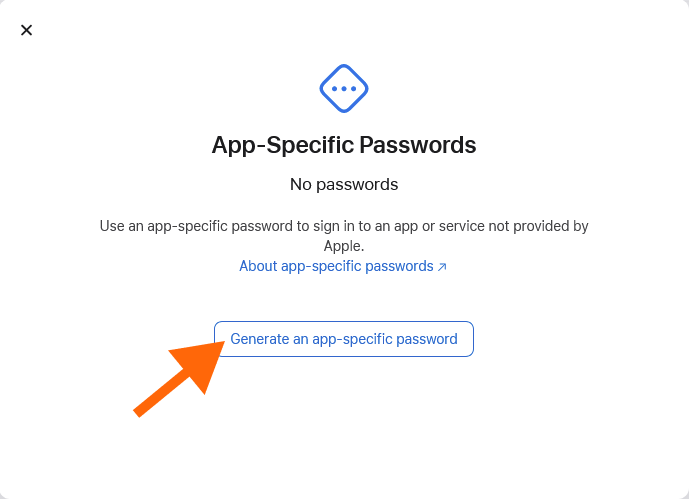
Prerequisite: Generate an application specific password from your iCloud account
To connect your iCloud account to CalendarBridge you do not use your normal iCloud password. Instead, you must login to iCloud and create an application specific password. Here is how to do that:
-
Sign into https://appleid.apple.com.
-
In the Sign-In and Security section, select App-Specific Passwords.

-
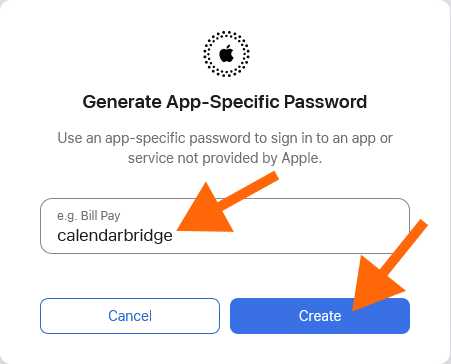
Select “Generate an app-specific password.”
-
Type in a name for the password (e.g., “CalendarBridge”) and click “Create.”
-
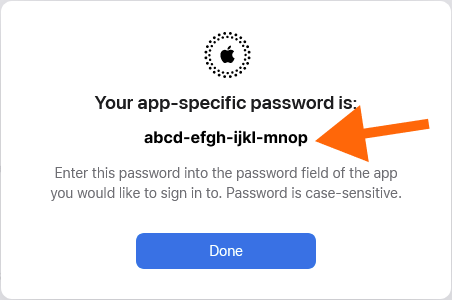
Your application specific password is now shown.
If you close the window, you cannot see it again. Either leave the window open or copy it and paste it somewhere safe, such as a password manager.
Connect your iCloud account to CalendarBridge using an app-specific password
-
Go to your CalendarBridge Accounts page.
Click the “Accounts” link in the left navigation bar, or enter https://calendarbridge.com/dashboard/accounts into your browser (if you haven’t saved your app-specific password, use a different browser tab than the one that your app-specific password is displayed in):
-
Click the “ADD ACCOUNT +” button.
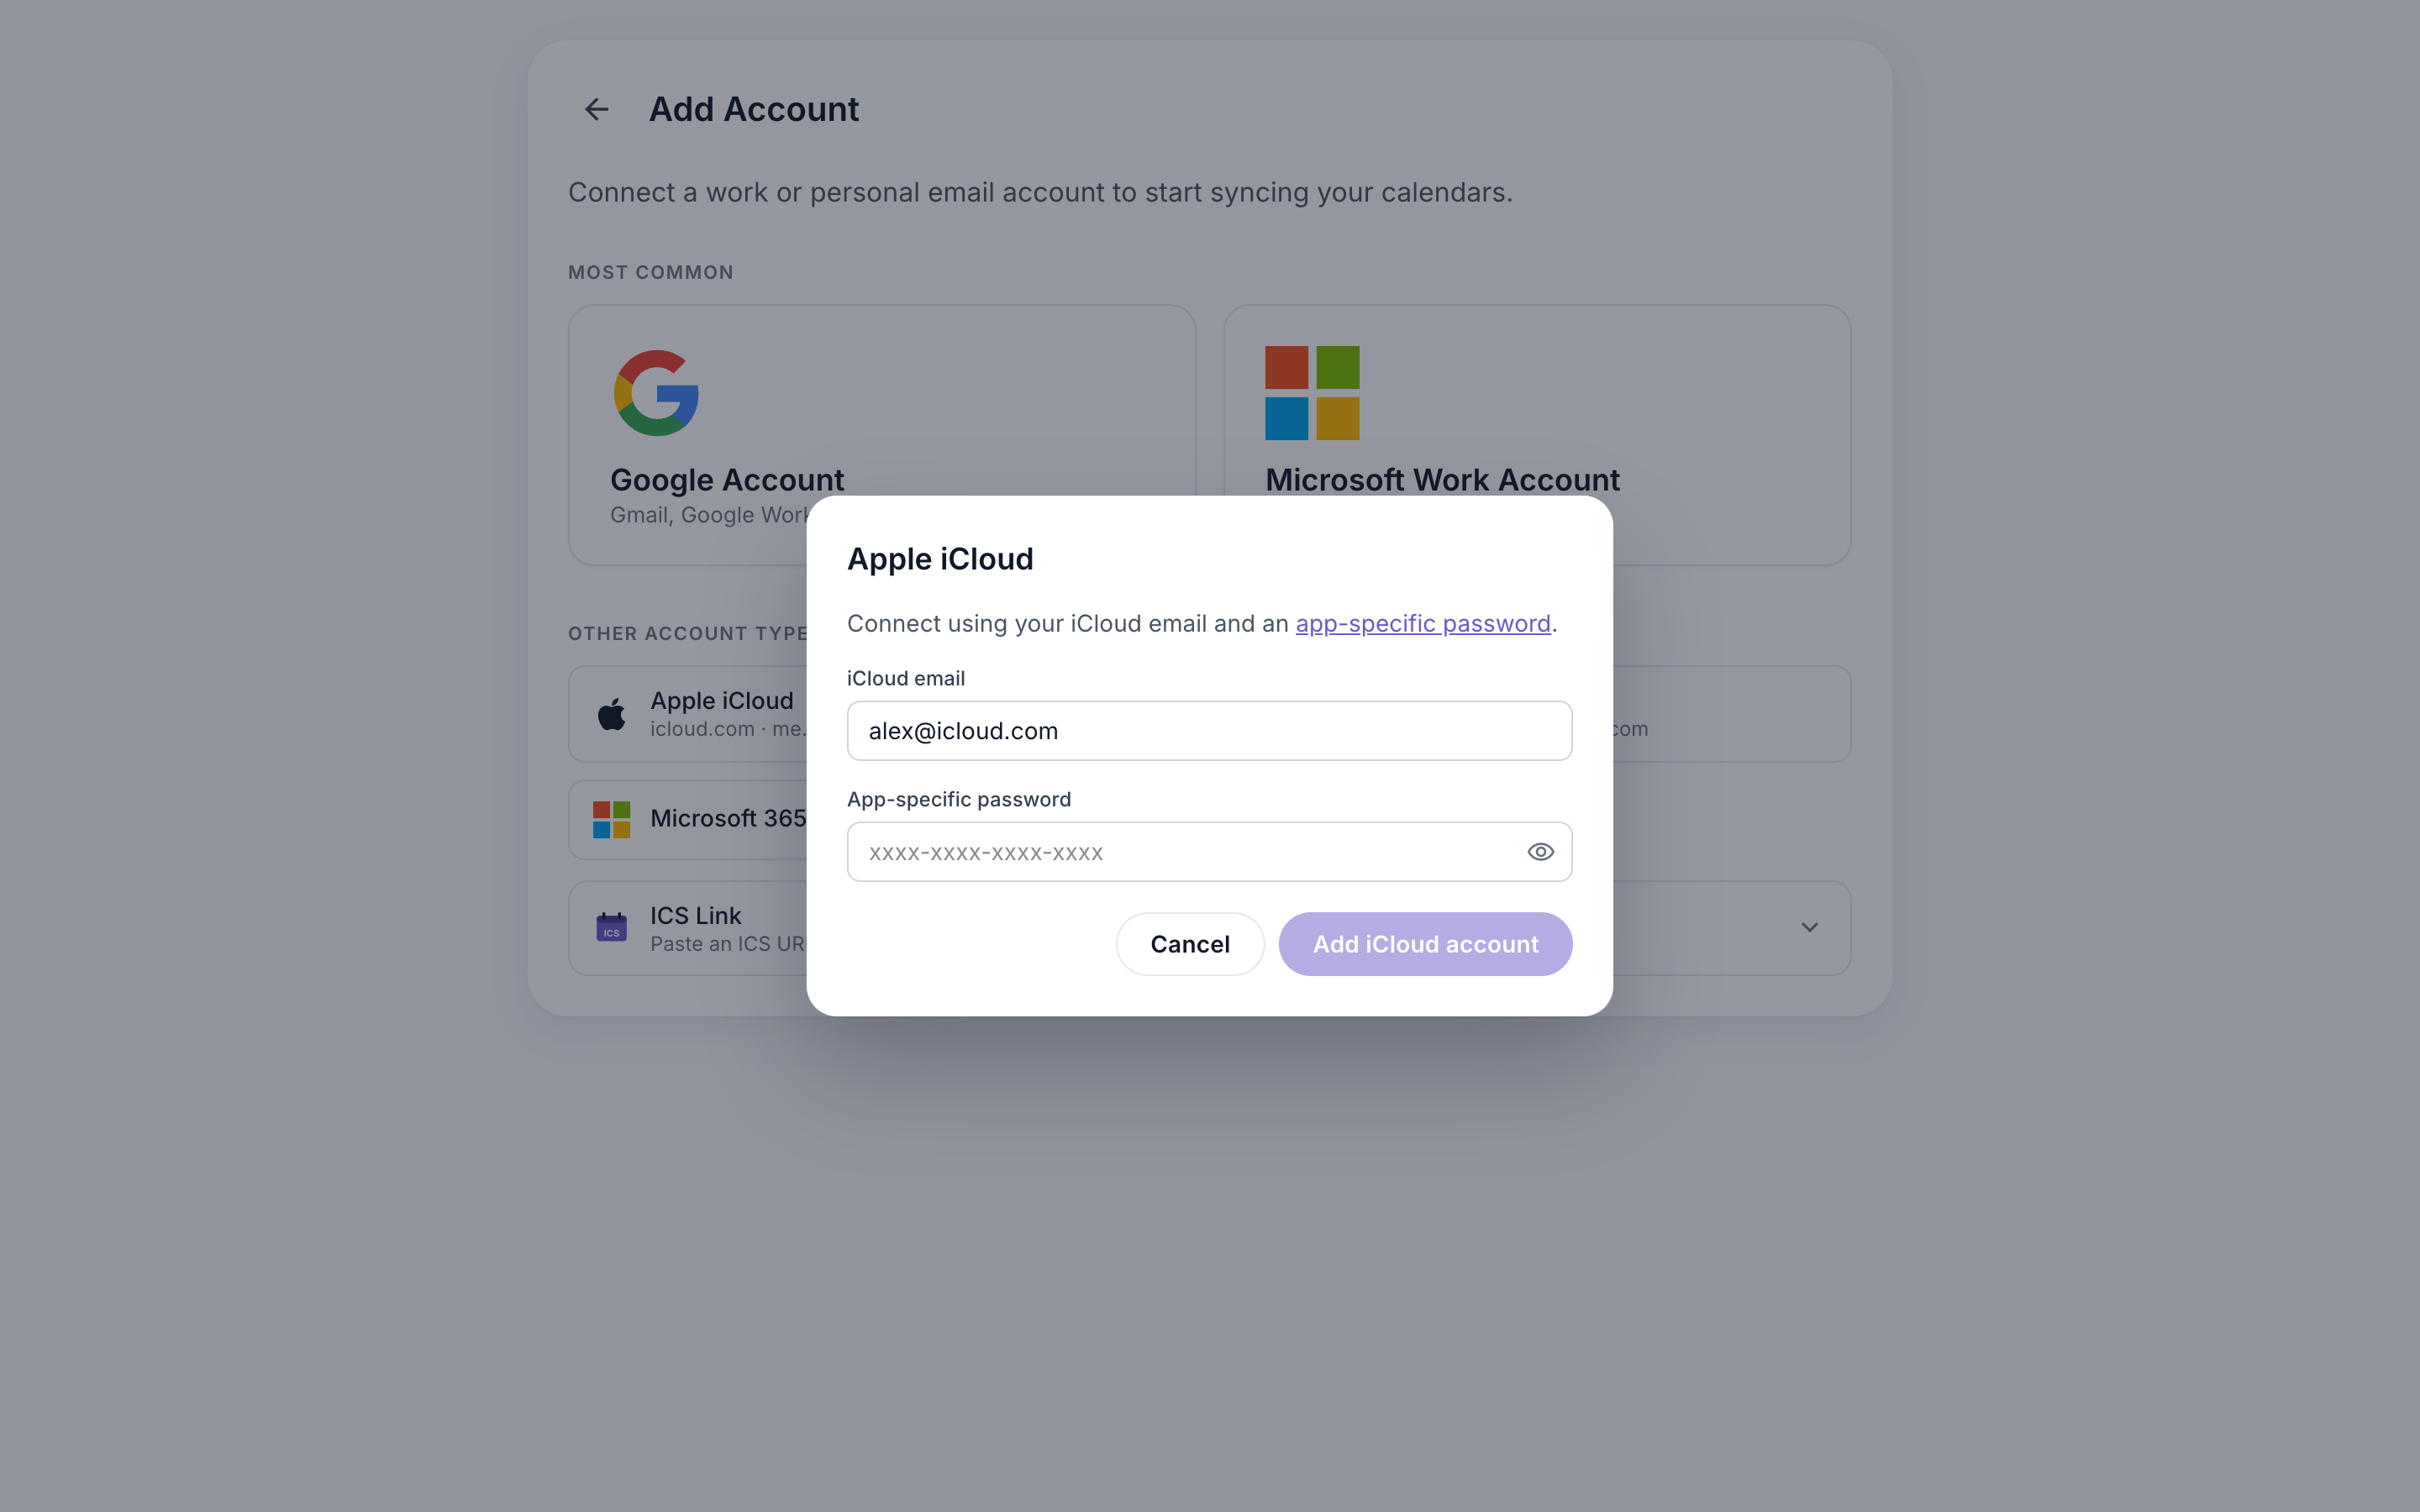
This will bring up the account type selection page:
-
Click the “Apple iCloud” button.
This will bring up the following dialog box. Enter your iCloud email address and the app-specific password generated in the steps above. Then click “Add iCloud Account.”