Creating a Scheduler
Schedulers are personalized web pages that others can use to automatically schedule meetings with you only at times you are available. This guide walks you through creating one.
1. About Schedulers
Schedulers are personalized web pages that others can use to automatically schedule meetings with you only at times you are available. Simply send someone a link to your scheduler and they can book a meeting at a time they know will work for you.
Follow these steps to create a new CalendarBridge scheduling link (or “scheduler”).
2. Creating a Scheduler
2.1 Go to your schedulers dashboard
While logged into the CalendarBridge dashboard, click the “Schedulers” link on the left navigation bar. Or just enter https://calendarbridge.com/dashboard/schedules into your browser. If you have not yet created any schedulers, it will look like this:
Click the “Create Scheduler” button. This will take you to the first screen scheduler setup:
2.2 Select Calendars
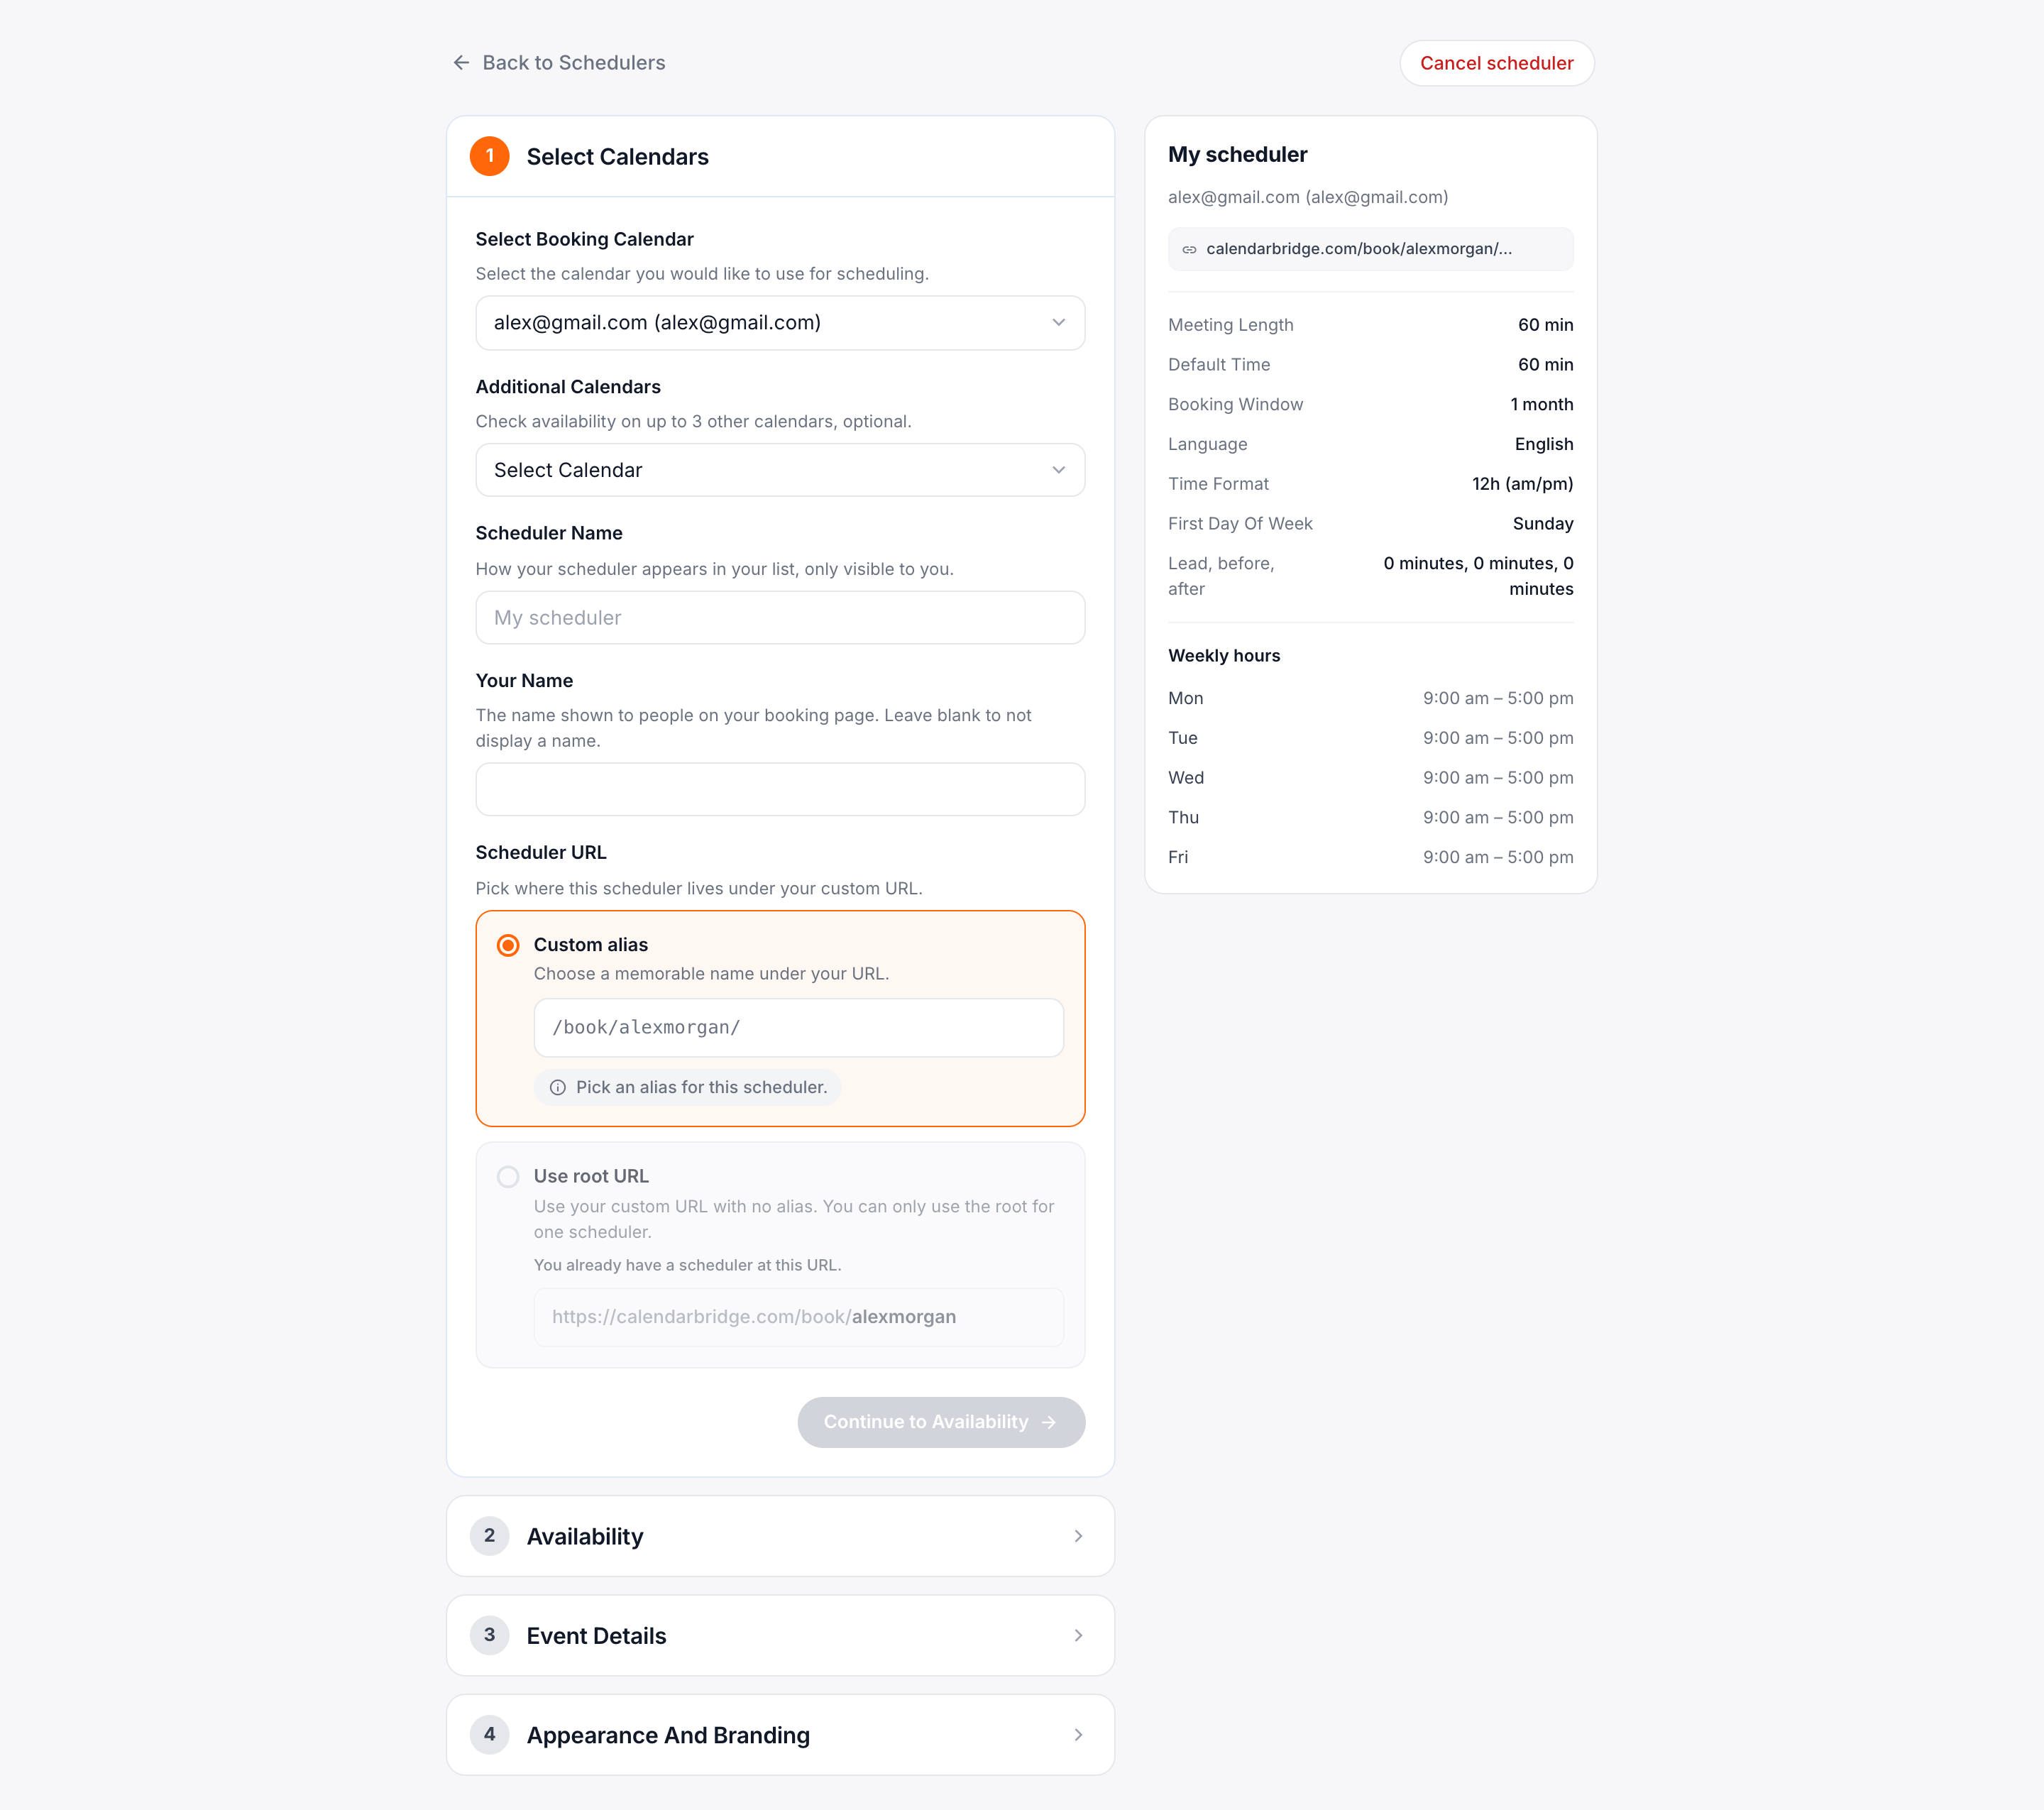
2.2.1 Booking Calendar
The booking calendar for a scheduler is the calendar (a) to which meetings scheduled through the link will be booked (and, therefore, the email address from which the invite will be sent); and (b) will be used to determine your availability. If other calendars are synced to your booking calendar, those calendars are automatically accounted for when determining your availability.
2.2.2 Additional Calendars to Check
If you have any calendars which are not synced to the booking calendar, but you still want taken into account when determining your availability, select those calendars in this box. You can select up to 3.
2.3 Set a custom URL (paid subscriptions only)
Before you can apply a custom URL to a particular scheduler, you must set your custom id. This will be the root which you can then extend on a per-scheduler basis. At the top of the schedulers page under “Your Custom URL”:
- Click ‘Check Availability.’
- Enter your custom id in the text box. The custom id must be (1) unique across all CalendarBridge users, (2) be 5 – 25 characters long; (3) use only lowercase letters, number, dashes, and underscores.
- If the custom id validates, you will then be able to click the “submit” button to lock in the custom id.
If your custom id is set, then the URL of any of your schedulers can take one of three formats:
- the default format of /book/<random id>.
- a format of /book/<your_custom id>. To adopt this format for a particular scheduler check the “Set as Default Path” checkbox.
infoYou can only have 1 scheduler with this format. If another scheduler was using “set as default path,” that other scheduler will revert to the default format /book/<random id>.
- A format of /book/<your custom id>/<additional id>. To use this format, type the additional id in the text box. For example, here the additional id is set to “60-min-meeting”:
2.4 Set Meeting Length & Availability

2.4.1 Meeting Length Options
Whichever boxes you check will be the duration options that someone visiting your link will be able to choose from. If you check only 60, then users of your link will only have the option to book 60 minute meetings, if you check 60, 30, and 15 then visitors to your link will be able to choose between 60, 30, and 15 minutes for their meeting, and so on.
By default, there are 15, 30, and 60 minute options. If you would like a different meeting duration option, click the “Add custom time” link to display a textbox. Enter the meeting duration in minutes and then click the “Add” button.
2.4.2 Available Days & Times
This allows you to restrict the days and hours during which visitors to your link can book a meeting with you. The default configuration is Monday through Friday, 9:00 to 5:00 in the timezone shown in the timezone picker (which defaults to the Timezone of the computer from which you are creating the scheduling link).
2.4.3 How Far In Advance Someone Can Book
Setting this to, for example, 1 month means a visitor to your link can book a meeting with you up to 1 month from the date on which they visit your link.
2.4.4 Notice Needed Before a Meeting
Setting this to, for example, 1 hour means a visitor to your link can book a meeting with you that starts no sooner than 1 hour from the time on which they visit your link.
2.4.5 Advanced Availability Options
Clicking the “+Show Advanced” link will reveal three additional settings:
2.4.5.1 Buffer Times
- Before buffer: If your before buffer is X minutes, time slots presented as available must end at least X minutes before any existing meetings on your calendar.
- After buffer: If your after buffer is X minutes, time slots presented as available must start at least X minutes after any existing meetings on your calendar.
2.4.5.2 Start Time Increments
The “default” setting is that the times at which a meeting can start depends on the duration of the meeting:
- For meetings of 15 minutes or less, meetings can start at :00, :15, :30, :45
- for meetings between 16 and 30 minutes, meetings can start at :00 and :30
- For meetings of 31 minutes or more, meetings can start at :00
Instead of “default” you can pick a certain number of minutes by which to increment start times. Choosing 5 minutes will result in the most possible meeting slots, but with potentially unusual start times (e.g., a meeting starting at :10 or :35).
Click “Continue to Event Details” to proceed to the final step of scheduler creation.
2.5 Event Details
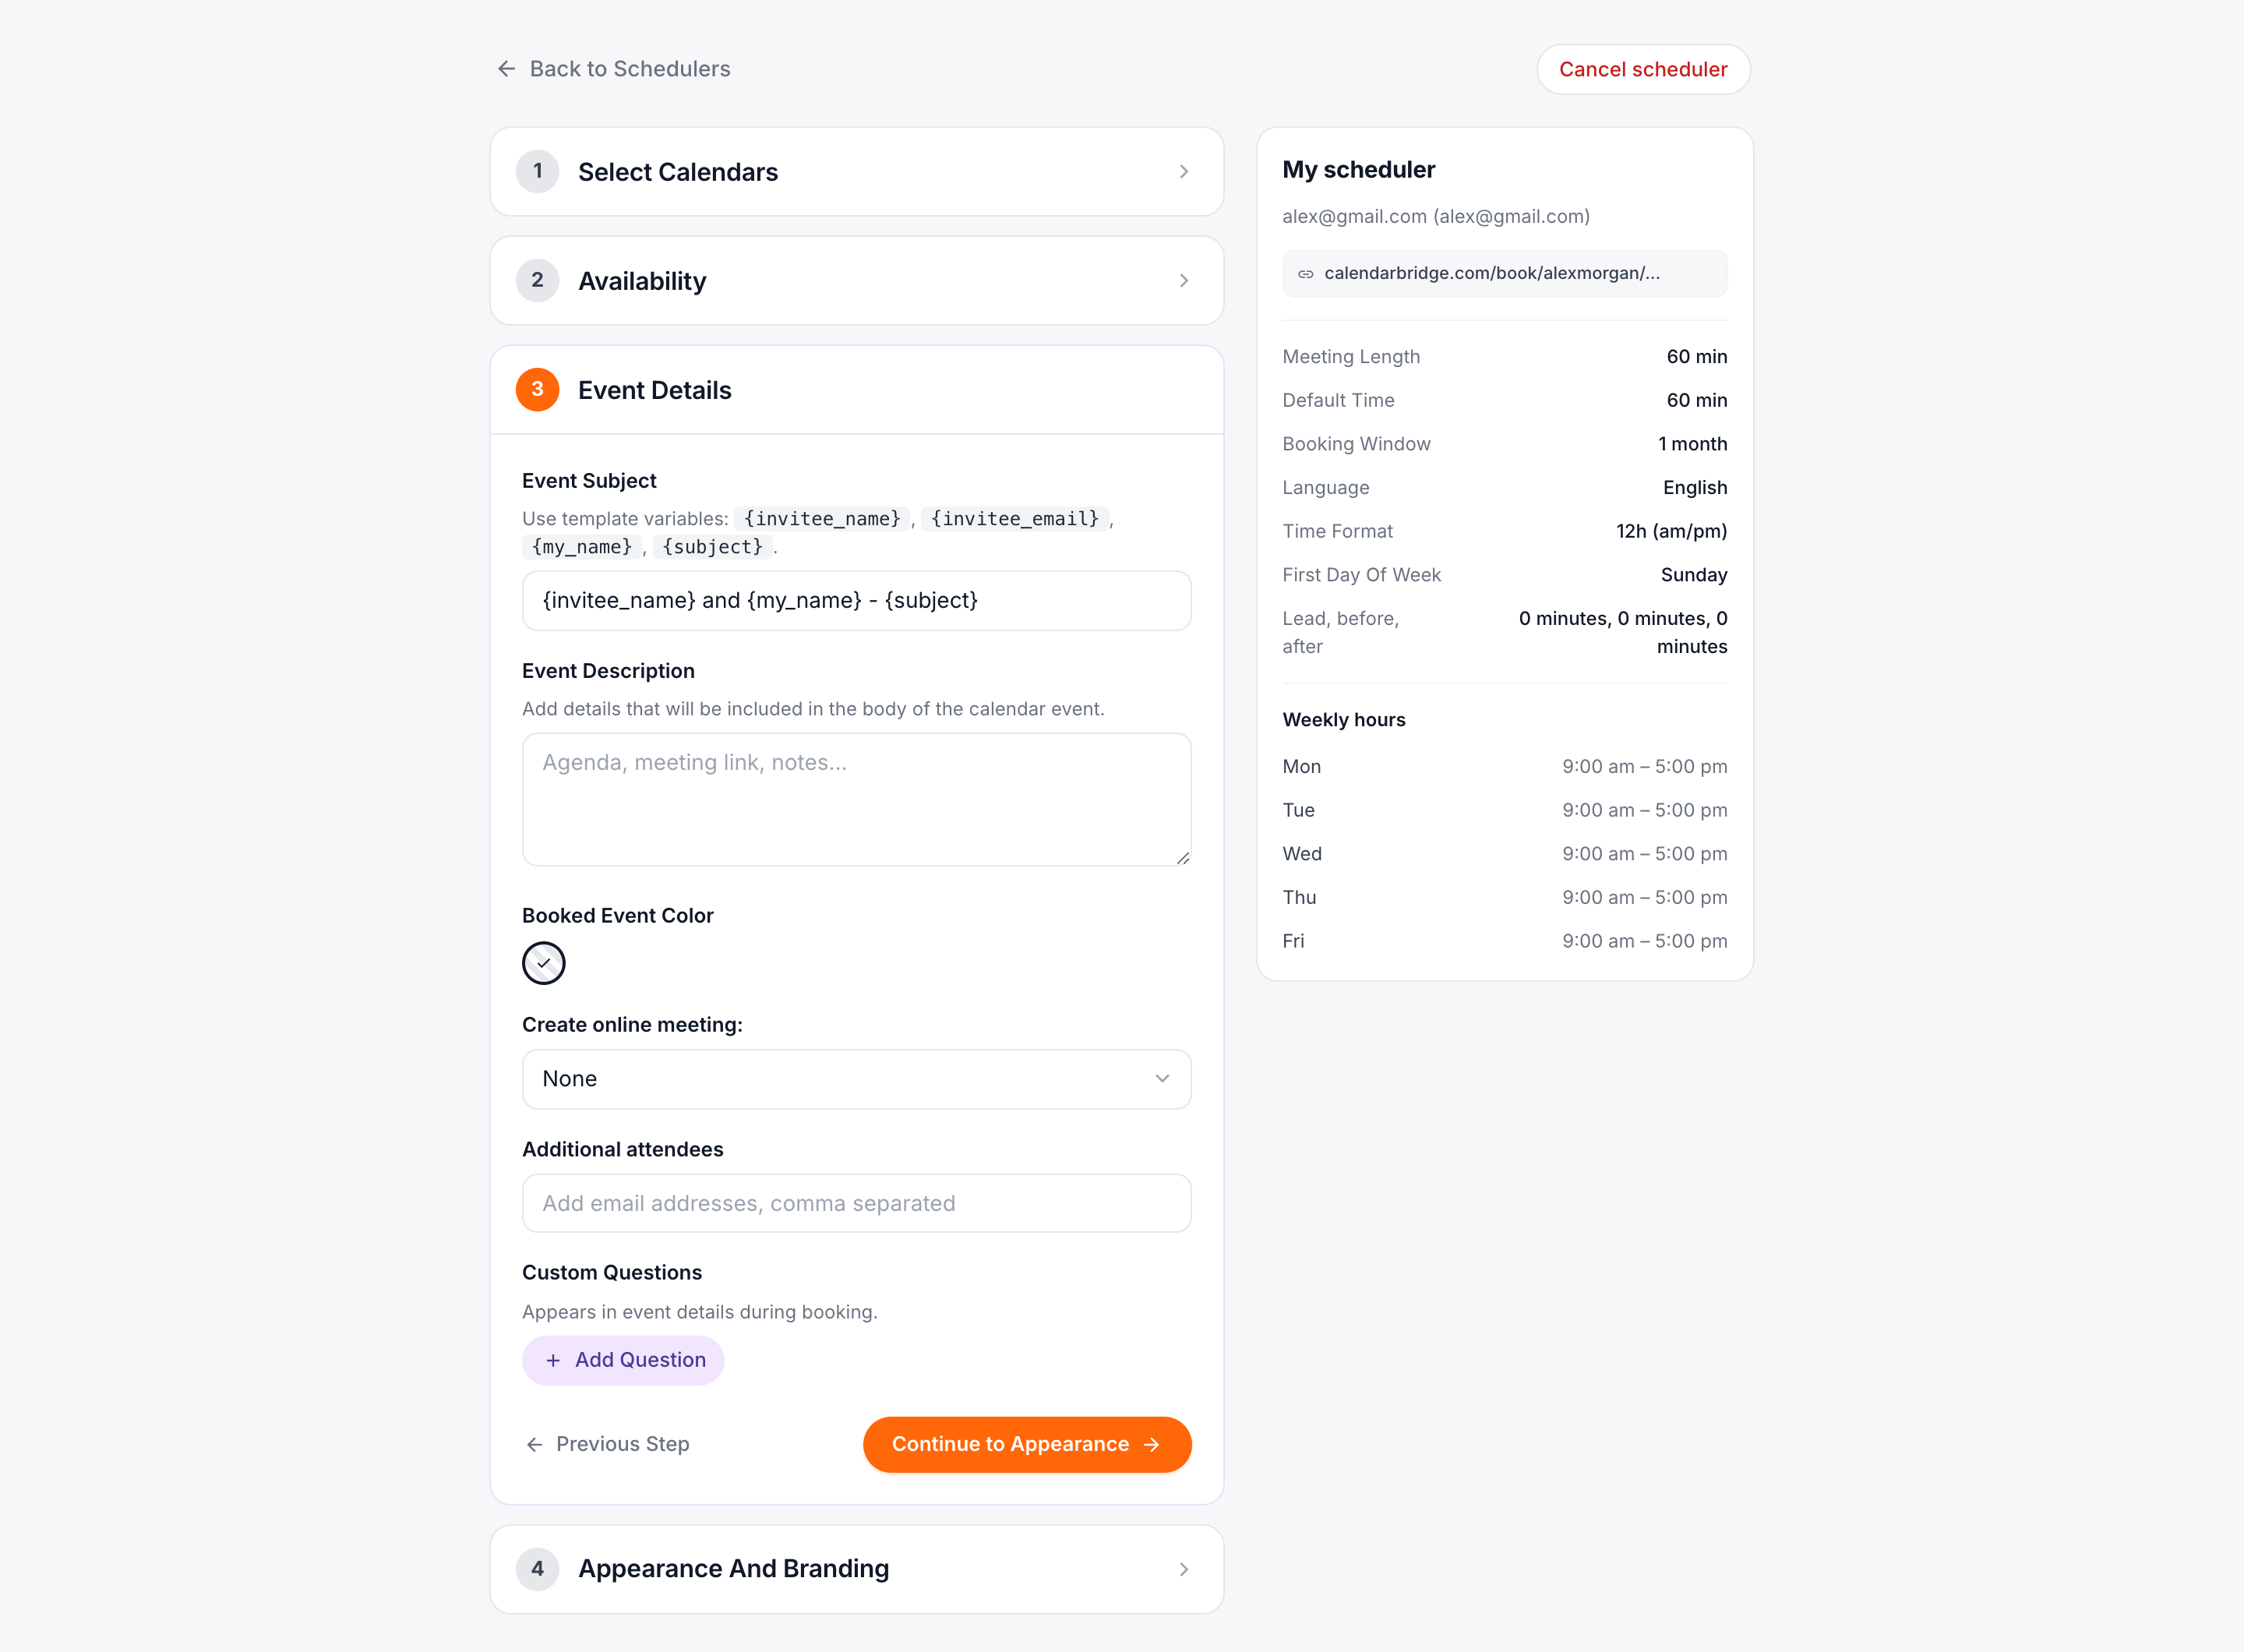
2.5.1 Custom Subject Line
In this text box you can set the subject of events booked through this scheduler. To have the subject customized per event, you can use the following placeholders:
{subject}– this placeholder will be replaced by a subject provided by the invitee when booking a meeting via this scheduler.{invitee_name}– The name provided by the invitee when booking a meeting via this scheduler.{invitee_email}– The email address provided by the invitee when booking a meeting via this scheduler.{my_name}– The name on the account that is used as the booking calendar for this scheduler.{my_email}– The email address on the account that is used as the booking calendar for this scheduler.
Example 1: 1-on-1 Meeting with Jane – All events booked through this scheduler will have the subject “1-on-1 Meeting with Jane.”
Example 2: {invitee_name} and {my_name} – {subject} – An example event booked through this link might be “Jack Doe and Busy Jane – strategy session”
2.5.2 Event Notes/Details
In the text box, you can enter any details you would like to appear in the body of the invitation. This can include personalized messages, zoom/webex/etc. links, or any other desired text.
Zoom users: if you want to use your Personal Meeting ID, enter that information in the Event Details box. If you want to generate a unique Zoom conference for each meeting, see the “Online Meeting” section in step 2.5.4 below.
2.5.3 Booked Event Color
This allows you to select a specific color for events created through the scheduling link. This can be useful to help see at-a-glance which events on your calendar were booked through your scheduling link. “Calendar default” means events booked through your scheduling link will be the default color determined by Outlook or Google Calendar.
2.5.4 Create Online Meeting
If a box in this section is checked, then a unique online conference will be automatically generated and the conference details will be automatically added to the invite.
If the booking calendar is a Microsoft calendar, there will be a checkbox to add a unique Teams or Skype conference to meetings booked via this scheduling link (whether it is Teams or Skype is determined by your Microsoft account settings).
If the booking calendar is a Google calendar, there will be a checkbox to add a Google Meet conference to meetings booked via this scheduling link.
If you have connected a Zoom account (see connecting a Zoom account), there will be a checkbox to add a unique Zoom conference to meetings booked via this scheduling link. Note: if you want to use your Zoom Personal Meeting ID, see the “Event Details” box discussed in step 2.5.2 above.
2.5.5 Add Additional Invitees
If there are other people that should automatically be invited to meetings booked through this scheduler, enter their email addresses here separated by commas.
2.5.6 Add a Form/Questions
This section allows you to create a form/questionnaire to be filled out by invitees that book through the scheduler. Each question/prompt you add will be associated with a text box in which the invitee can type a response.
To let someone view your availability and book a meeting with you using the scheduler, simply share the link with them via email, chat, etc.
2.6 Appearance and Branding
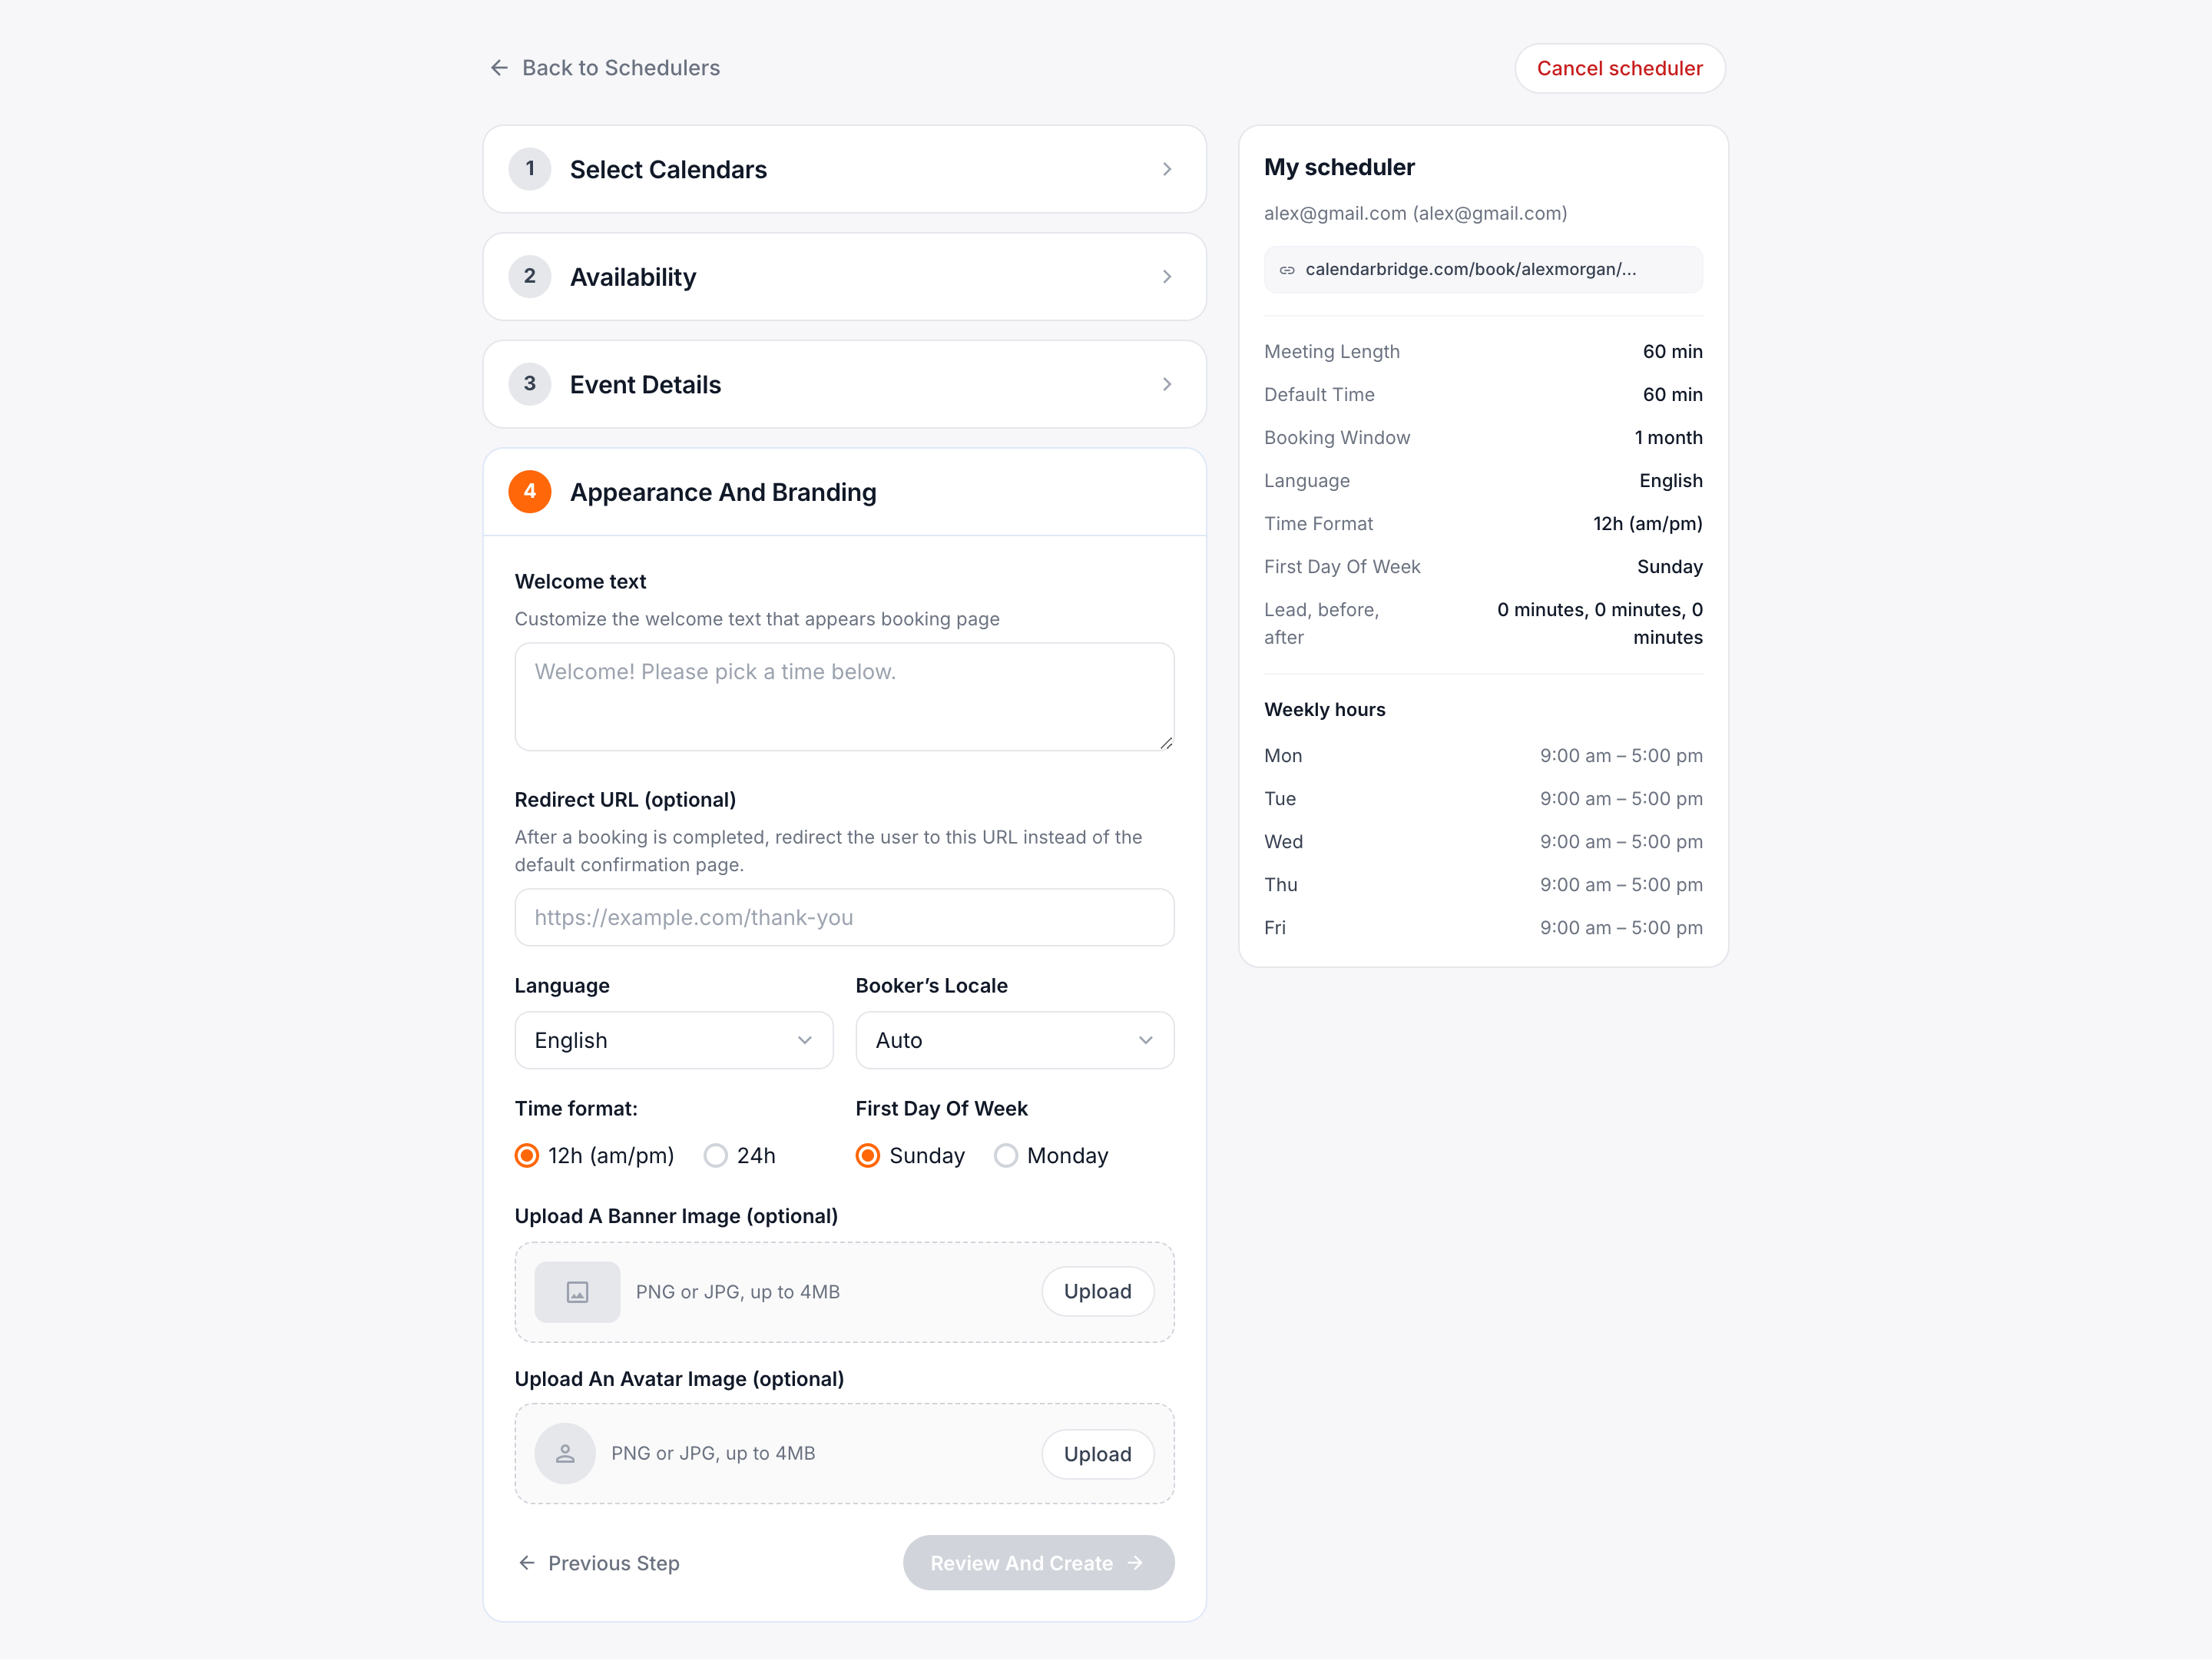
2.6.1 Customize the welcome text that appears on the booking page
This is the text that appears at the top of your booking page (see image below).
2.6.2 Redirect Url
After a booking is completed, redirect the user to a custom URL instead of the default confirmation page.
2.6.3 Banner Image/Logo (optional)
If an image is uploaded, it will be shown in place of the CalendarBridge logo at the top of the page (see image below). On desktop, the banner image will be scaled to a width of 576 pixels. On mobile the banner image will be scaled to 100% device width (e.g., 390 pixels on iPhone 13). When the width of the image exceeds these values, the width and height will be scaled proportionally.
2.6.4 Avatar Image (optional)
The avatar is displayed below the greeting text. If no image is uploaded, the space is simply blank. The image will be scaled to a width of 100px. It is usually best to use an image file that is square or that is 100 pixels wide.
Click “Review and Create” to bring up the scheduler review screen:
If you need to make any changes, click “Back.”
If everything looks good, click “Create” and you will be taken back to your schedulers overview page showing the newly-created scheduler.