Setting up One-Way Syncing
Follow this section to configure syncing between two calendars you have already connected to your CalendarBridge account.
Introduction
This article walks you through setting up syncing from one calendar to one other calendar. If you want to setup syncing in both directions between multiple calendars (i.e., if you want to setup multiple sync connections at once, see Setting up Multiple Sync Connections).
Go to your Syncs page
Click the “Syncs” link at the top navigation bar. Or just enter https://calendarbridge.com/dashboard/syncs into your browser. If you have not yet created any syncs, it will look like this:
Click the “New Sync +” button to proceed to the calendars select screen.
Select the Source Calendar
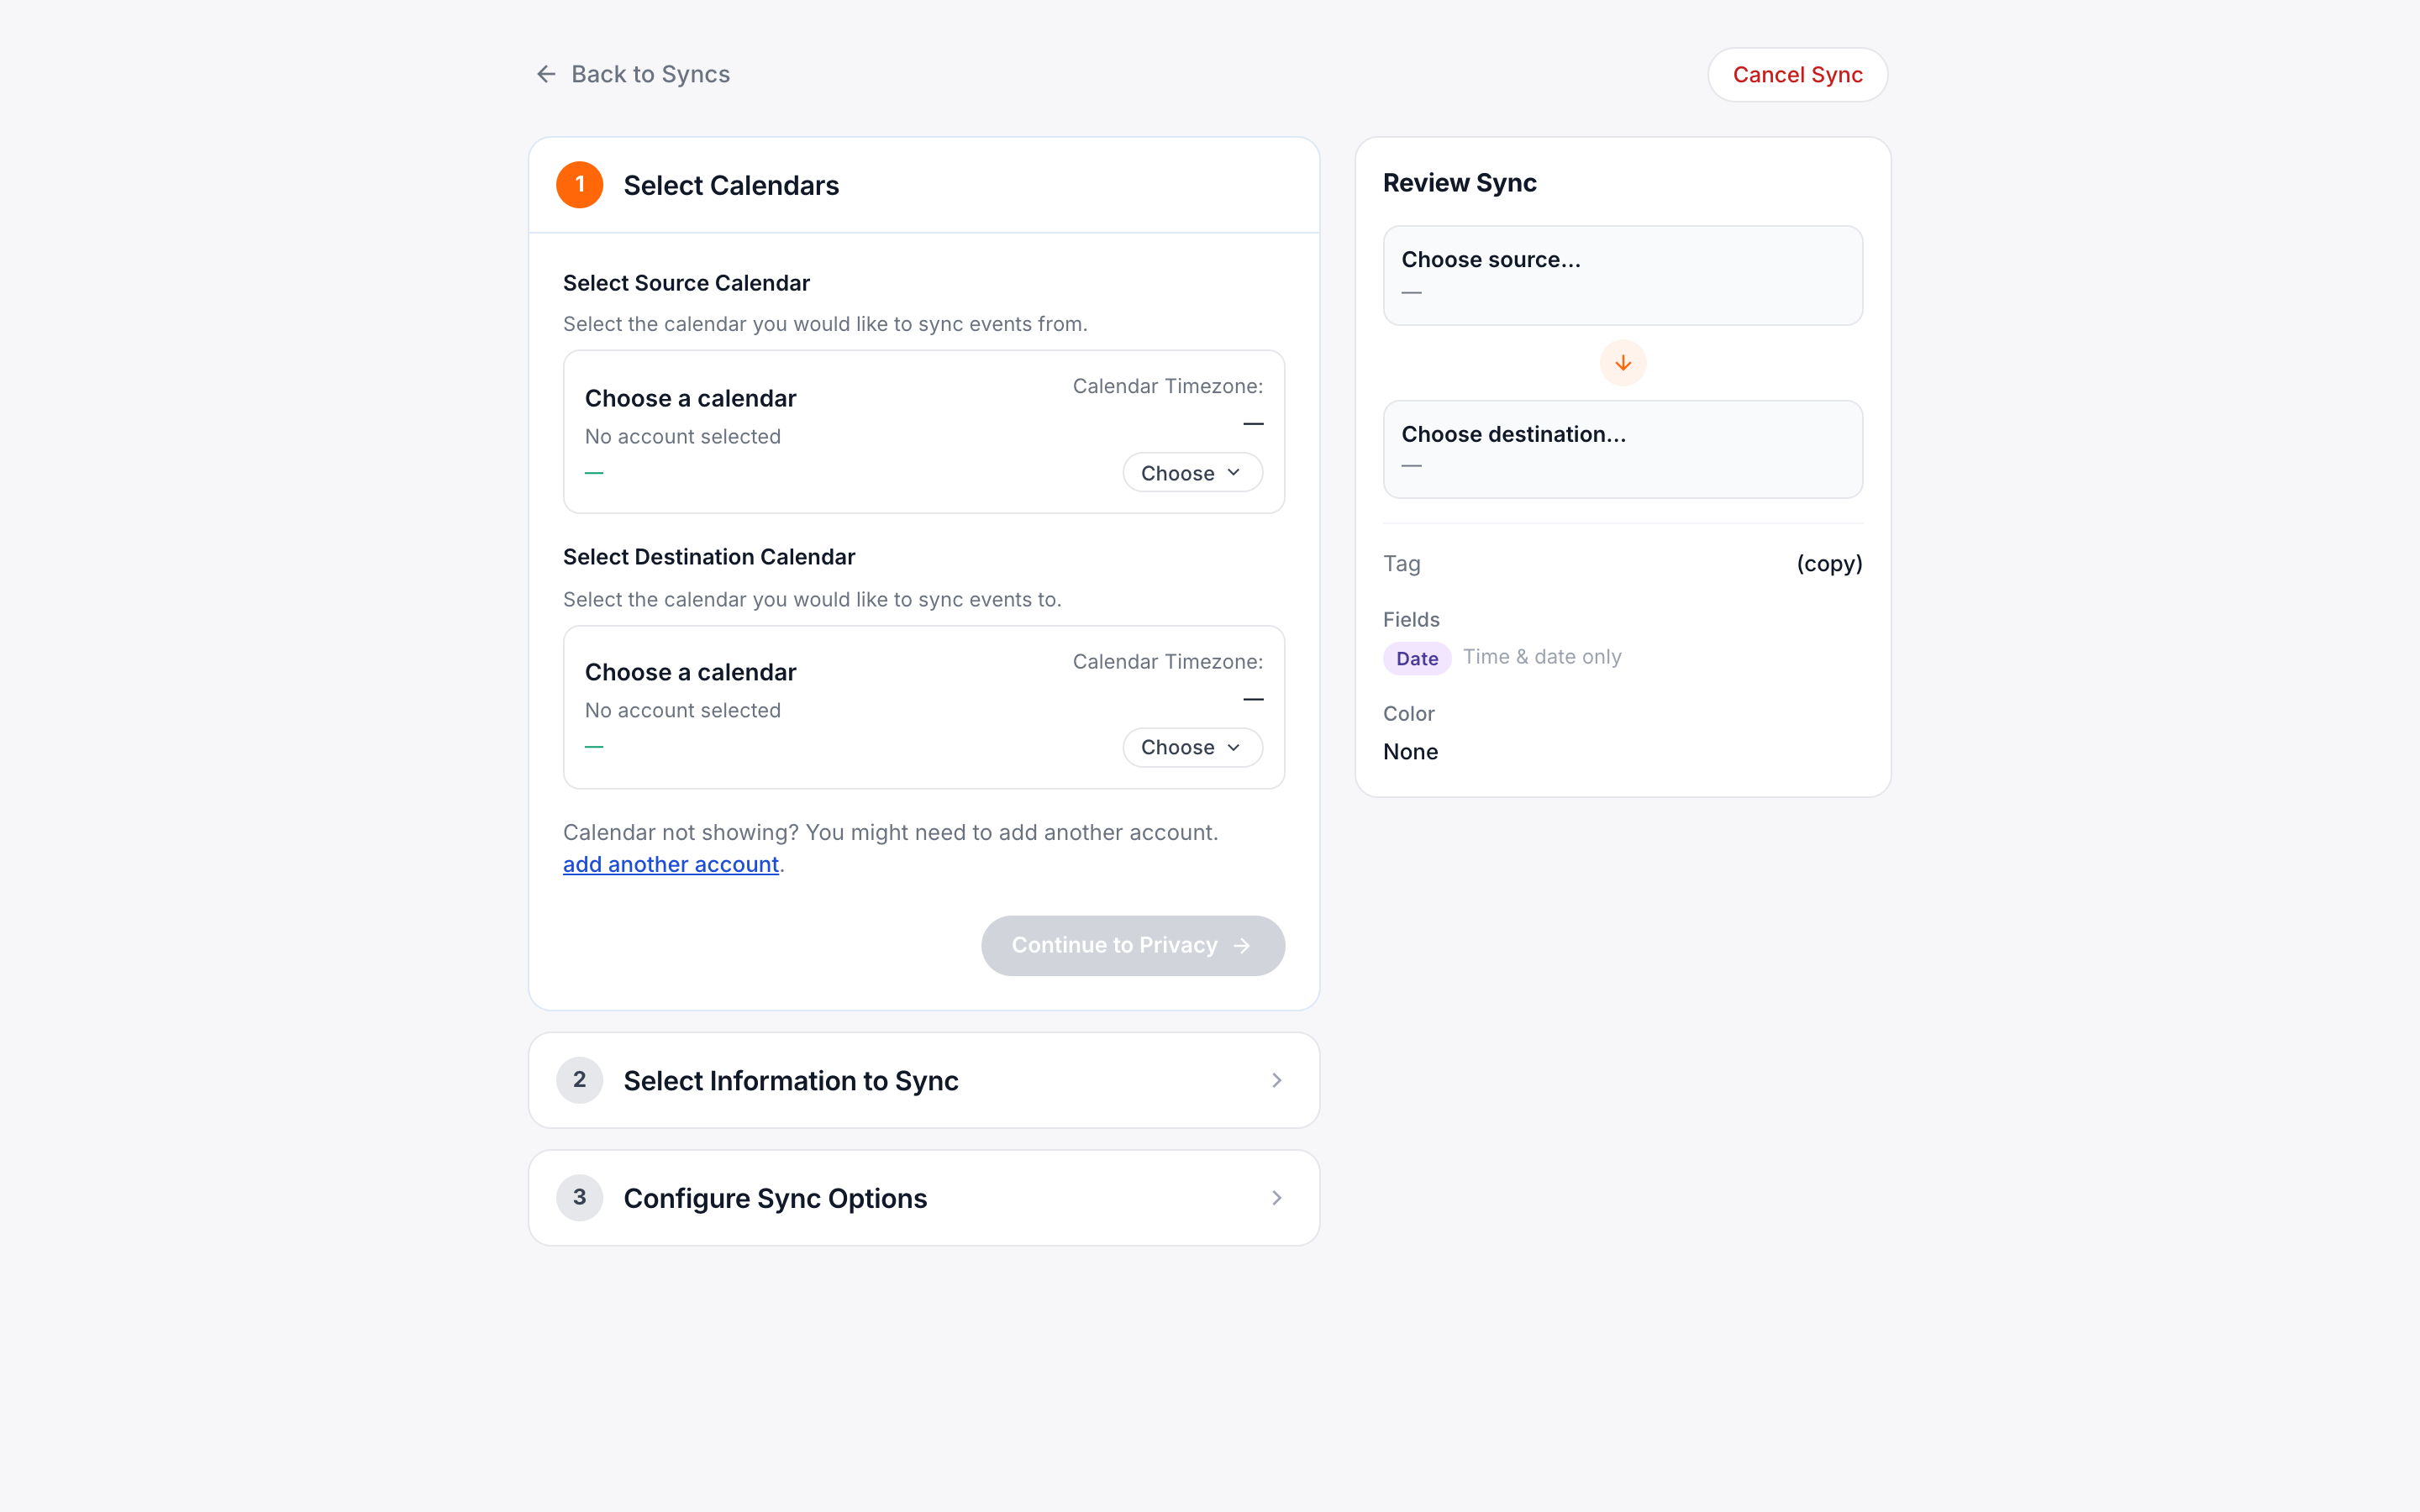
Selecting a Google, Microsoft, or iCloud source calendar
In the center column of this screen are listed all the calendar accounts you have connected to CalendarBridge.
Find the account of the source calendar that you want, and click it to expand a list of calendars for that account.
Explanation of this screen
In the “Select Source Calendar” screen, each calendar in the list is represented by a rectangle with:
- an icon of the account type (Google, Microsoft, or apple)
- the name of the calendar (top line of text)
- For Microsoft accounts, the primary calendar of the account is always named “Calendar.”
- For Google accounts, the primary calendar of the account is indicated by “Primary Calendar” in a third line of text.
- For iCloud accounts, there are two calendars by default “Work” and “Home.” Which of these your events are on depends on how you have been using your iCloud calendar.
- the account that the calendar is on (second line of text)
- A flag of “Read Only” means that the account indicated on the second line of text does not have permission to edit that calendar.
- This is the case for system-generated calendars (e.g., the Holiday calendars), and for calendars which have been shared (using Google’s or Microsoft’s calendar sharing features) into that account with read-only permissions.
Select the calendar you want events to be copied from.
Using an ICS URL as a source calendar
If the desired source calendar is not a Google, Microsoft, or iCloud calendar. OR, if the desired source calendar is on a Google or Microsoft account for which the administrator does not allow you to connect CalendarBridge, you can still use that calendar as a source calendar if you can publish a .ics feed for that calendar.
Click to expand “Other Calendar Types”
Paste the public .ics URL of the calendar into the box and click “Use ICS URL as Source.”
Select the Destination Calendar
Next, expand the list of calendars for the account that you want as the destination, and then select the particular calendar of that account that you want events to be copied to.
In the screenshot below, events will be copied from the calendar named “marketing@calendarbridge.com” on the Google account associated with marketing@calendarbridge.com; those events will be copied to the calendar named “Home” on the iCloud account for cal_bridge@icloud.com
For Microsoft accounts, verify the time zone of the calendar.
By default, we assume the time zone of the Microsoft calendar is the time zone you are currently in. If this is not the case, select the correct time zone from the drop down menu.
Once you have selected the source and destination calendars and set the timezone of any Microsoft calendars, click “Continue to Privacy.” Which will bring up the “Select Information to Sync”
Configure the privacy settings for your event copies
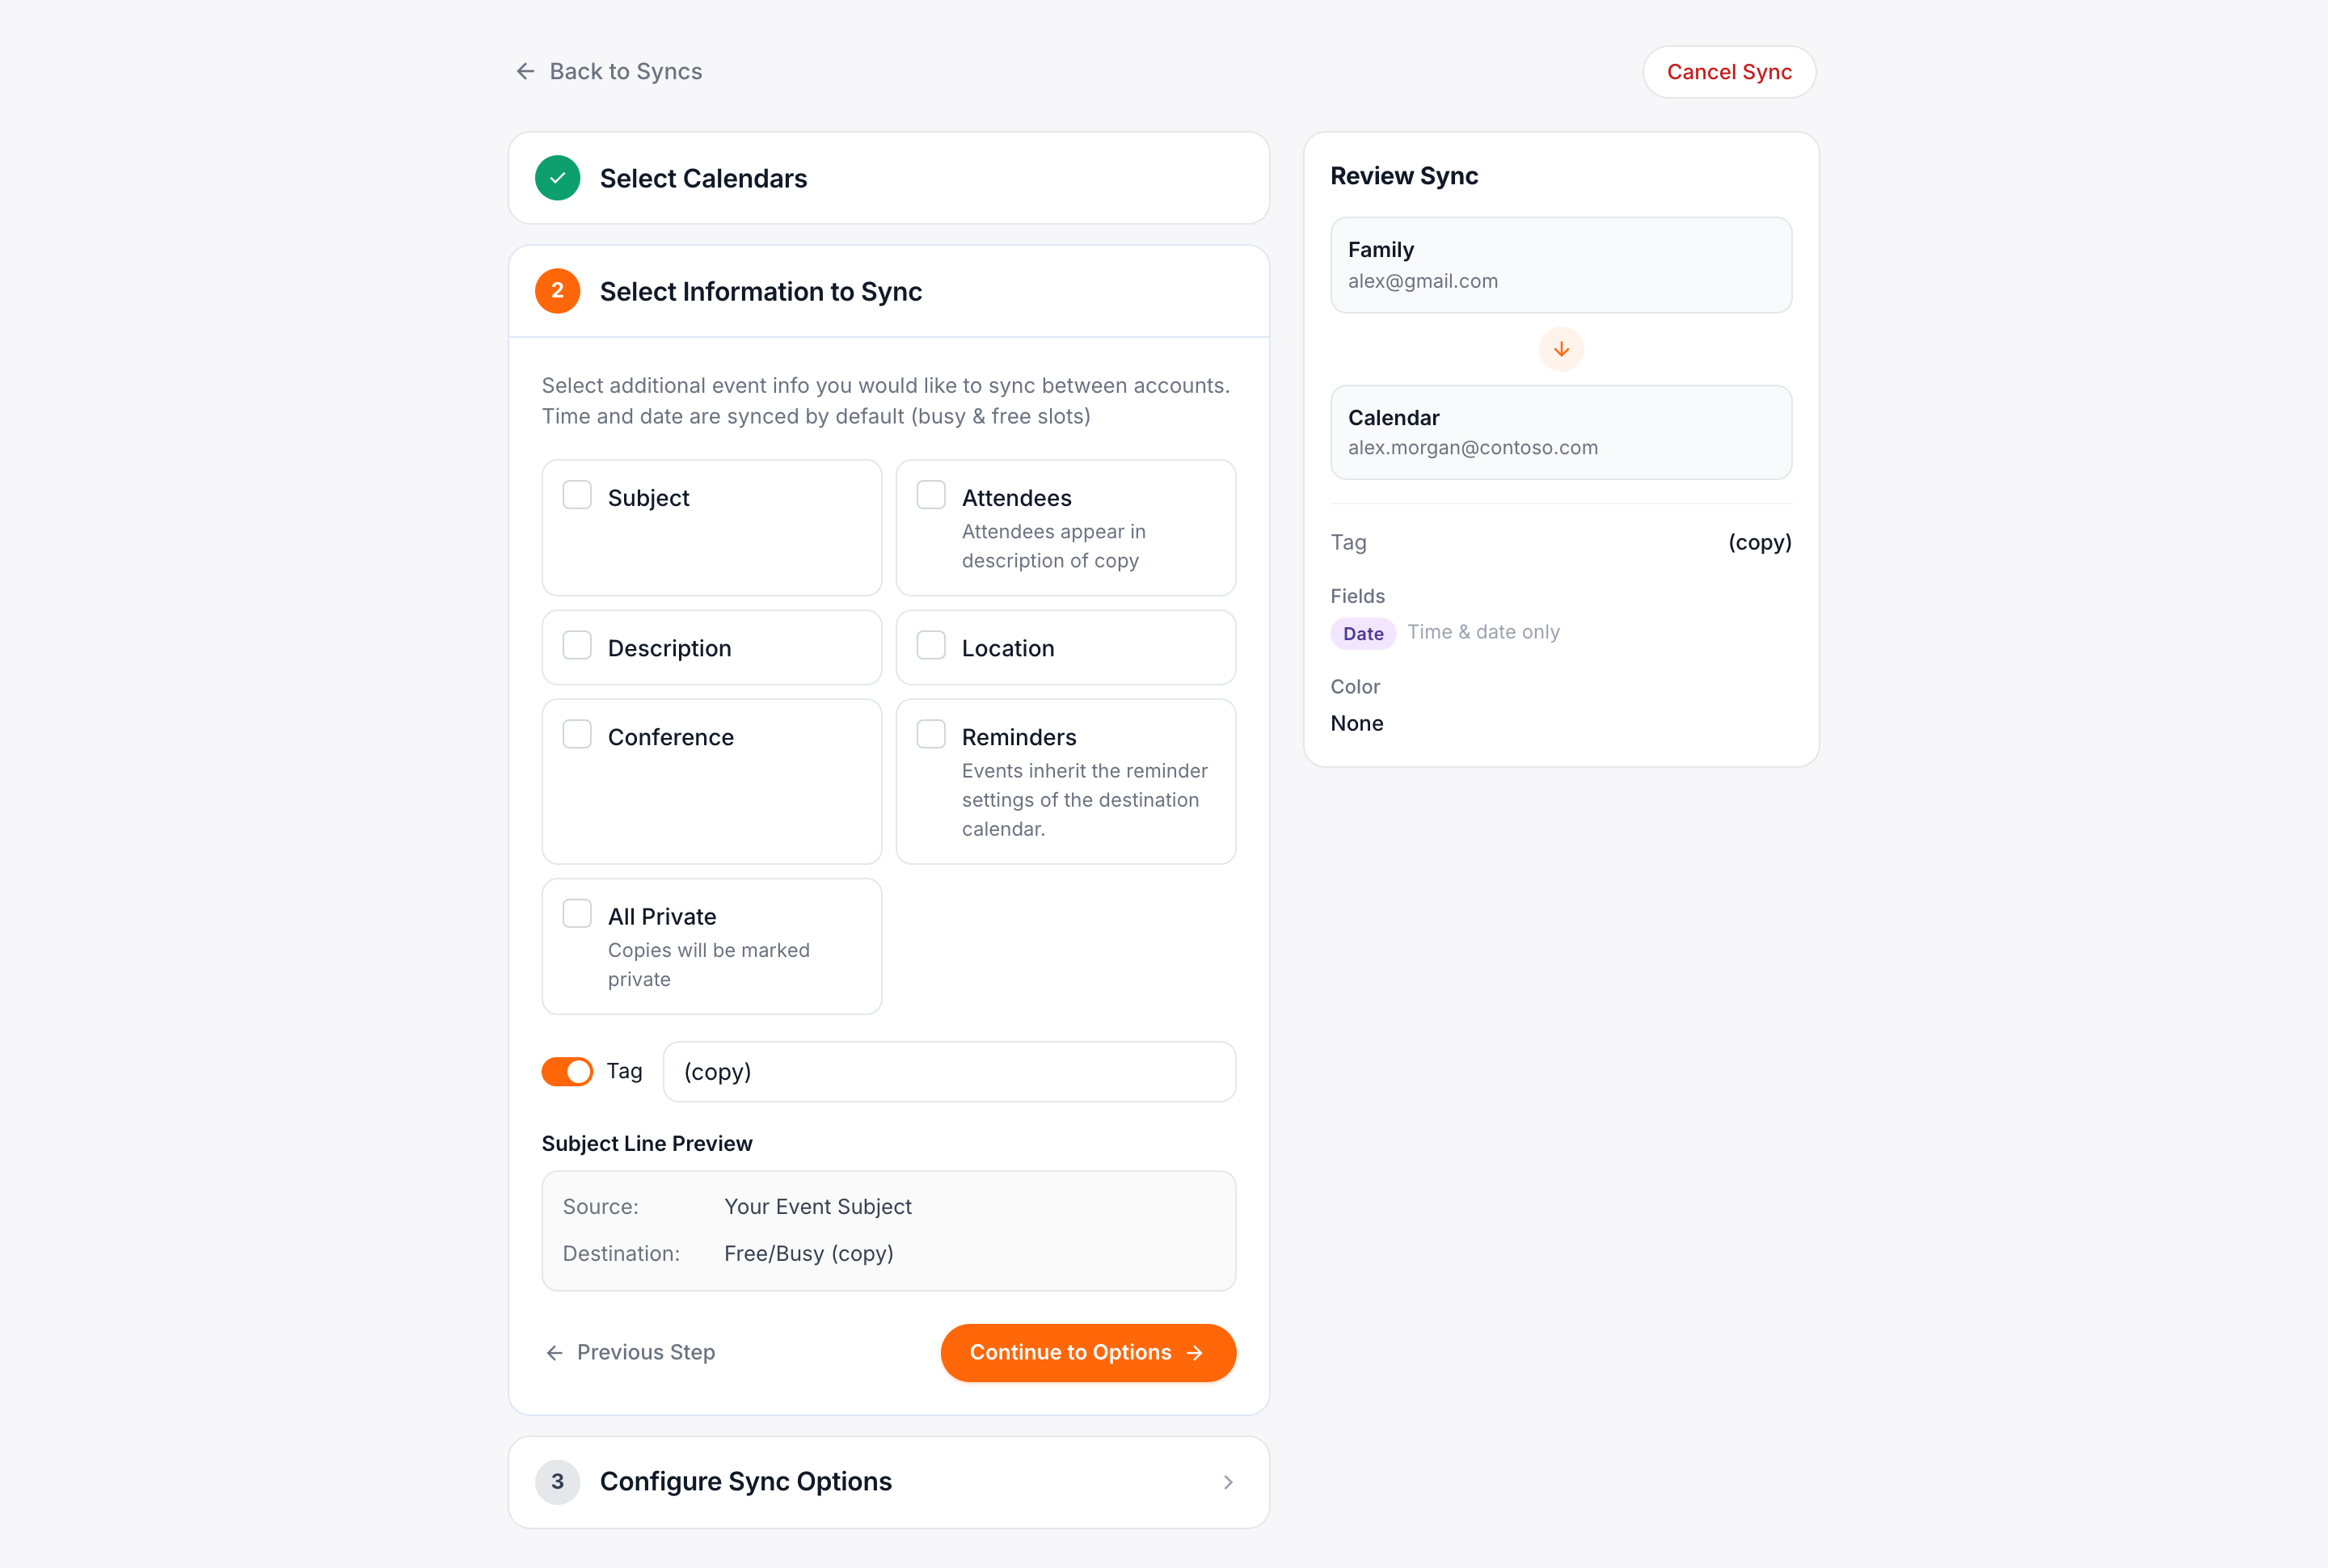
Next, configure the privacy settings of the sync connection and set the subject line tag that will be appended to event copies created by this sync connection.
- Subject
- If this box is checked, the subject of events will be copied from the source calendar to the destination calendar. If this box is unchecked the subject of the event copies will simply be “busy.”
- If you check this box, but want your event copies to show as “busy” in Outlook Scheduling Assistant and Google Find a Time, use the “All Private” option (discussed below).
- Attendees
- If this box is checked, the attendees of events will be copied from the attendees field of source calendar to the description field of the destination calendar. Attendees are not copied to the attendees field of event copies to avoid the potential for invites and event updates being sent from the wrong calendar.
- Description
- If this box is checked, the subject of events will be copied from the source calendar to the destination calendar. If this box is unchecked the description in the event copy will be left blank.
- If you check this box, but don’t want the description to show in Outlook Scheduling Assistant and Google Find a Time, use the “All Private” option (discussed below).
- Location
- If this box is checked, the location of events will be copied from the source calendar to the destination calendar. If this box is unchecked the location field of the event copy will be left blank.
- If you check this box, but don’t want the location to show in Outlook Scheduling Assistant and Google Find a Time, use the “All Private” option (discussed below).
- Conference
- If this box is checked, web conference details generated by Google Meets, Microsoft Teams, Skype, and Zoom add-ins/extensions will be copied into the description of the event copy. If this box is unchecked, web conference details generated through these add-ins/extensions will not be added to event copies.
- Reminders
- If this box is checked, the default reminder settings of the destination calendar will be applied to event copies. If this box is unchecked event copies will have no reminders set by default. Note: If this box is checked, subsequent updates to the original event will cause the reminder on the event copy to be reset (i.e., you may have to dismiss it again on the destination calendar).
- All Private
- If this box is checked, then all event copies will be marked as private such that other users in your organization will see your event copies as simply “busy” in the Outlook Scheduling Assistant and Google Find a Time features.
As explained in this Microsoft support thread: “If you share your Calendar, Contacts, or Tasks folders with one or more people who have Read permissions, the Private feature will not prevent them from seeing the details of your appointments. In addition, anyone with Read access to your folders could use programmatic methods or other email applications to view the details of your private items.”
Configure the tag appended to the subject of event copies
By default, CalendarBridge appends “(copy)” to the subject of event copies. If you would like to replace “(copy)” with some other text (e.g., some text that indicates the calendar that the event came from), type that text in this textbox. If you would not like CalendarBridge to add any tag to the subject of event copies, toggle the “No Tag” switch.
Important notes about choosing a tag:
- No Tag is not recommended because it can quickly become confusing as to which events originated from which calendar. If your concern is that “(copy)” looks strange to coworkers, the recommended approach is to use the “make private” setting instead. If you are sure you want to disable tagging of event copies, then it is recommended to at least set a custom color for event copies (steps 5c and 5e, above).
- Choose a tag that will not likely occur “naturally” at the end of an event subject. For example, wrap the tag in parenthesis or include a special character.
When you have all the above settings configured as desired, click “Continue to Options” to bring up the Sync Options screen.
Configure Event Color and Event Filtering
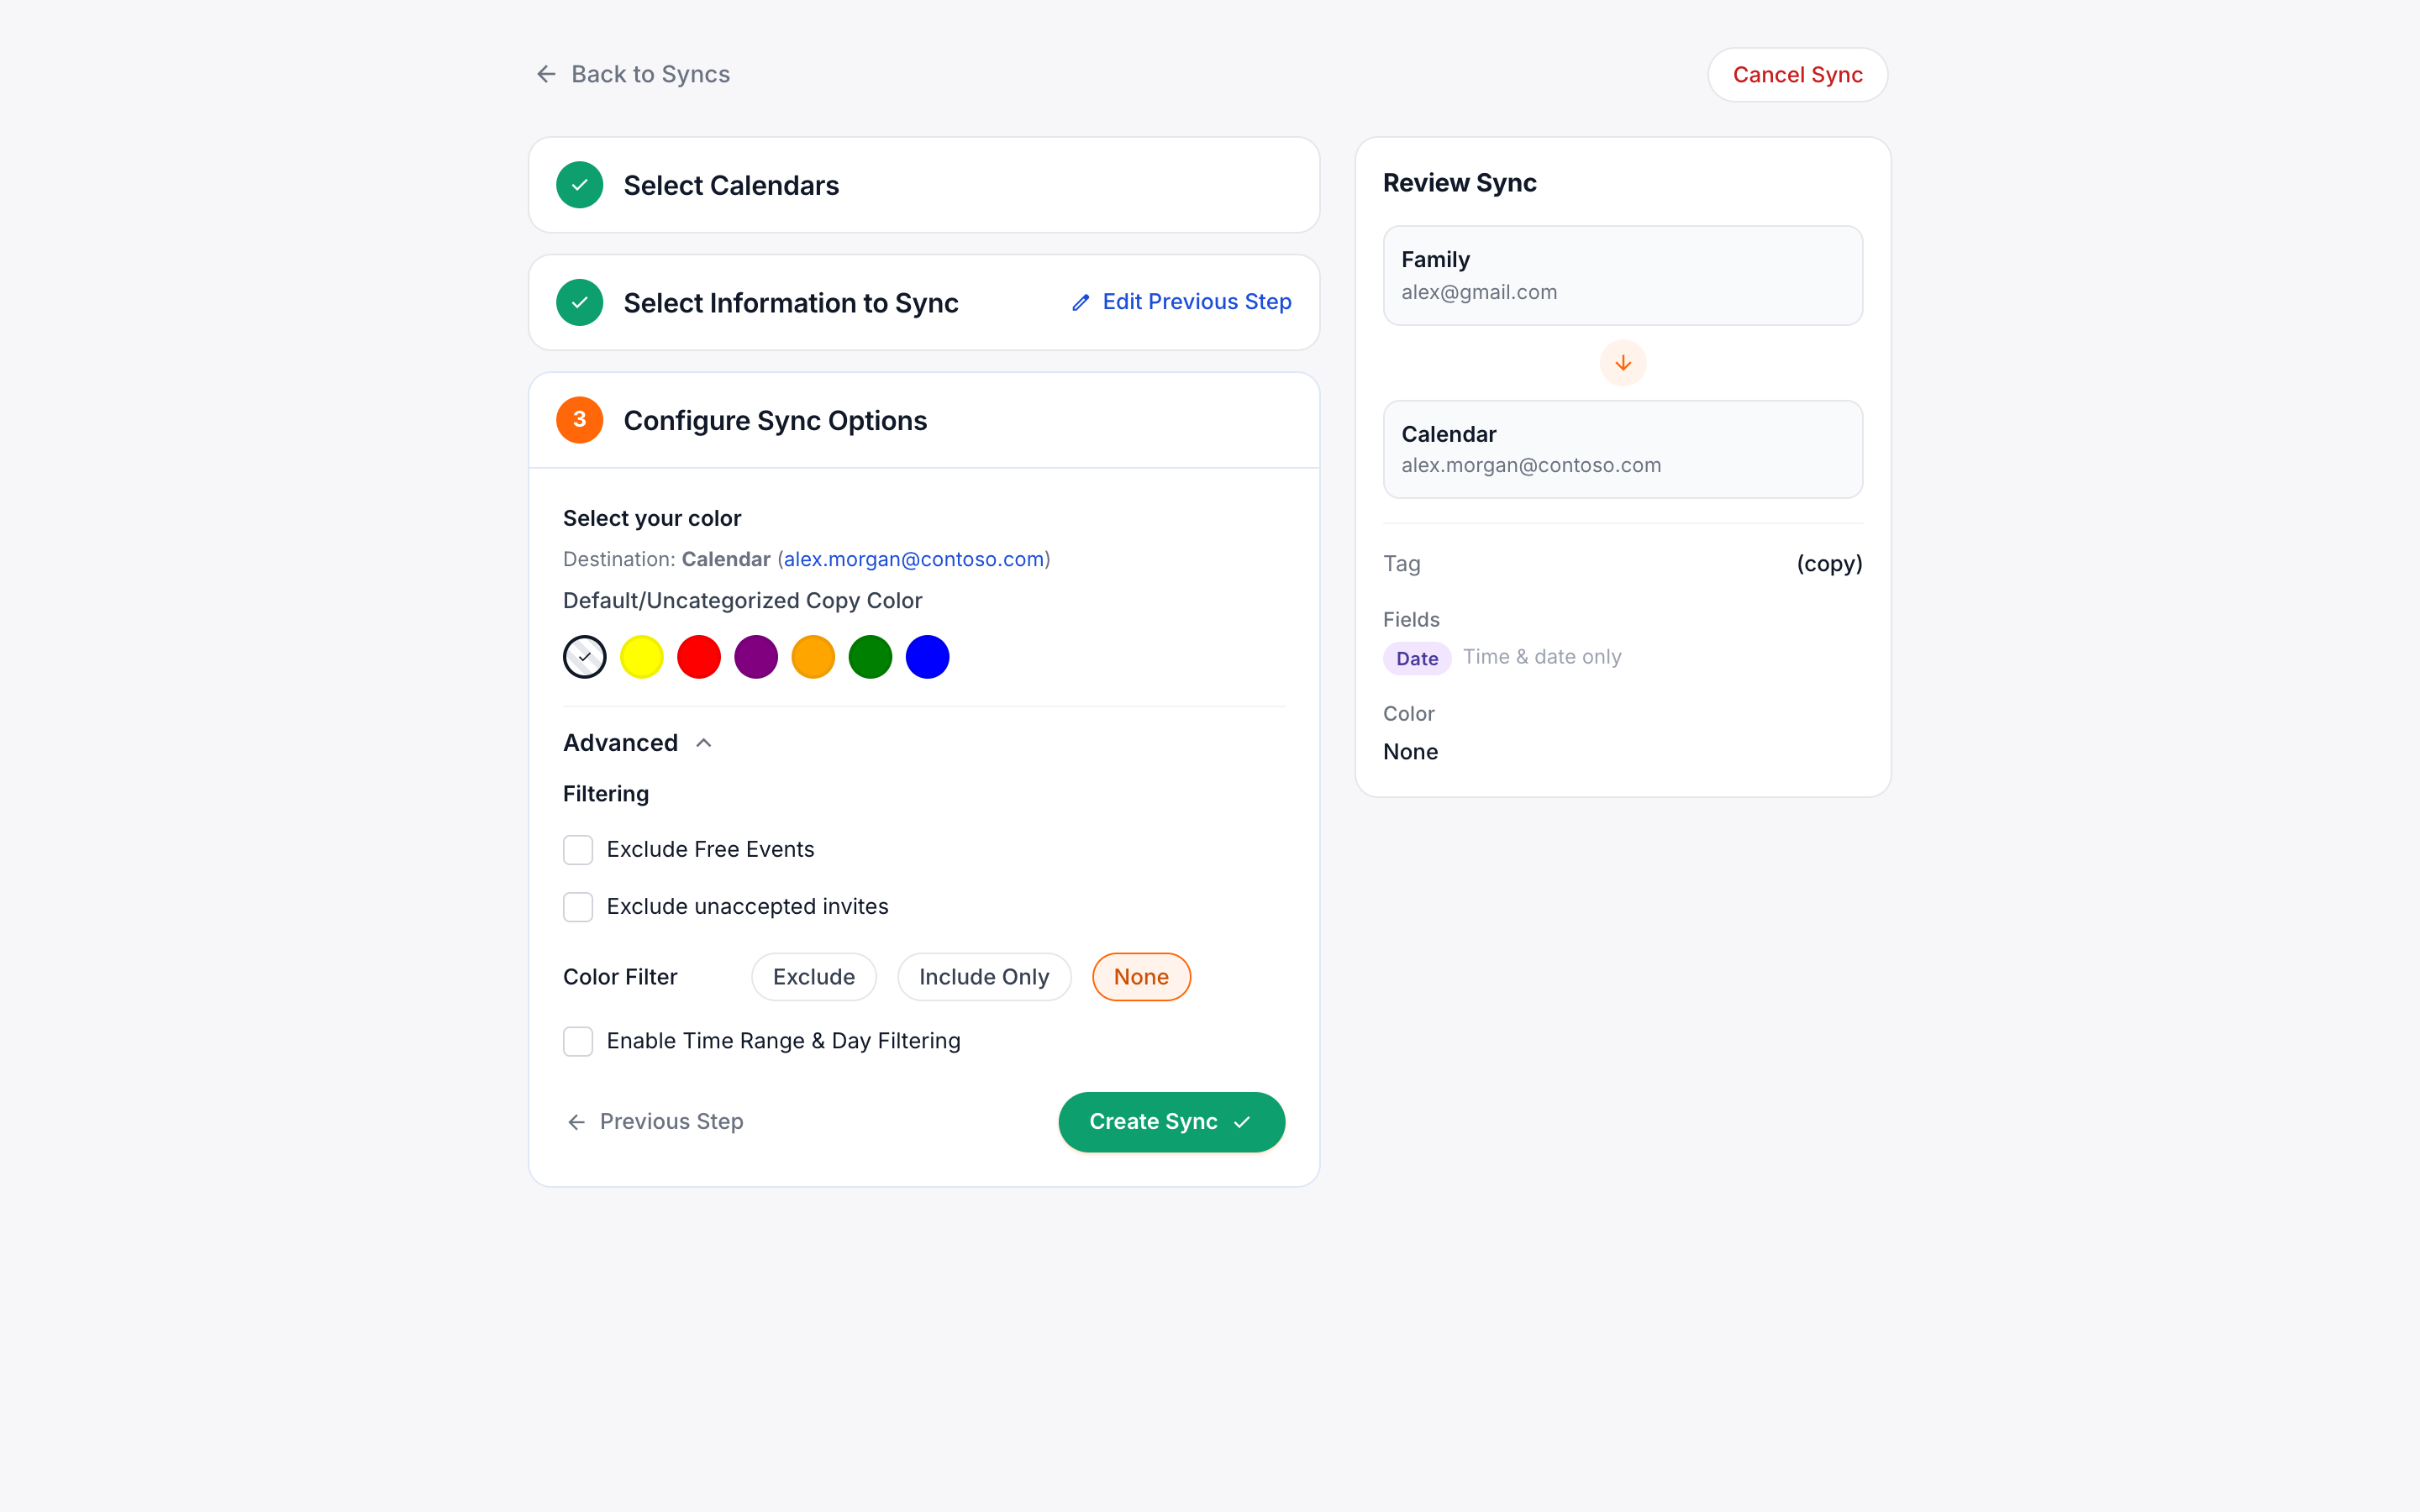
- Default/uncategorized Copy Color. The value/color selected in this dropdown controls the color of uncategorized event copies on the destination calendar. “Calendar Default” means the default color assigned to the destination calendar in Outlook or Google Calendar.
- Match Event Source Colors. With this switch in the off position, all event copies will use the color set for uncategorized events copies – regardless of whether the event has been categorized on the source calendar. With this switch in the on position, event copies of categorized events will have the color of the original event on the source calendar.
- Note: this requires the category names to be the same on the source calendar and the destination calendar.
- Note: this setting is only available when the source calendar and the destination calendar are of the same type (i.e., both source and destination calendar are Microsoft, or both source and destination calendars are Google).
- Note: color coding is not currently available for iCloud or ICS URLs.
Filtering events you do not want synced
In the “Advanced” section, you have the option of setting filters that will prevent CalendarBridge from syncing certain events. Note filtering is only available for Google and Microsoft accounts — filtering is not supported for Apple or ICS URLs.
Exclude Free Events
If you activate this setting, CalendarBridge will not sync events that are designated as “free” on the source calendar. (For example, all-day events are set as “free” by default in both Google and Outlook Calendars.)
Exclude tentative events
This setting is available when the source calendar is an Outlook calendar. If you activate it, CalendarBridge will not sync events that are set as “tentative” in your Outlook calendar. By default, Outlook marks invitations that you have received but not accepted as “tentative.”
Exclude Unaccepted Events
This setting is available when the source calendar is a Google calendar. If you activate it, CalendarBridge will not sync events resulting from invitations that you have received, but not accepted on your Google calendar.
Exclude Source events with a specific color/category
This setting allows you to designate a color (Google source calendar) /category (Outlook source calendar) that, when applied to an event on the source calendar, will result in CalendarBridge not syncing that event to the destination calendar. This enables deciding which events to sync and not to sync on a per-event basis. Please note that, for Outlook source calendar, your category name must exactly match the default name that Outlook uses (“Green category”, “Yellow category” etc.).
Only Sync Events of a Specific Color
This is the inverse of the above setting. Only the events that match the selected color/category will be synced, and all others will be ignored. This is helpful if you assign a color to work events, personal events, travel events, etc., and only want a specific subset to sync.
Enable Time Range & Day Filtering
This allows you to sync only the events that fall within specific hours and specific days of the week. Events occurring outside the selected range will not be synced.
Once the sync options are configured as desired, click “Review Sync,” to bring up the final review screen:
If you need to change something, click “Back,” otherwise click “Create” to establish the sync connection and return to your syncs overview page.
It may take up to 15 minutes for the initial sync to complete. Until the initial sync is complete, you will see a progress indicator on the sync overview page (refresh the page to update the progress indicator):
When the sync is complete the progress indicator will be replaced by “Active and Up-to-Date.” (To refresh the status, you must refresh the page)
Sync connection setup is now complete. Repeat these steps for each pair of calendars you want to sync.