Bulk Jobs
Create — or remove — many calendar sync connections and user seats at once. Import a list, choose the settings a single time, and CalendarBridge works through it in the background — with per‑row status and errors you can fix and retry.
What Bulk Jobs are for
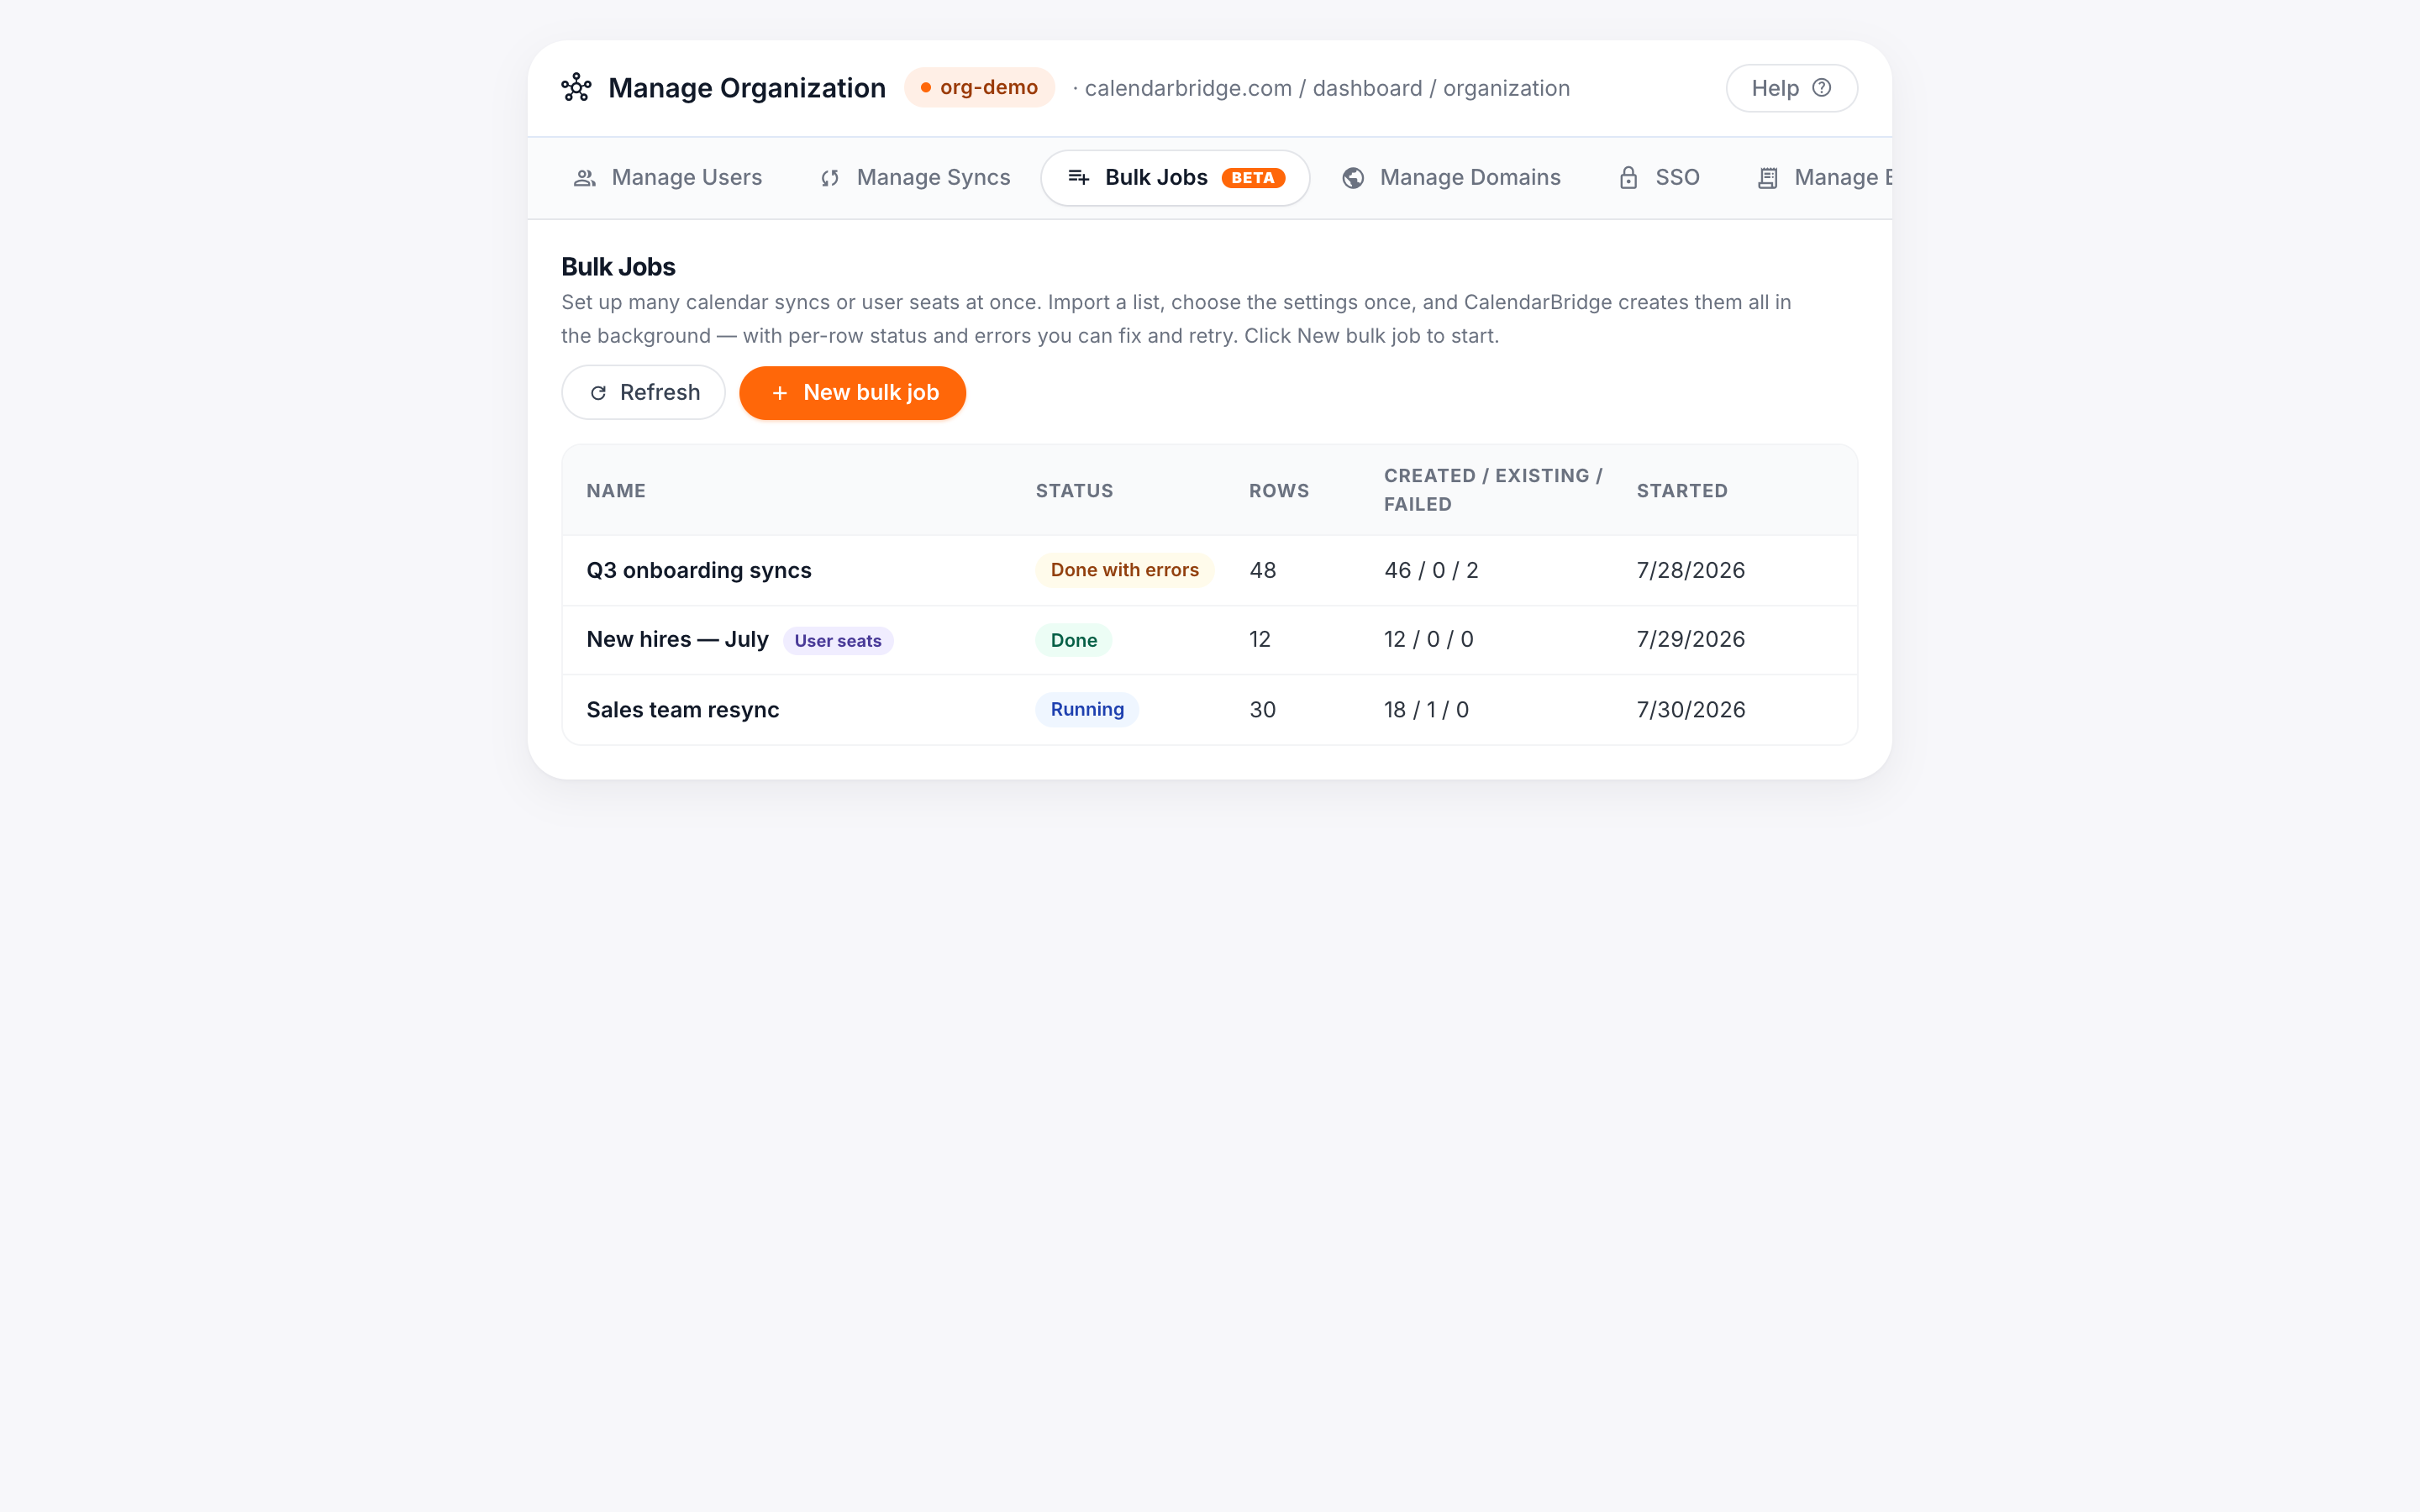
Bulk Jobs is a tab in the organization admin portal. Instead of adding or removing sync connections and users one at a time, you provide a single list and CalendarBridge works through every item in one run. A job comes in four types:
- Sync connections — create many one‑way calendar syncs (optionally with their reverse direction too) from a list of source → destination calendars.
- User seats — provision many users at once, each with a plan, an access‑control policy, and (optionally) pre‑connected calendar accounts.
- Delete syncs — pick sync connections from your live sync list and delete them all at once, cleaning the copied events out of the destination calendars.
- Remove users — pick users from your member list and remove them from your organization at once, like the per‑user Delete on the Manage Users tab.
You configure the settings once for the whole job, so every row is created consistently. Because large jobs are paced to protect the calendar providers’ rate limits, they run in the background — it’s safe to leave the page while a job runs.
Before you start
- You must be an organization admin, and the domains you use must be authorized domains on your organization. The wizard lists your authorized domains at the top for reference. See Connect Authorized Domains.
- Creating syncs or users consumes seats. If your subscription doesn’t have enough, CalendarBridge will either add them automatically (metered plans) or ask you to authorize the additional seats before the job starts (prepaid plans). See Seats and billing below.
Create a bulk sync job
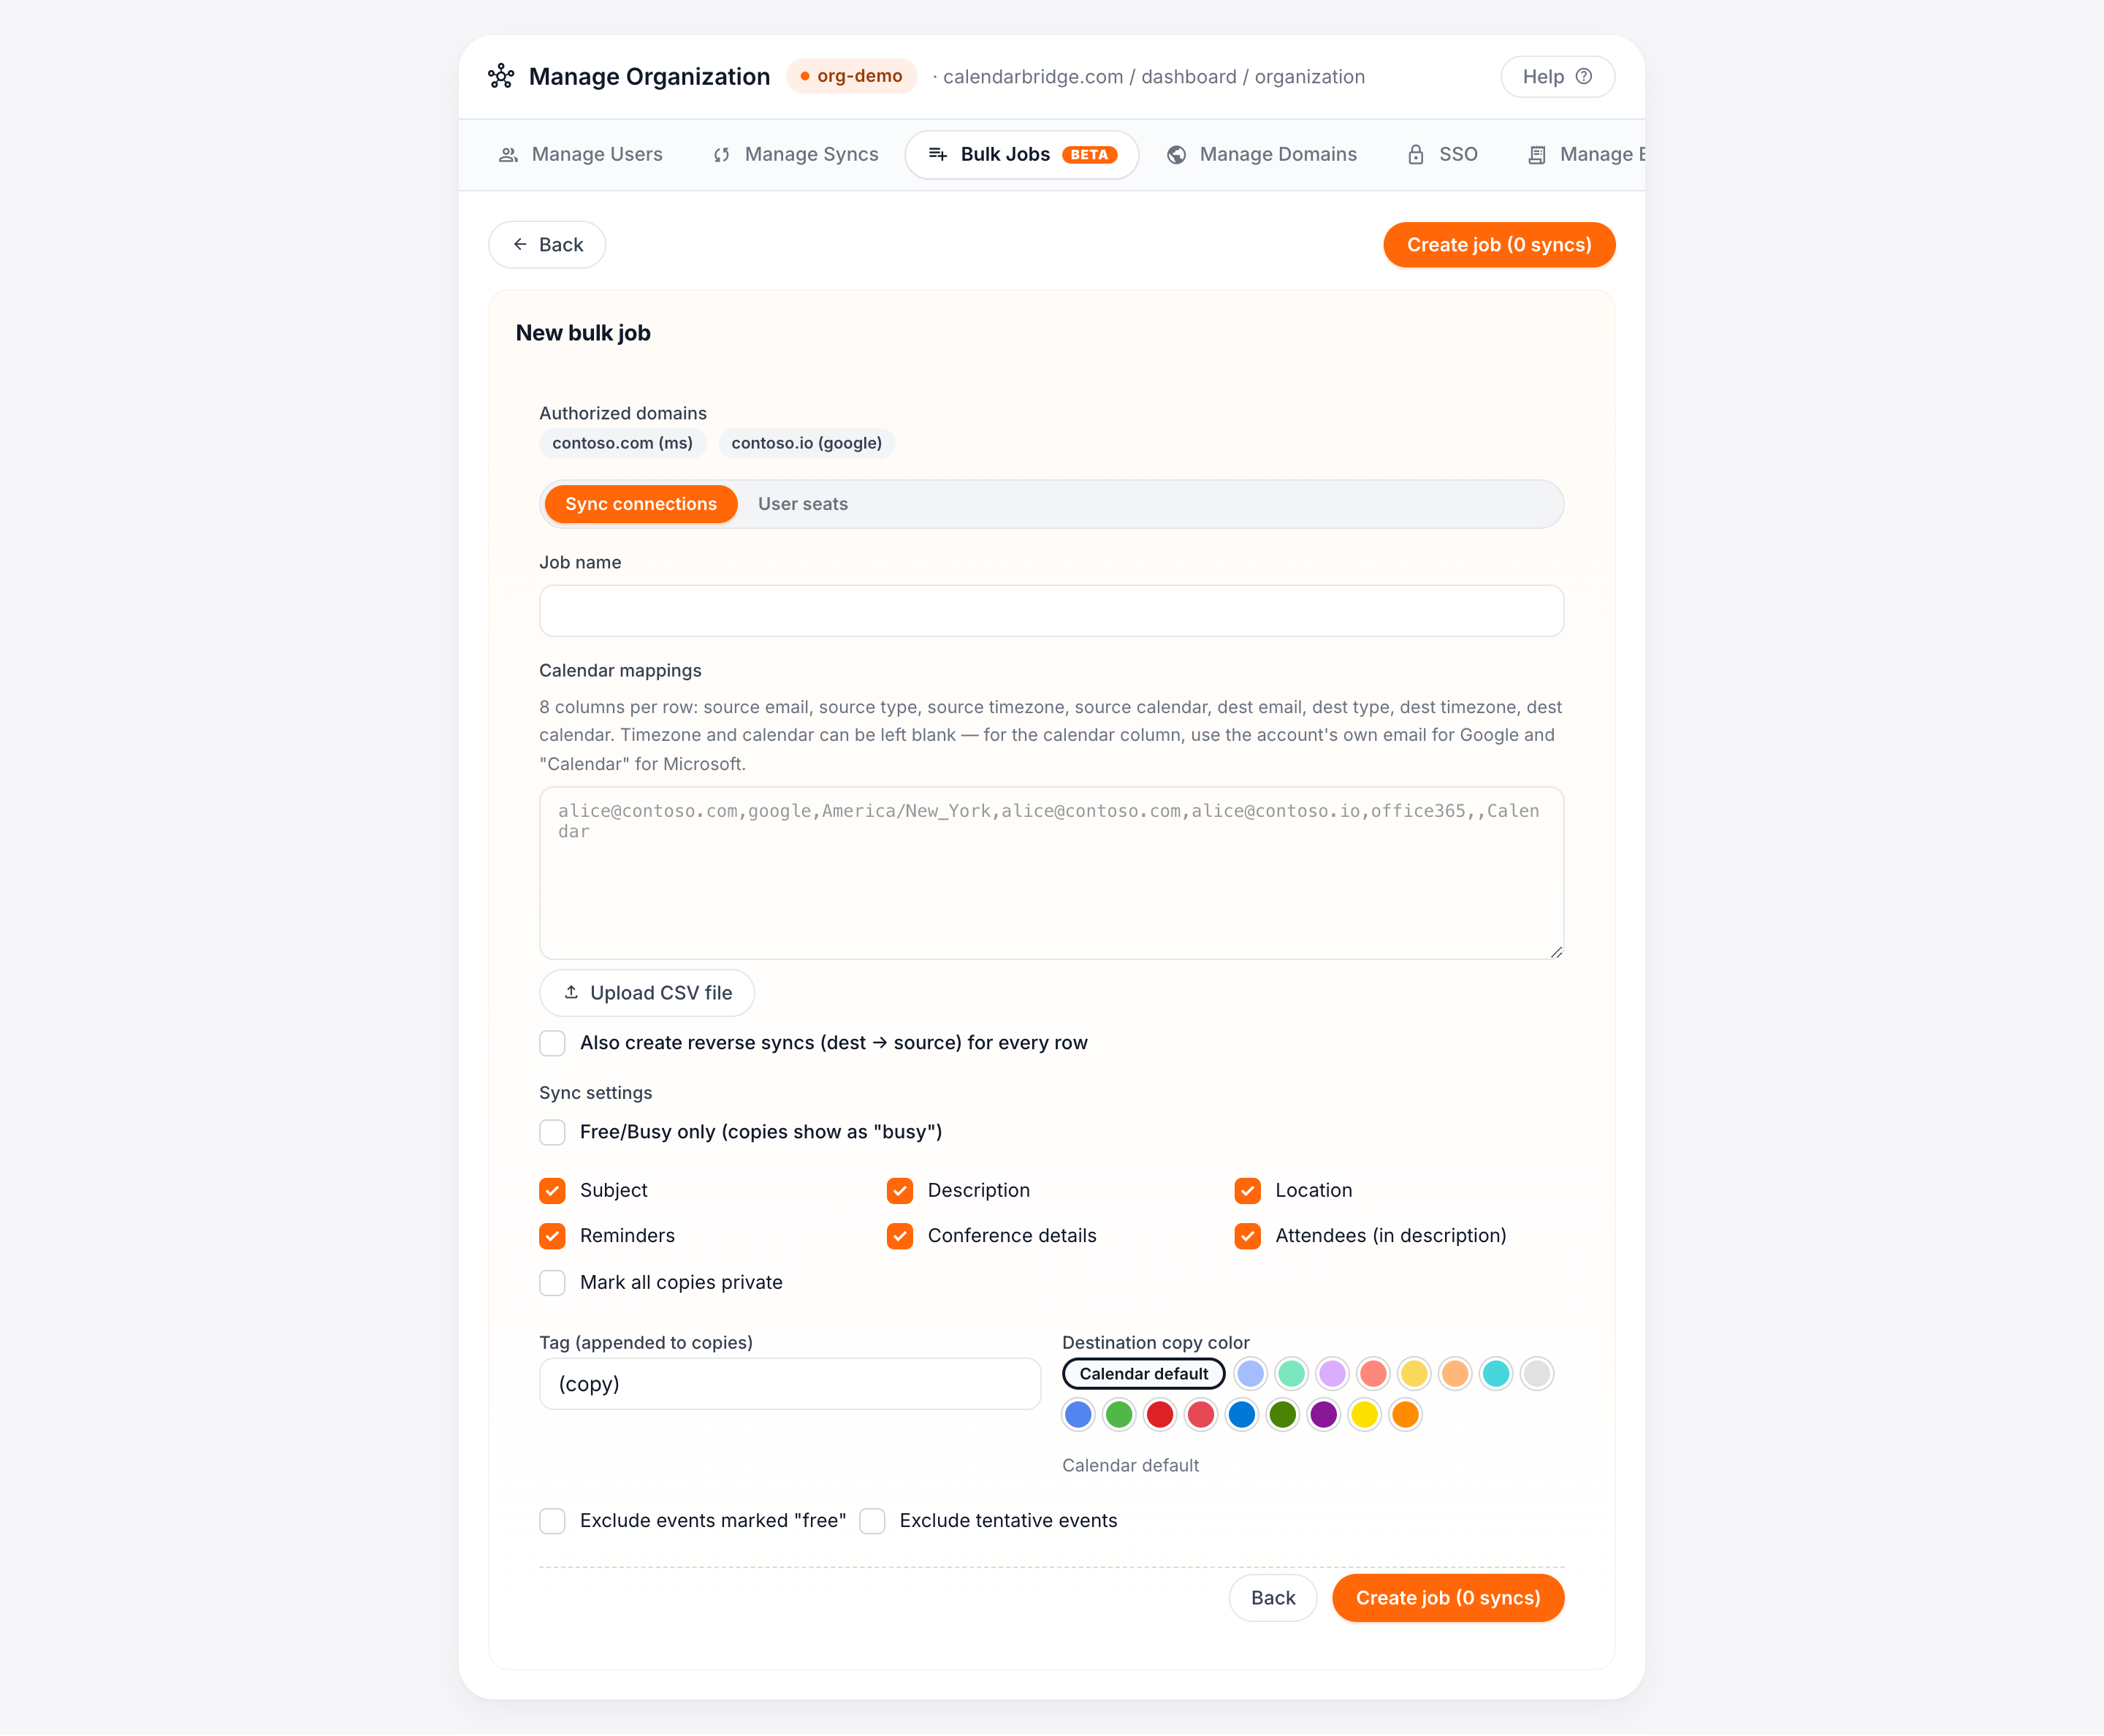
-
Open Bulk Jobs and click “New bulk job”
In the organization admin portal, open the Bulk Jobs tab and click New bulk job. Leave the type set to Sync connections.
-
Provide the calendar mappings
Paste or upload a CSV with one row per sync. Each row has eight columns:
source email, source type, source timezone, source calendar, dest email, dest type, dest timezone, dest calendar- Type is
google,office365, orexchange. - Timezone and calendar are optional. For the calendar column, use the account’s own email address for Google and
Calendarfor Microsoft; leave it blank to use the default calendar.
As you paste, a preview grid validates every row and flags problems (unauthorized domains, unknown types, malformed emails) so you can fix them before the job is created.
- Type is
-
(Optional) Also create the reverse syncs
Turn on “Also create reverse syncs” to create the destination → source direction for every row as well. The reverse legs get their own settings panel, so you can, for example, use a different tag or color for events copied back the other way.
-
Choose the sync settings once
Set the field policy (which event details are copied), the tag appended to copies, the destination color, and any filters. These apply to every row. You can override the tag and color for individual rows right in the preview grid.
-
Create the job, then preflight it
Click Create job. On the job page, click Check setup to run a pre‑flight: CalendarBridge verifies tenant access for each distinct account and reports any billing shortfall before you commit. Fix any blockers, then click Start.
Create a bulk user‑seats job
-
Click “New bulk job” and choose “User seats”
In the Bulk Jobs tab, click New bulk job and switch the type to User seats.
-
Provide the user list
Paste or upload a CSV with one user per row:
email, an optionalplan, and then any optional connected‑account emails as extra columns.- The login email can be on any domain — contractors and personal addresses are fine.
- To pre‑connect a calendar account for a user, add its exact email as an extra column. CalendarBridge does not guess addresses across domains. If a domain is authorized on both Google and Microsoft, disambiguate with
:googleor:office365after the email (for examplebob@corp.com:google).
-
Choose the seat settings
Pick the default plan and the sync field policy (All fields, Free/Busy only, or Custom). You can also check “Block AI assistant & MCP access” to turn off the AI scheduling assistant and the MCP server for every user this job creates.
-
Create, preflight, and start
Click Create job, then Check setup to validate tenant access and seats, and Start. Each user is created with a login and an invite email, just like adding a user individually.
Bulk delete sync connections
A Delete syncs job removes many managed sync connections in one run — typically when people leave and you want their syncs cleaned up. Deleting a sync also removes the events it copied from the destination calendars, the same as deleting a sync individually.
-
Click “New bulk job” and choose “Delete syncs”
In the Bulk Jobs tab, click New bulk job and switch the type to Delete syncs.
-
Pick the syncs
Your organization’s sync connections are listed with checkboxes. Use the search box to filter — for example by a departing user’s name or email — then check the syncs to delete, or use Select all on the filtered list.
-
Create the job and review the list
Click Create delete job. Nothing is deleted yet — the job page shows one row per selected sync so you can double‑check the list.
-
Start the job
Click Start and confirm. Deletions run a few at a time in the background; each row shows Deleting while its copied events are removed and Deleted when the sync is gone. Deleting cannot be undone.
Deleting syncs does not change your subscription: the freed sync seats simply become available again. To reduce your seat count for the next billing cycle, remove the licenses from the Manage Billing tab.
Bulk remove users
A Remove users job removes each selected user from your organization — the same thing as the per‑user Delete on the Manage Users tab, done many times over: the account is deactivated, its syncs stop updating, and the license leaves your organization. Your subscription is not changed — the freed seats stay available on your plan.
-
Click “New bulk job” and choose “Remove users”
In the Bulk Jobs tab, click New bulk job and switch the type to Remove users.
-
Pick the users
Your organization’s members are listed with checkboxes. Use the search box to filter, then check the users to remove. Your own account can’t be selected.
-
Create, review, and start
Click Create delete job, review the rows, then click Start and confirm. Users are removed a few at a time; each row shows Removed when done.
Watch a job and fix errors
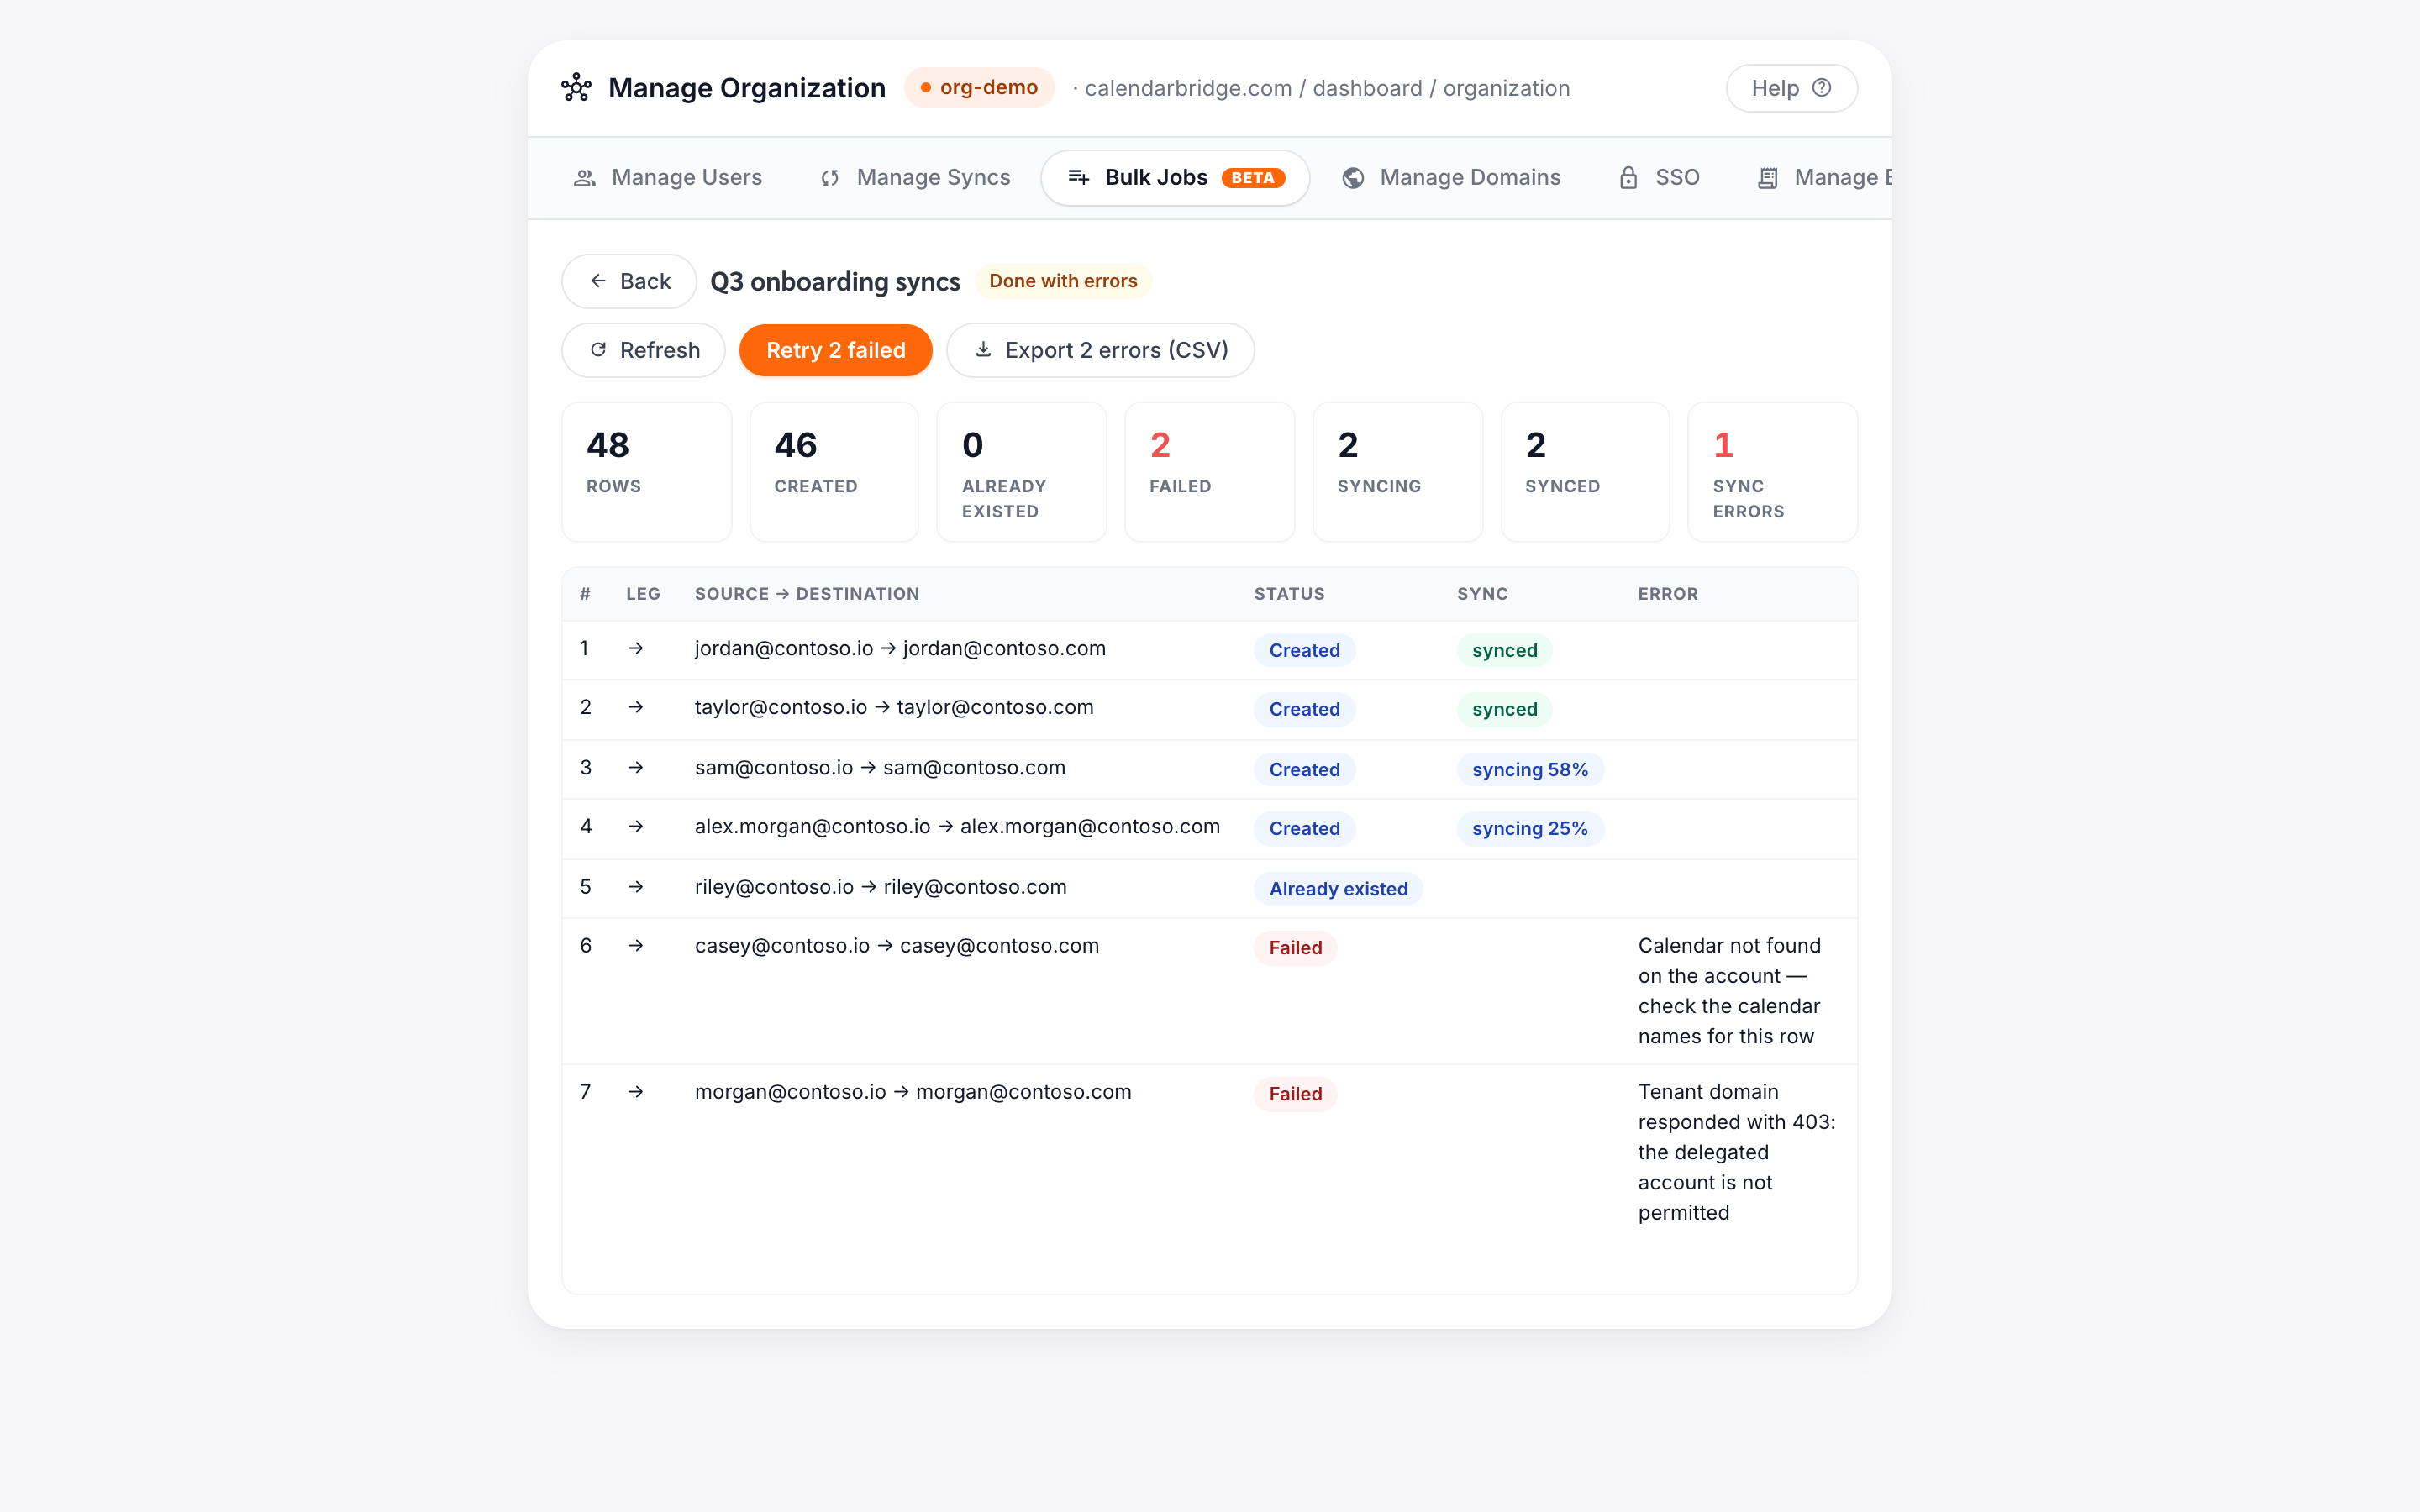
While a job runs, the job page shows a live summary (created, already existed, failed, and — for syncs — how many are still syncing) and a per‑row table with each row’s status. You can pause, resume, or cancel a running job at any time.
- Rows that fail show a specific reason (for example, a tenant permission problem or a calendar that couldn’t be found).
- Click Retry failed to re‑run just the failed rows after you’ve fixed the underlying issue.
- Click Export errors to download a CSV of the failed rows with their error messages. It’s formatted so that, once you’ve corrected the values, you can paste it straight back in as a new job.
Seats and billing
Every sync connection or user created by a job needs a seat, exactly as when you add one individually. Delete jobs never consume seats — and they never change your subscription either: seats freed by deleted syncs or removed users stay on your plan as available seats. To reduce your seat count for the next billing cycle, remove licenses from the Manage Billing tab.
- Metered subscriptions add the needed seats to your subscription automatically as rows are created — you’re only billed for what’s actually created.
- Prepaid subscriptions draw from your seat pool. If a job needs more seats than you have, the pre‑flight reports the shortfall and the Start button becomes “Add N seats & start.” Clicking it purchases exactly the shortfall (billed with proration) and then starts the job. You can also add seats yourself first from the Manage Billing tab.