Schedulers
Give people a public link to book time with you — without the email ping-pong. A scheduler reads availability from your connected calendars, applies the rules you set (length, working hours, buffers, lead time), and writes the booking back to the calendar of your choice. This guide walks the whole flow: creating a scheduler, tuning availability, customizing the booking page, sharing it, and managing the ones you’ve already published.
Scheduler basics
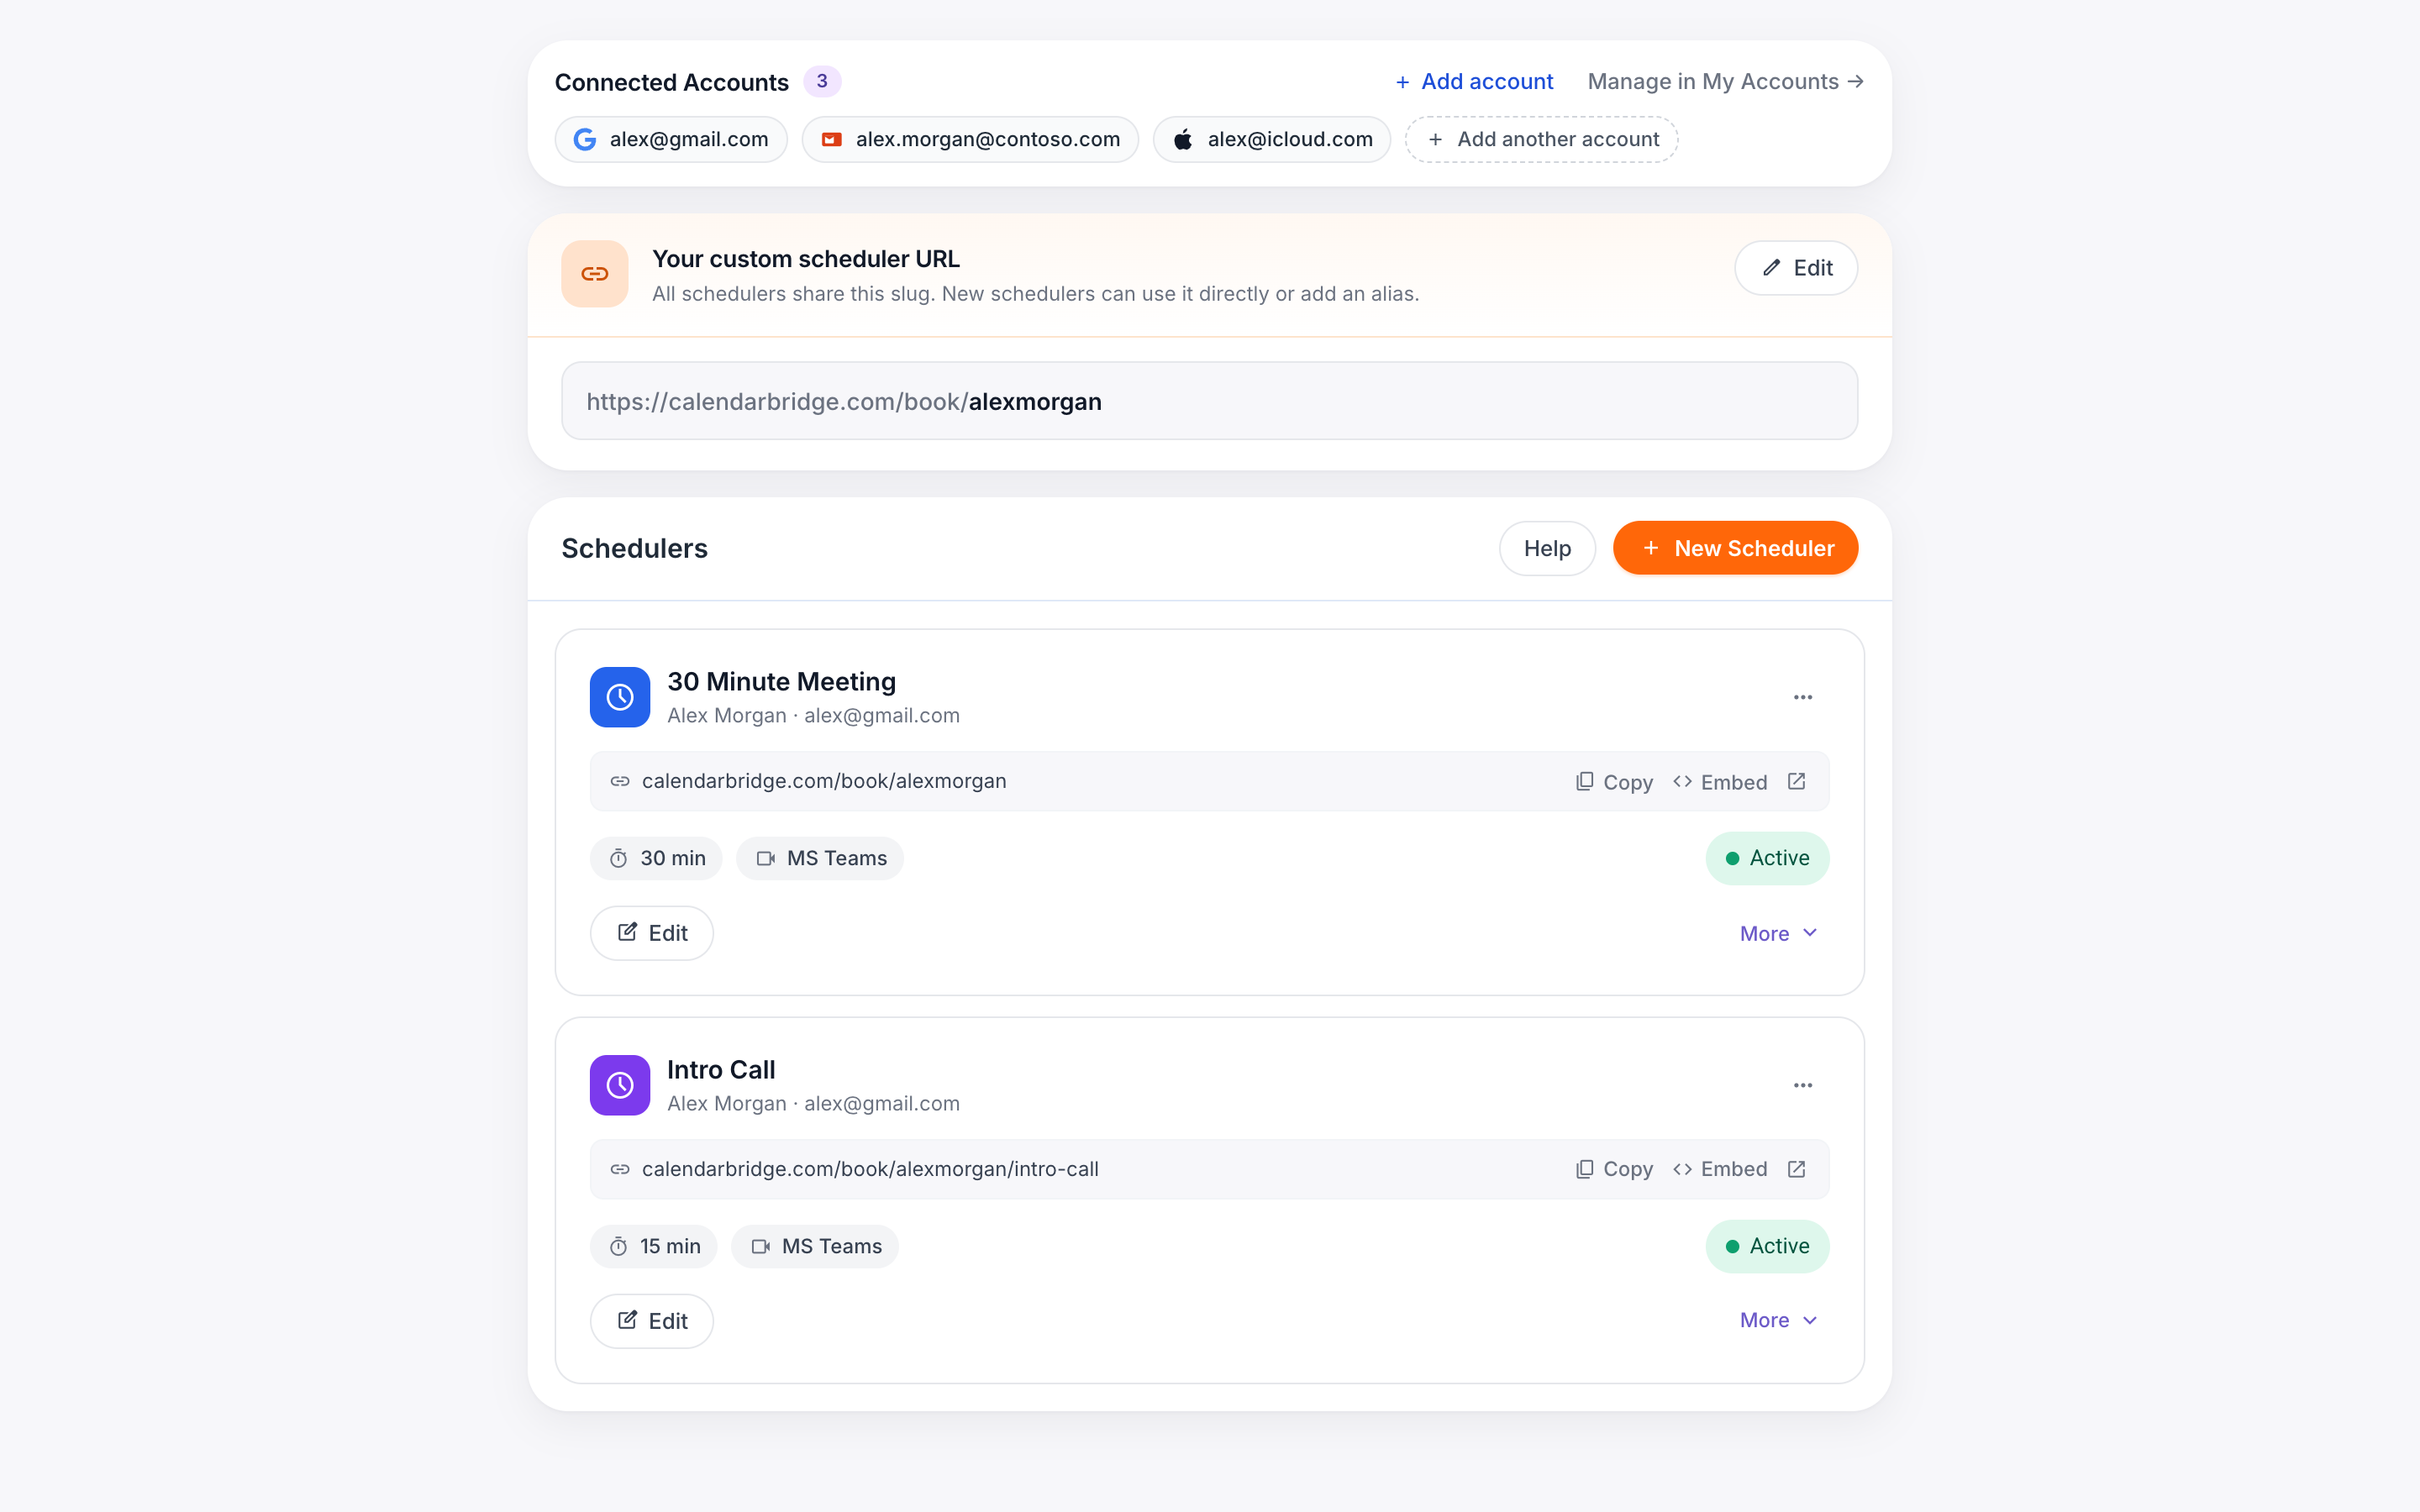
Open Schedulers from the side rail. At the top of the page is your Connected Accounts card — you need at least one calendar account connected here before you can create a scheduler. Below it is the Schedulers card itself, with a New Scheduler button on the right and a grid of any schedulers you’ve already created.
What a scheduler does
Every scheduler is a public booking page with its own URL — for example calendarbridge.com/book/userx/30min. When someone visits it, CalendarBridge:
- Reads free/busy from your booking calendar and any extra calendars you’ve attached, so already-busy times are hidden.
- Applies your working hours, lead time, and buffer windows to narrow the offered slots.
- Lets the visitor pick a time, fill in name, email, and any custom questions, then writes the event onto your booking calendar — and any other calendars you’re syncing with.
The scheduler card at a glance
Each scheduler in the grid shows up as a card with five regions:
- Header — colored icon, scheduler name, the account and email it’s tied to, plus a ⋯ menu with Edit, Clone, and Delete.
- URL row — the public link with a one-click Copy button and an Embed button that opens the iframe snippet.
- Quick stats — meeting length and the video conferencing provider, with an Active pill on the right.
- Footer — an Edit shortcut and a More / Less toggle.
- Expanded detail — when you click More, the card grows to show length, booking window, language, time format, first day of the week, lead time, buffers, custom-question count, online meeting type, extra calendars, and the full weekly working-hours grid.
Create a new scheduler
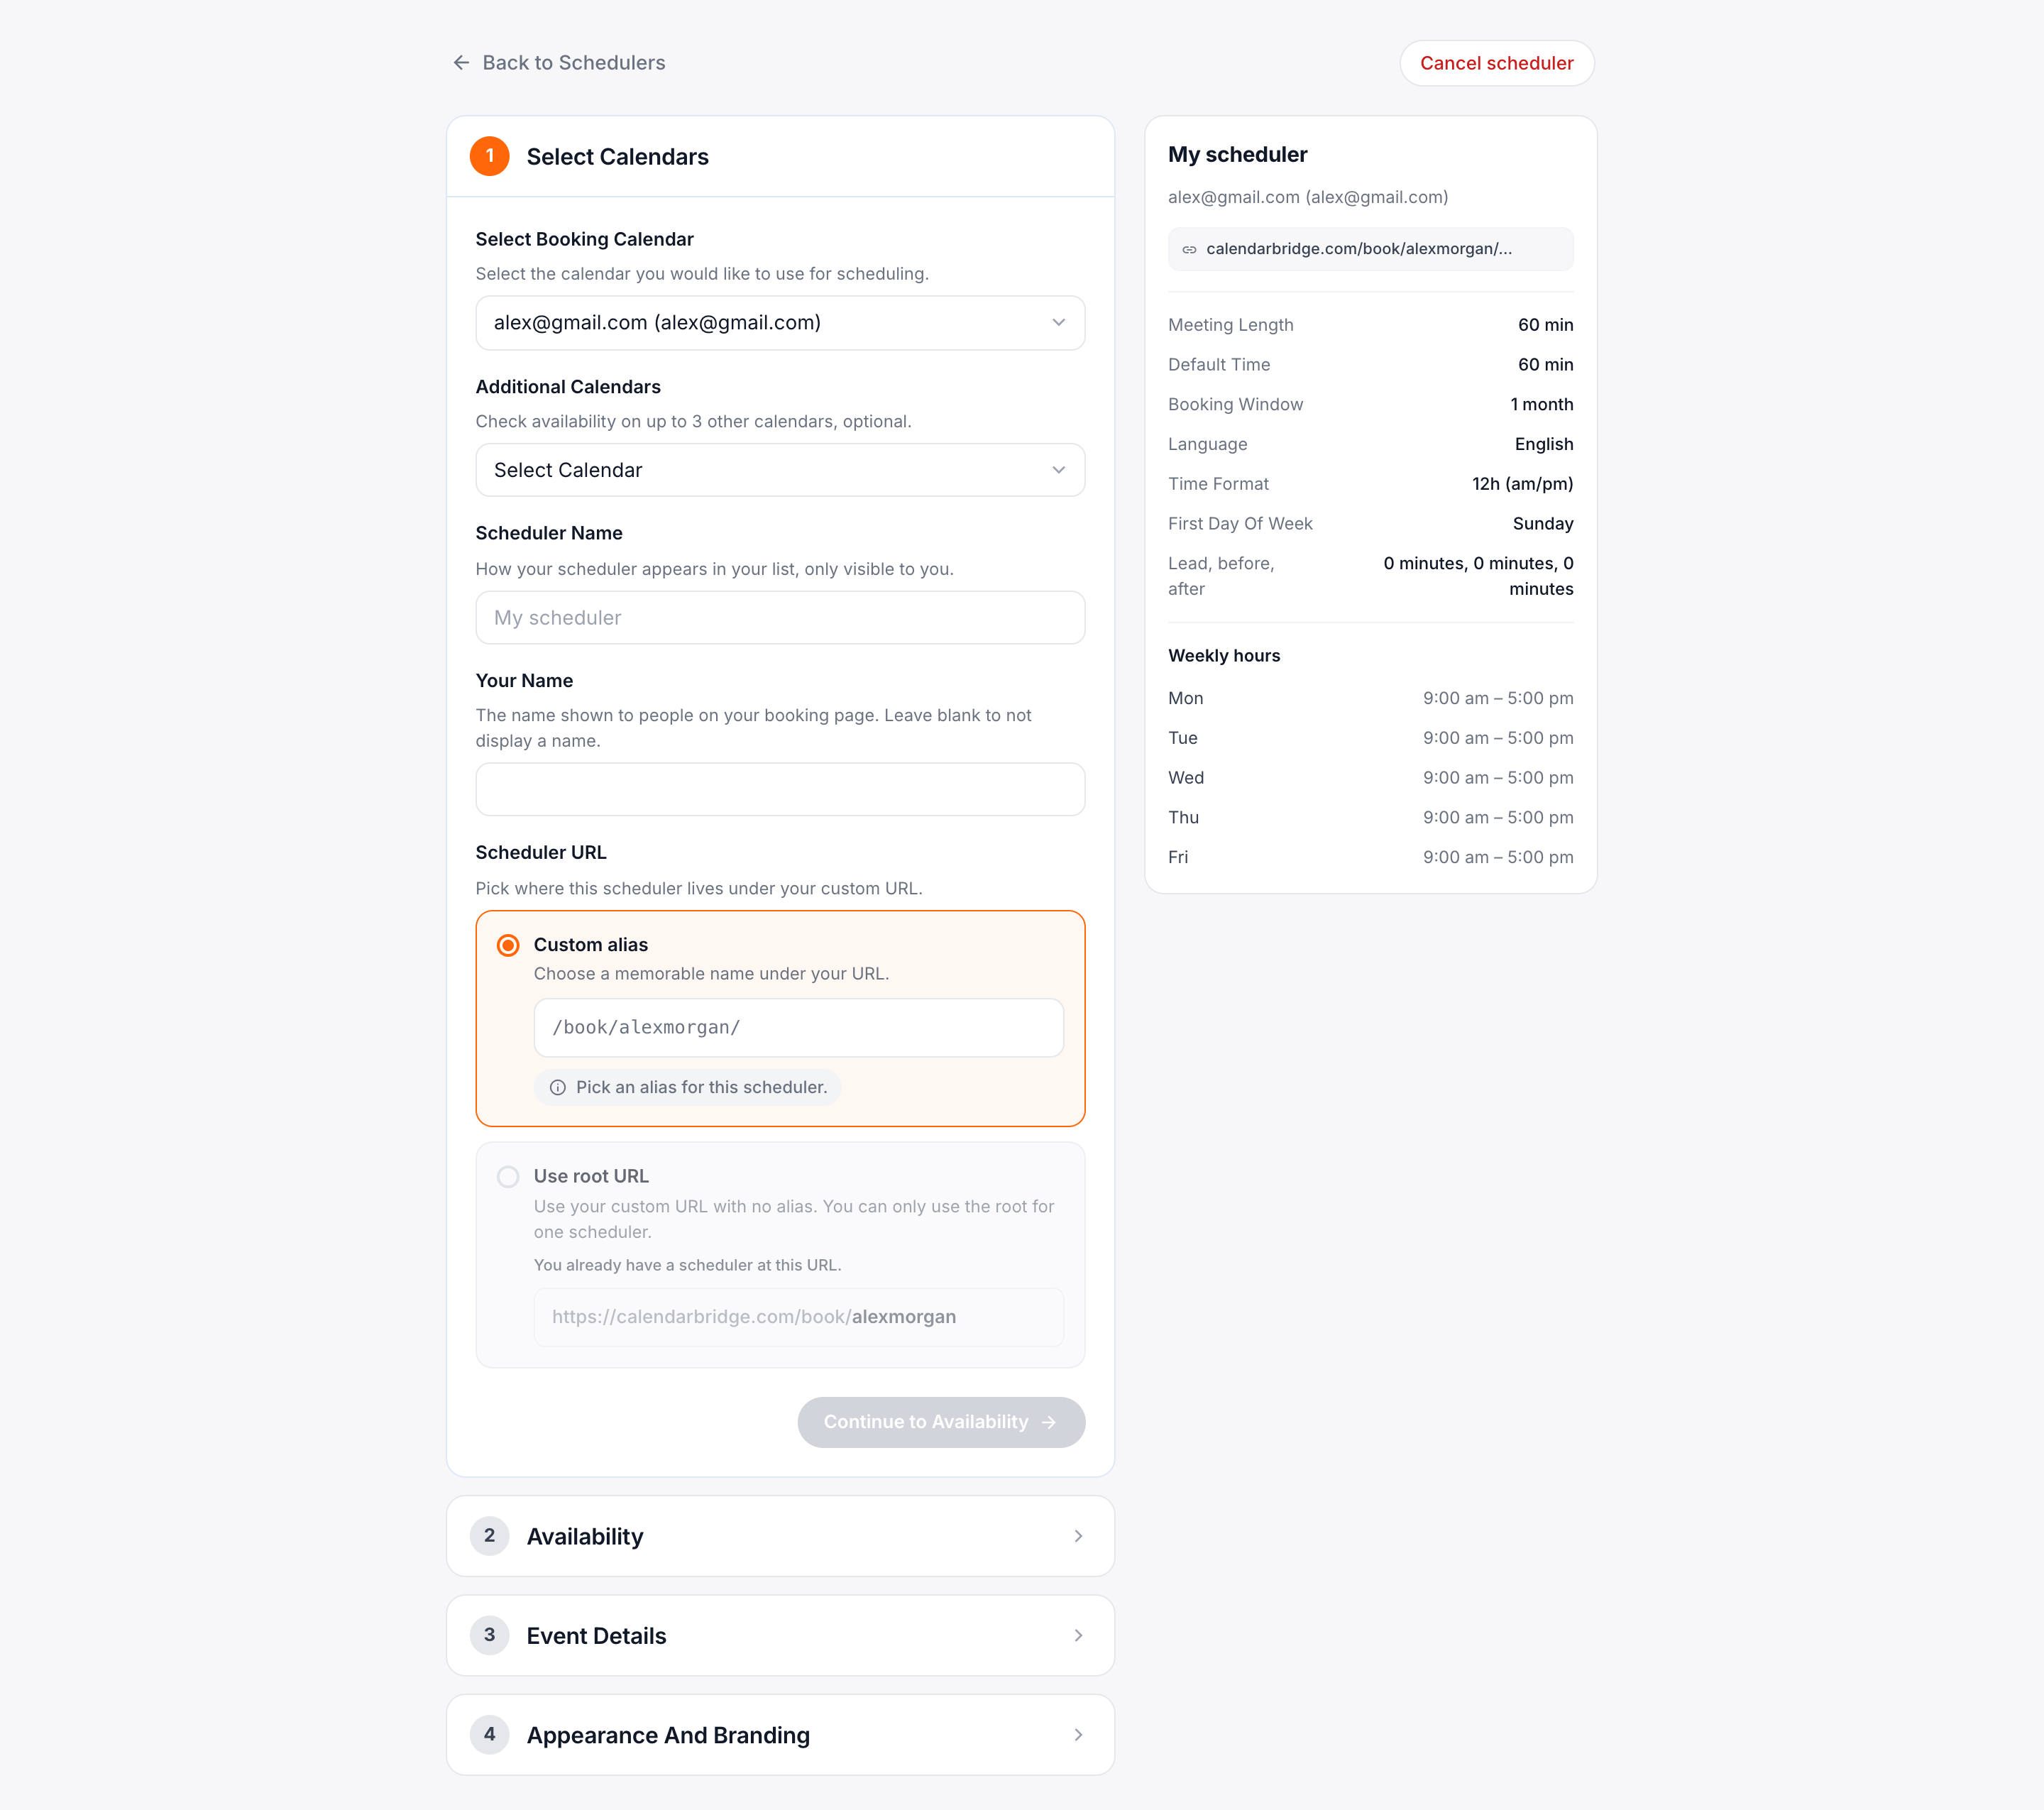
Click + New Scheduler in the top-right of the Schedulers card. The page swaps into a six-step builder with a live preview pinned to the right — the preview updates as you go, so you can see exactly what your booking page will say.
-
Pick calendars & name your scheduler
Step 1 covers the plumbing — which calendars the scheduler reads, and what to call it.
- Booking calendar — the calendar bookings are written to. Pick one of your connected calendars.
- Additional calendars to check — optional. Add any extra calendars you also want consulted for conflicts (think: your personal calendar, a shared team calendar). Their free/busy is honored, but bookings still land on the booking calendar above.
- Scheduler name — internal label, e.g. “30 min meeting” or “Design review.” This is what shows in your dashboard and in the page title of the booking page.
Click Next to advance to availability.
-
Set length, hours, and buffers
Step 2 controls when people can book. See Availability & buffers below for the full field-by-field walkthrough — at a glance:
- Pick a meeting length: 60, 30, or 15 minutes, or add a custom value.
- Toggle each weekday on or off and set start/end times.
- Set your timezone, booking window, minimum notice, and before/after buffers.
-
Configure the event itself
Step 3 decides what the resulting calendar event looks like. Set the subject line, a description, an event color, the video conferencing provider, any additional invitees, and as many custom questions as you need (see Event details & questions).
-
Polish the booking page
Step 4 covers the booker’s experience: welcome message, post-booking redirect URL, page language, time format, first day of the week, and an optional banner image and avatar.
-
Automate the follow-through (optional)
Step 5 is the workflow: up to two reminder emails before the meeting and one follow-up after it. Skip it entirely if you don’t need it.
-
Charge for bookings (optional)
Step 6 is payments: connect your own Stripe account, set a price, and choose a refund policy. Leave it switched off and the link stays free. Click Create scheduler to finish. You land back in the Schedulers grid with the new card already published.
Availability & buffers
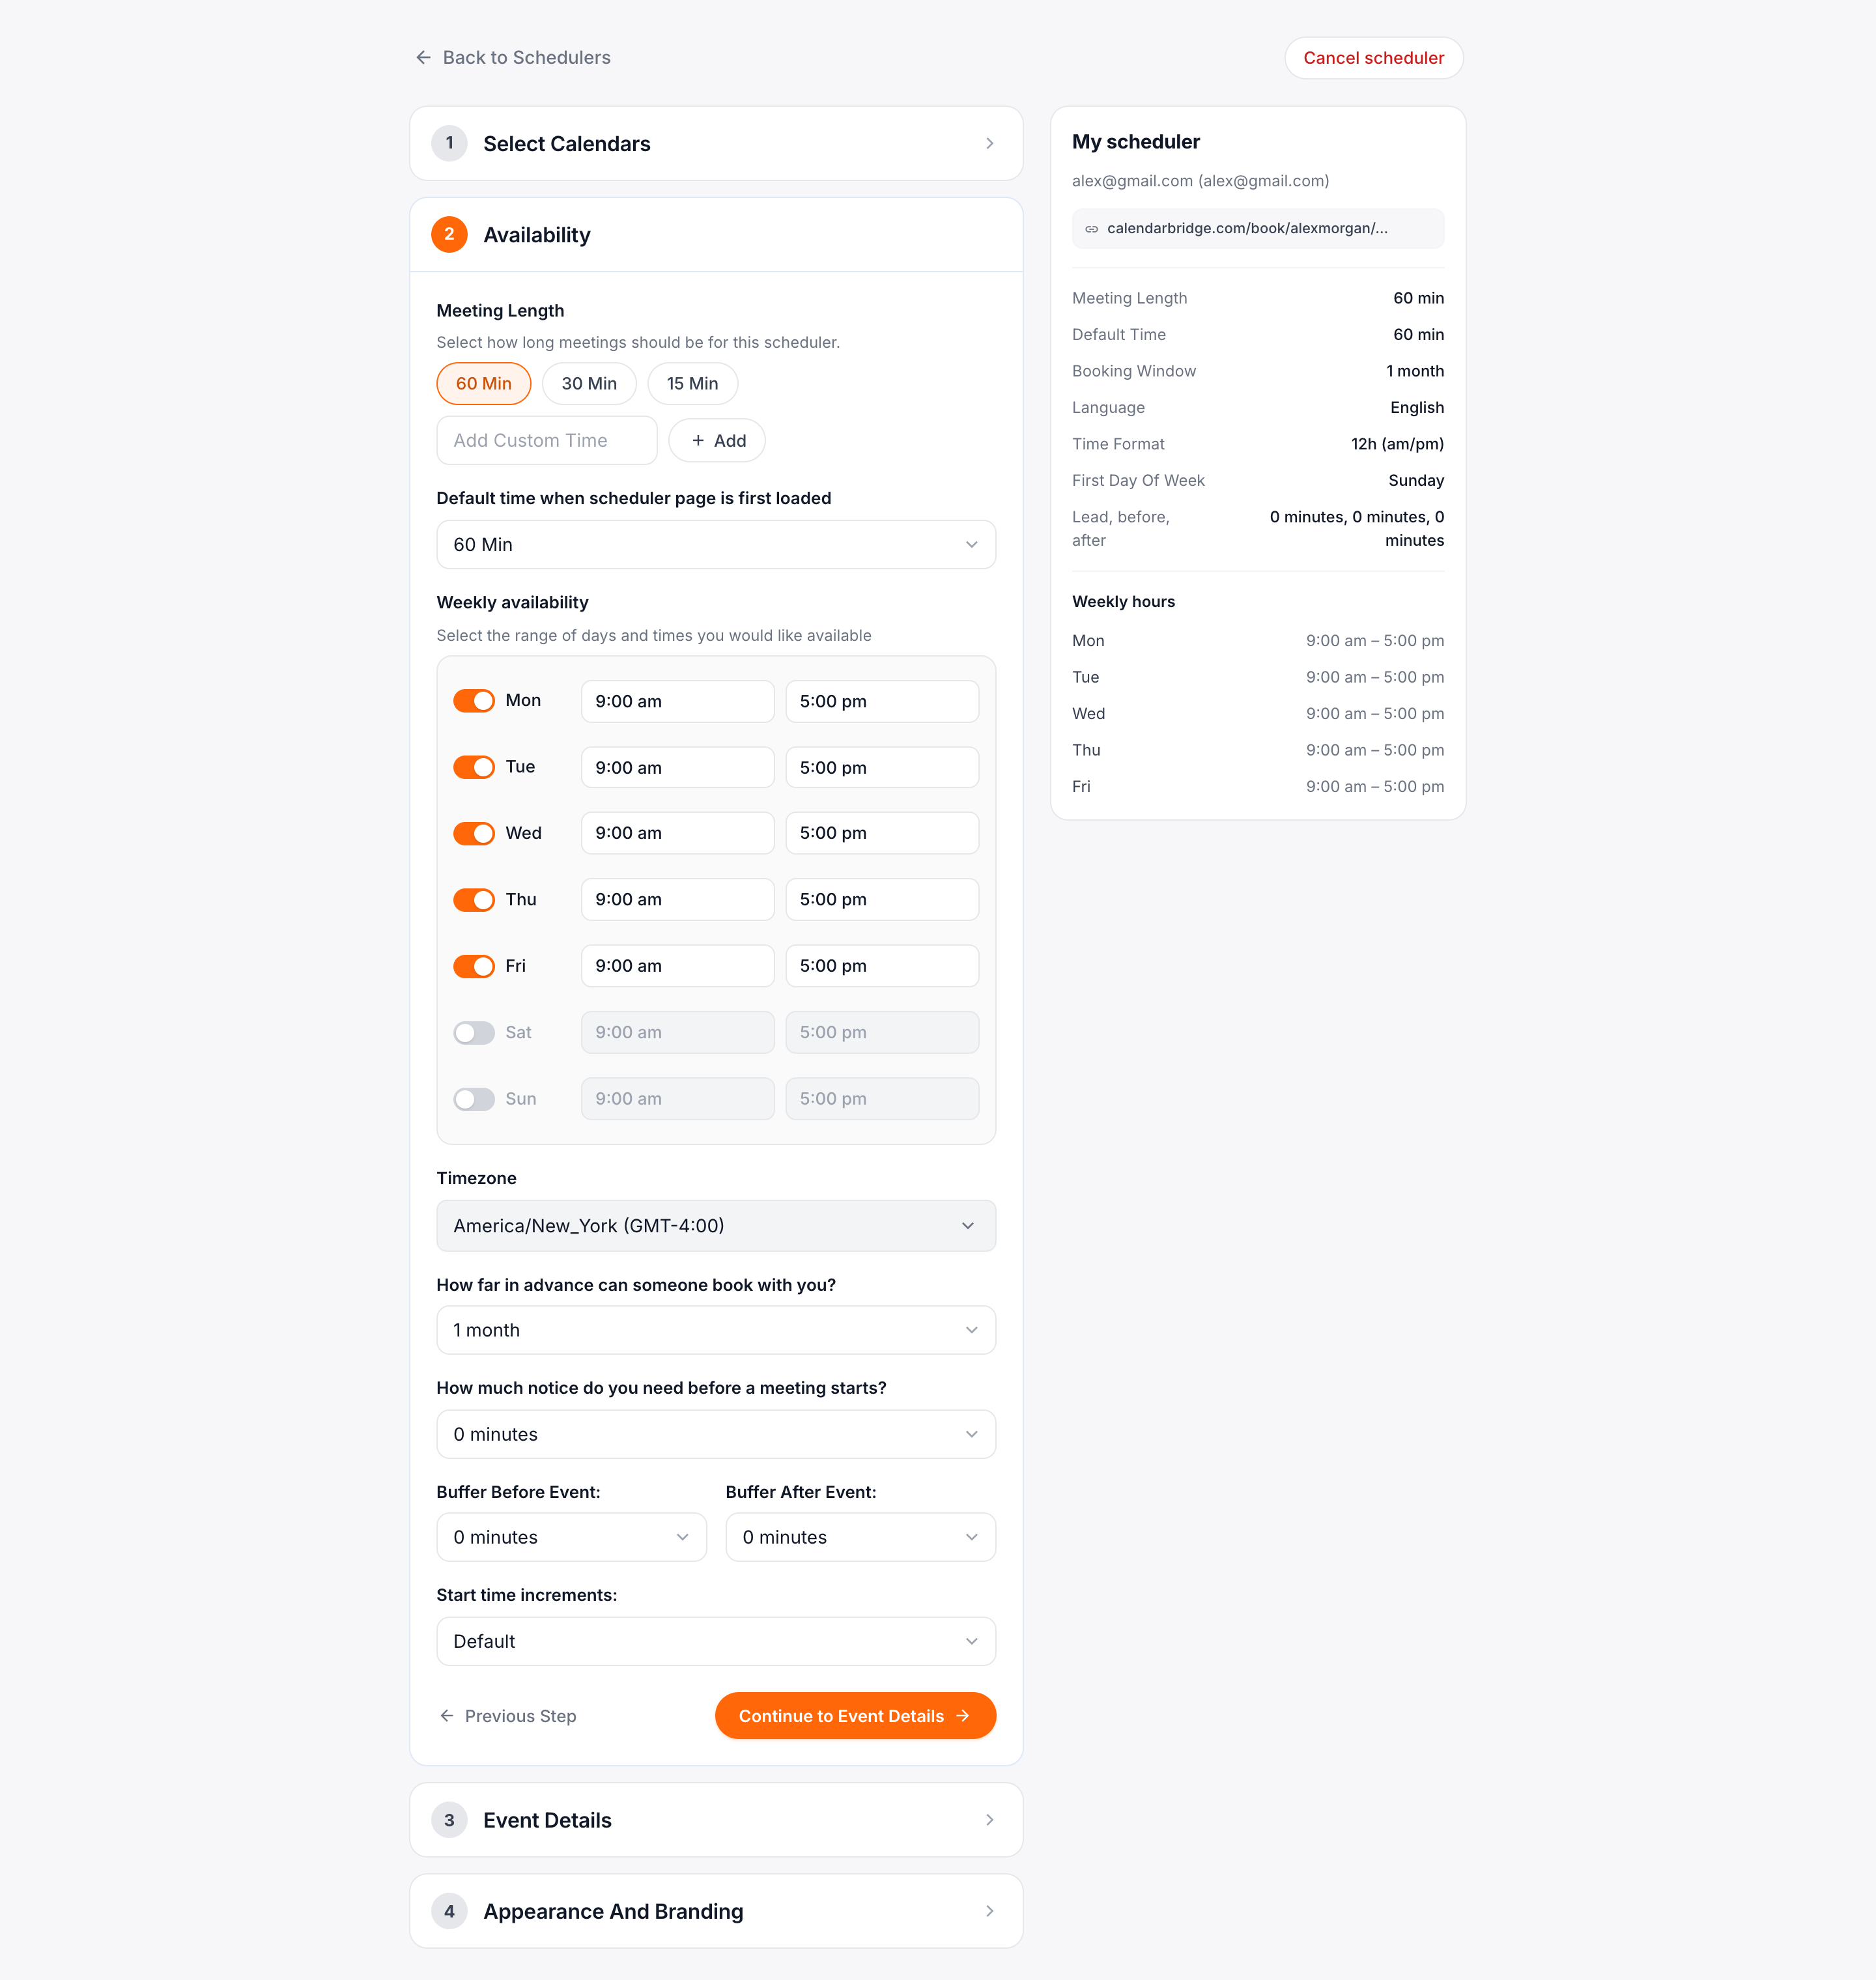
Step 2 is where you draw the boundary around your bookable time. Every control on this step compounds: a slot has to satisfy all of the rules below to be offered.
Meeting length
Pick from the three quick options (60 / 30 / 15 minutes) or click + Add custom to enter your own. The Default time field underneath shows the chosen value in minutes and is editable directly if you want a non-round number — for example 45.
Weekly availability
Each day of the week is a row in the weekly grid with a toggle, a start time, and an end time. Switch a day off to block bookings entirely; switch it on and adjust the times to match your working hours. Use the small + on the right of any row to add a second window in the same day — handy for split schedules (e.g. mornings and late afternoons, lunch carved out in the middle).
Timezone
The timezone the times above are expressed in. CalendarBridge automatically converts to each visitor’s local timezone on the booking page, so a 9 am ET slot will show as 6 am PT for someone on the west coast.
Booking window
How far into the future people can book. Choose from 1 week, 2 weeks, 3 weeks, 1 month, 2 months, 3 months, 6 months, or 1 year. The booking page never offers dates past this horizon.
Minimum notice
The smallest gap allowed between “now” and the start of a booking. Pick anything from 0 minutes up to 2 weeks. If you set 2 hours, no one can book a slot starting in the next 120 minutes — protects you from same-day surprises.
Buffers
Two separate fields, Buffer before and Buffer after. Each carves time off either side of a meeting so back-to-back bookings can’t collide. A 15-minute after buffer on a 30-minute call means CalendarBridge won’t offer another slot until at least 45 minutes after the previous one starts.
Event details & questions
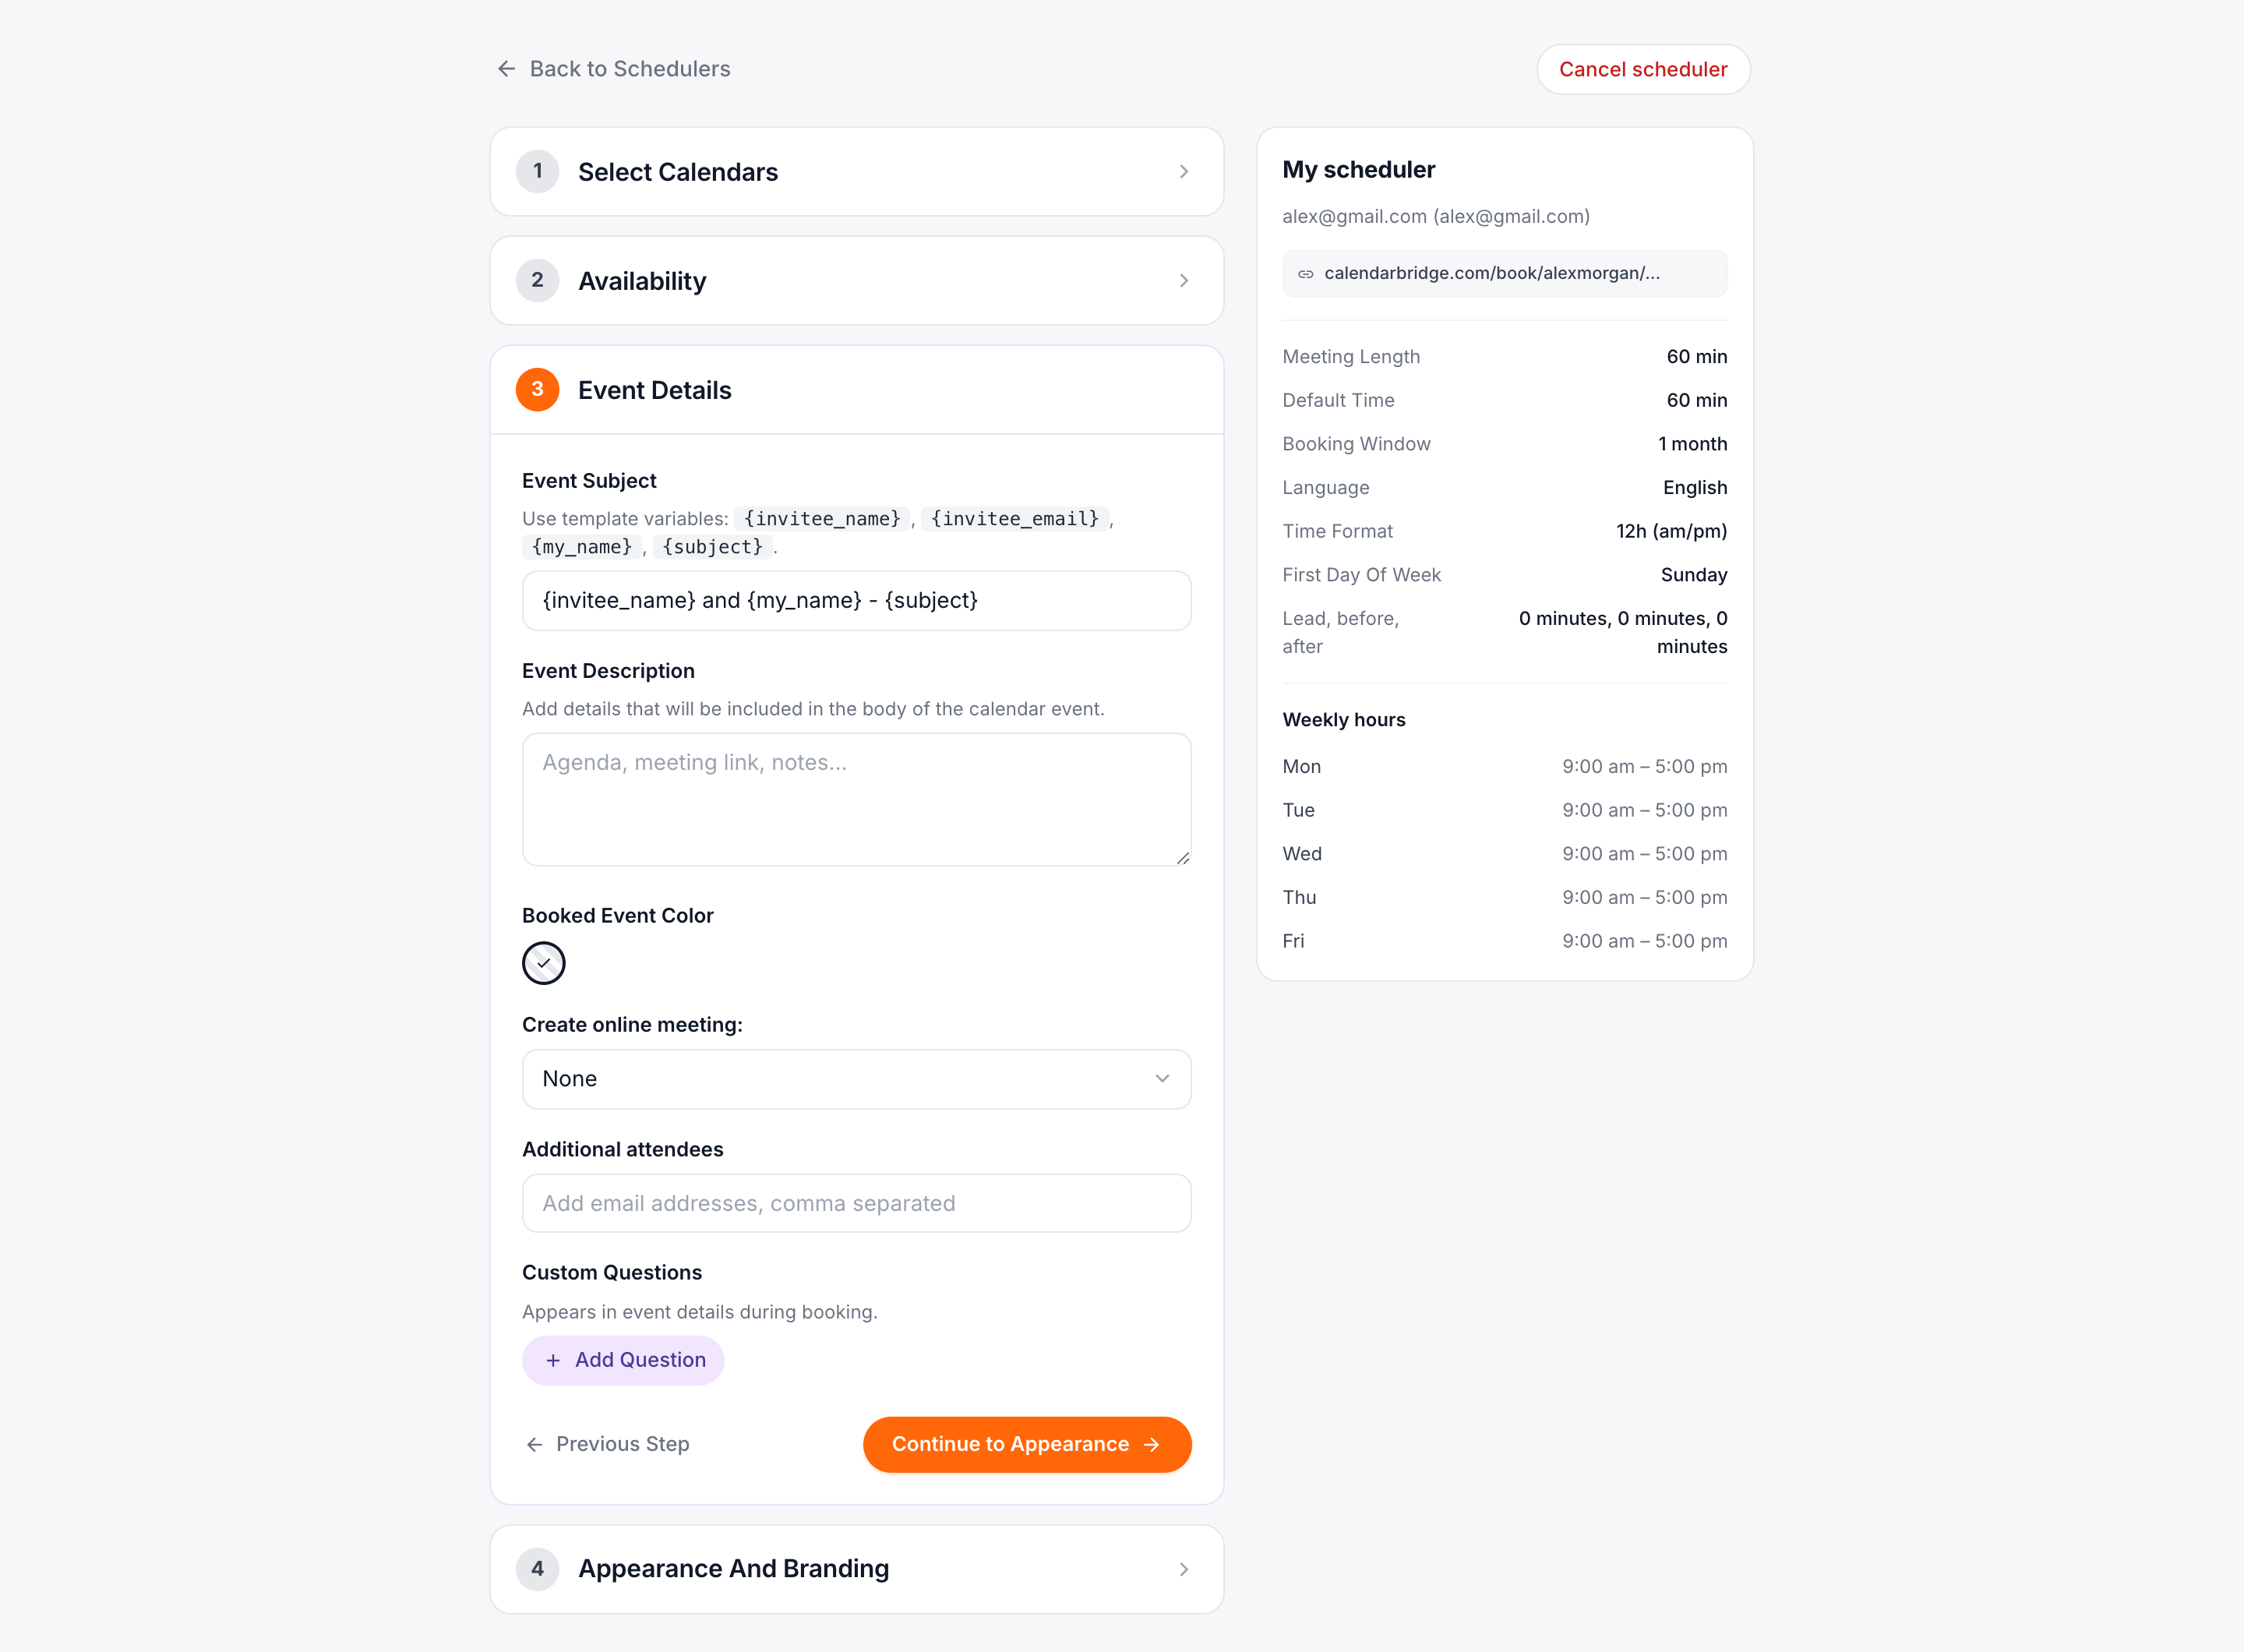
Step 3 controls what the booked event looks like on your calendar — and what the visitor is asked when they book.
Subject & description
The Subject field becomes the event title on your calendar. You can use the booker’s name in the title — for example “30 min with {{invitee_name}}” — by inserting the merge tags shown in the help link beneath the field. The Description behaves the same way and lands in the event body.
Event color
Pick from Calendar Default plus a palette of ten named colors (Tomato, Tangerine, Banana, Sage, Peacock, Blueberry, Grape, Flamingo, Graphite). The selection only affects this scheduler’s events — handy for visually separating client calls from internal meetings inside the same calendar.
Online meeting
Choose the video provider CalendarBridge attaches to every booking:
- None — no link is generated. Use for in-person meetings.
- Online Meeting for Microsoft — Microsoft Teams link via your connected Microsoft account.
- Zoom — a new Zoom meeting is created per booking.
- Google Meet — a Meet link tied to the booking calendar event.
If the provider you need isn’t connected yet, click + Connect another account beneath the dropdown to attach it.
Additional attendees
Email addresses entered in Additional attendees are CC’d on every booking. Use this to pull in a teammate, an assistant, or a shared inbox without forcing the visitor to remember to add them.
Custom questions
Click + Add question to ask anything beyond name and email — what the call is about, a phone number, a project link. The expanded scheduler card surfaces a Questions count so you can see at a glance how much a given scheduler asks of its bookers.
Making a question required
Each question has a Required toggle next to it. Turn it on and the booking page marks that question with an asterisk and refuses to submit until it’s filled in. Questions are optional by default, so existing schedulers are unaffected.
Requirements are enforced on our servers as well as in the browser, so a booking that skips a required answer is rejected no matter how it was submitted — you can rely on the answer being there.
Appearance & localization
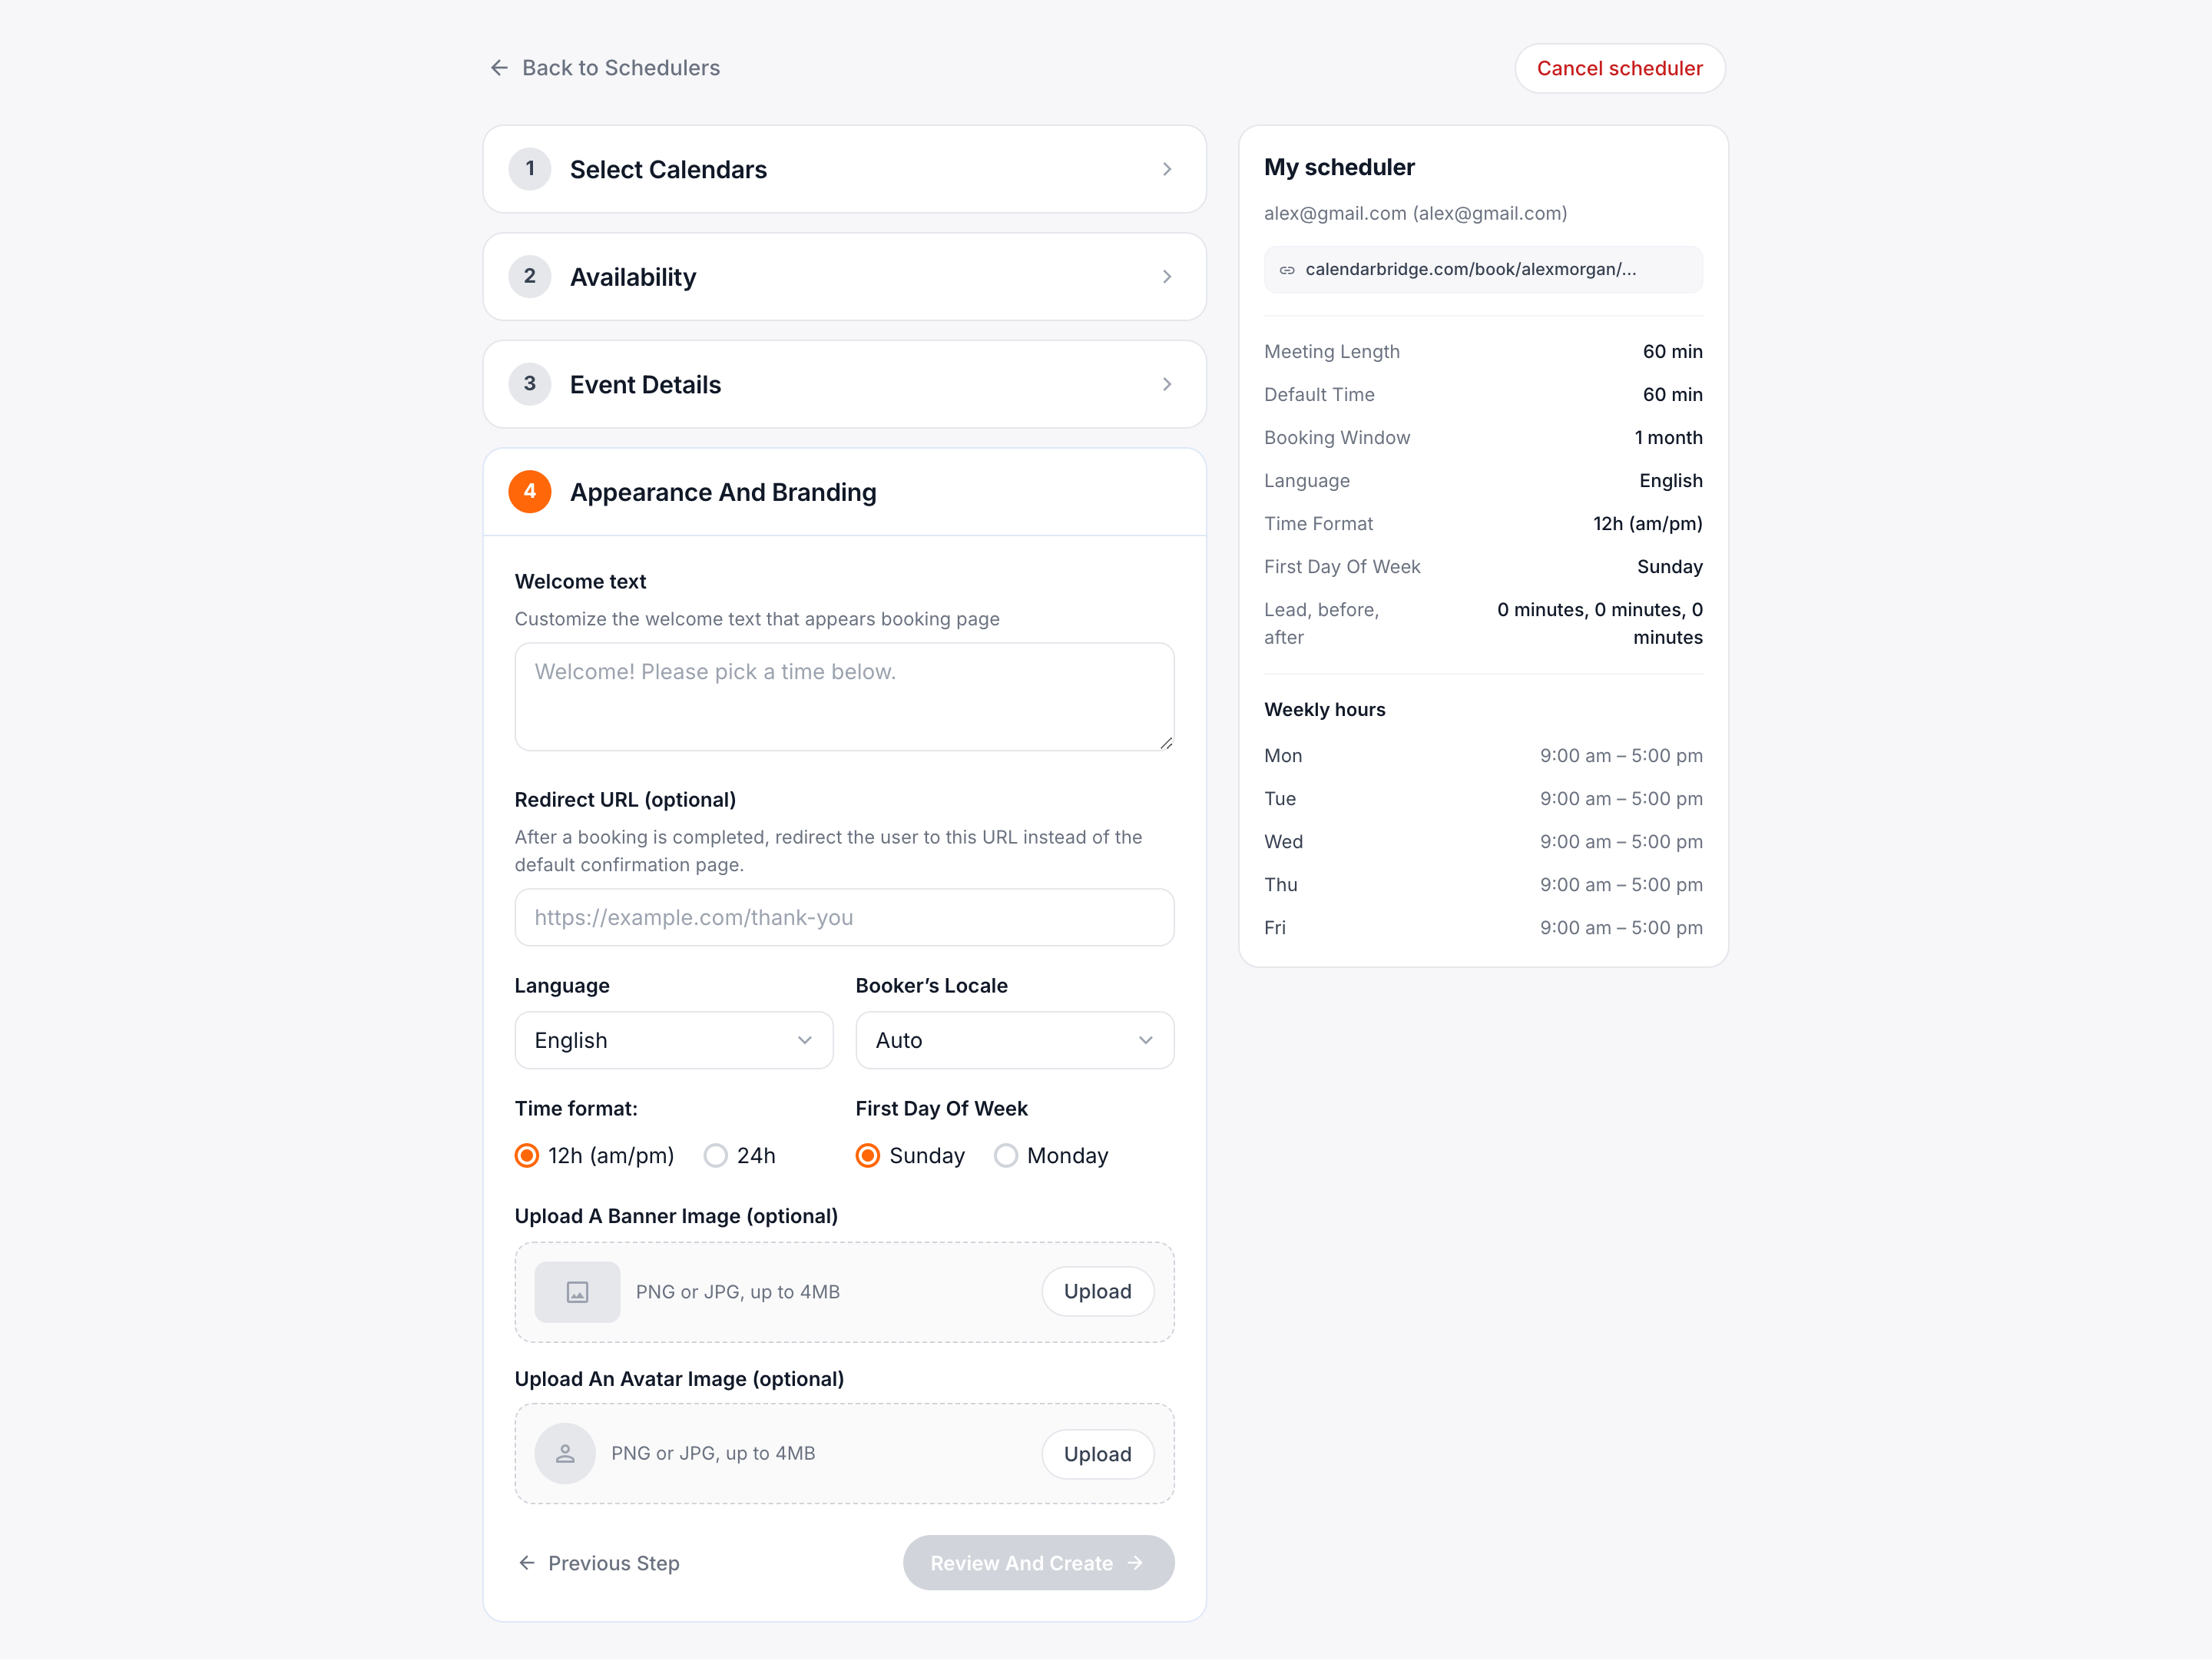
Step 4 is everything the booker sees and the post-booking experience.
Welcome message
A short paragraph that appears at the top of the booking page — context, instructions, or a sentence about you. Keep it scannable; this is the first thing visitors read.
Redirect URL
An optional URL CalendarBridge sends visitors to after they confirm a booking. Use it to send them to a thank-you page, a payment flow, or a Calendly-style next-step prompt. Leave it blank to show the default confirmation page.
Page language
The language the booking page is rendered in: English, Spanish, German, French, Portuguese, or Japanese. This is independent from the dashboard locale you use yourself.
Booker locale override
Controls date and number formatting on the booking page. Auto matches the visitor’s browser locale; pick a specific locale like en-GB or es-ES if you want consistent formatting regardless of who’s viewing.
Time format & first day of week
Independent radio toggles. Time format flips between 12h (am/pm) and 24h. First day of the week flips between Sunday and Monday, which changes the column order in the date picker.
Banner image and avatar
Drop in a wide banner for the top of the page and a round avatar for the header. Both are optional — without them the page falls back to a clean text-only header — but a photo and a banner make a scheduler feel more personal and on-brand.
Share & embed
Every published scheduler has a public URL of the form calendarbridge.com/book/<handle>/<slug>. You’ll find it in two places.
Copy the link
On the scheduler card, the URL row is the gray pill under the header. Click Copy — the icon switches to a green check and reads Copied for a couple of seconds. Paste it into an email signature, a chat message, or a CRM template.
Embed it on a website
Click the Embed button next to Copy. A modal opens with an <iframe> snippet pre-filled with your scheduler URL — copy and paste it into any page that accepts HTML. The default iframe is 600px tall and full-width; tweak the inline styles if your layout needs different dimensions.
book.acme.com.Manage existing schedulers
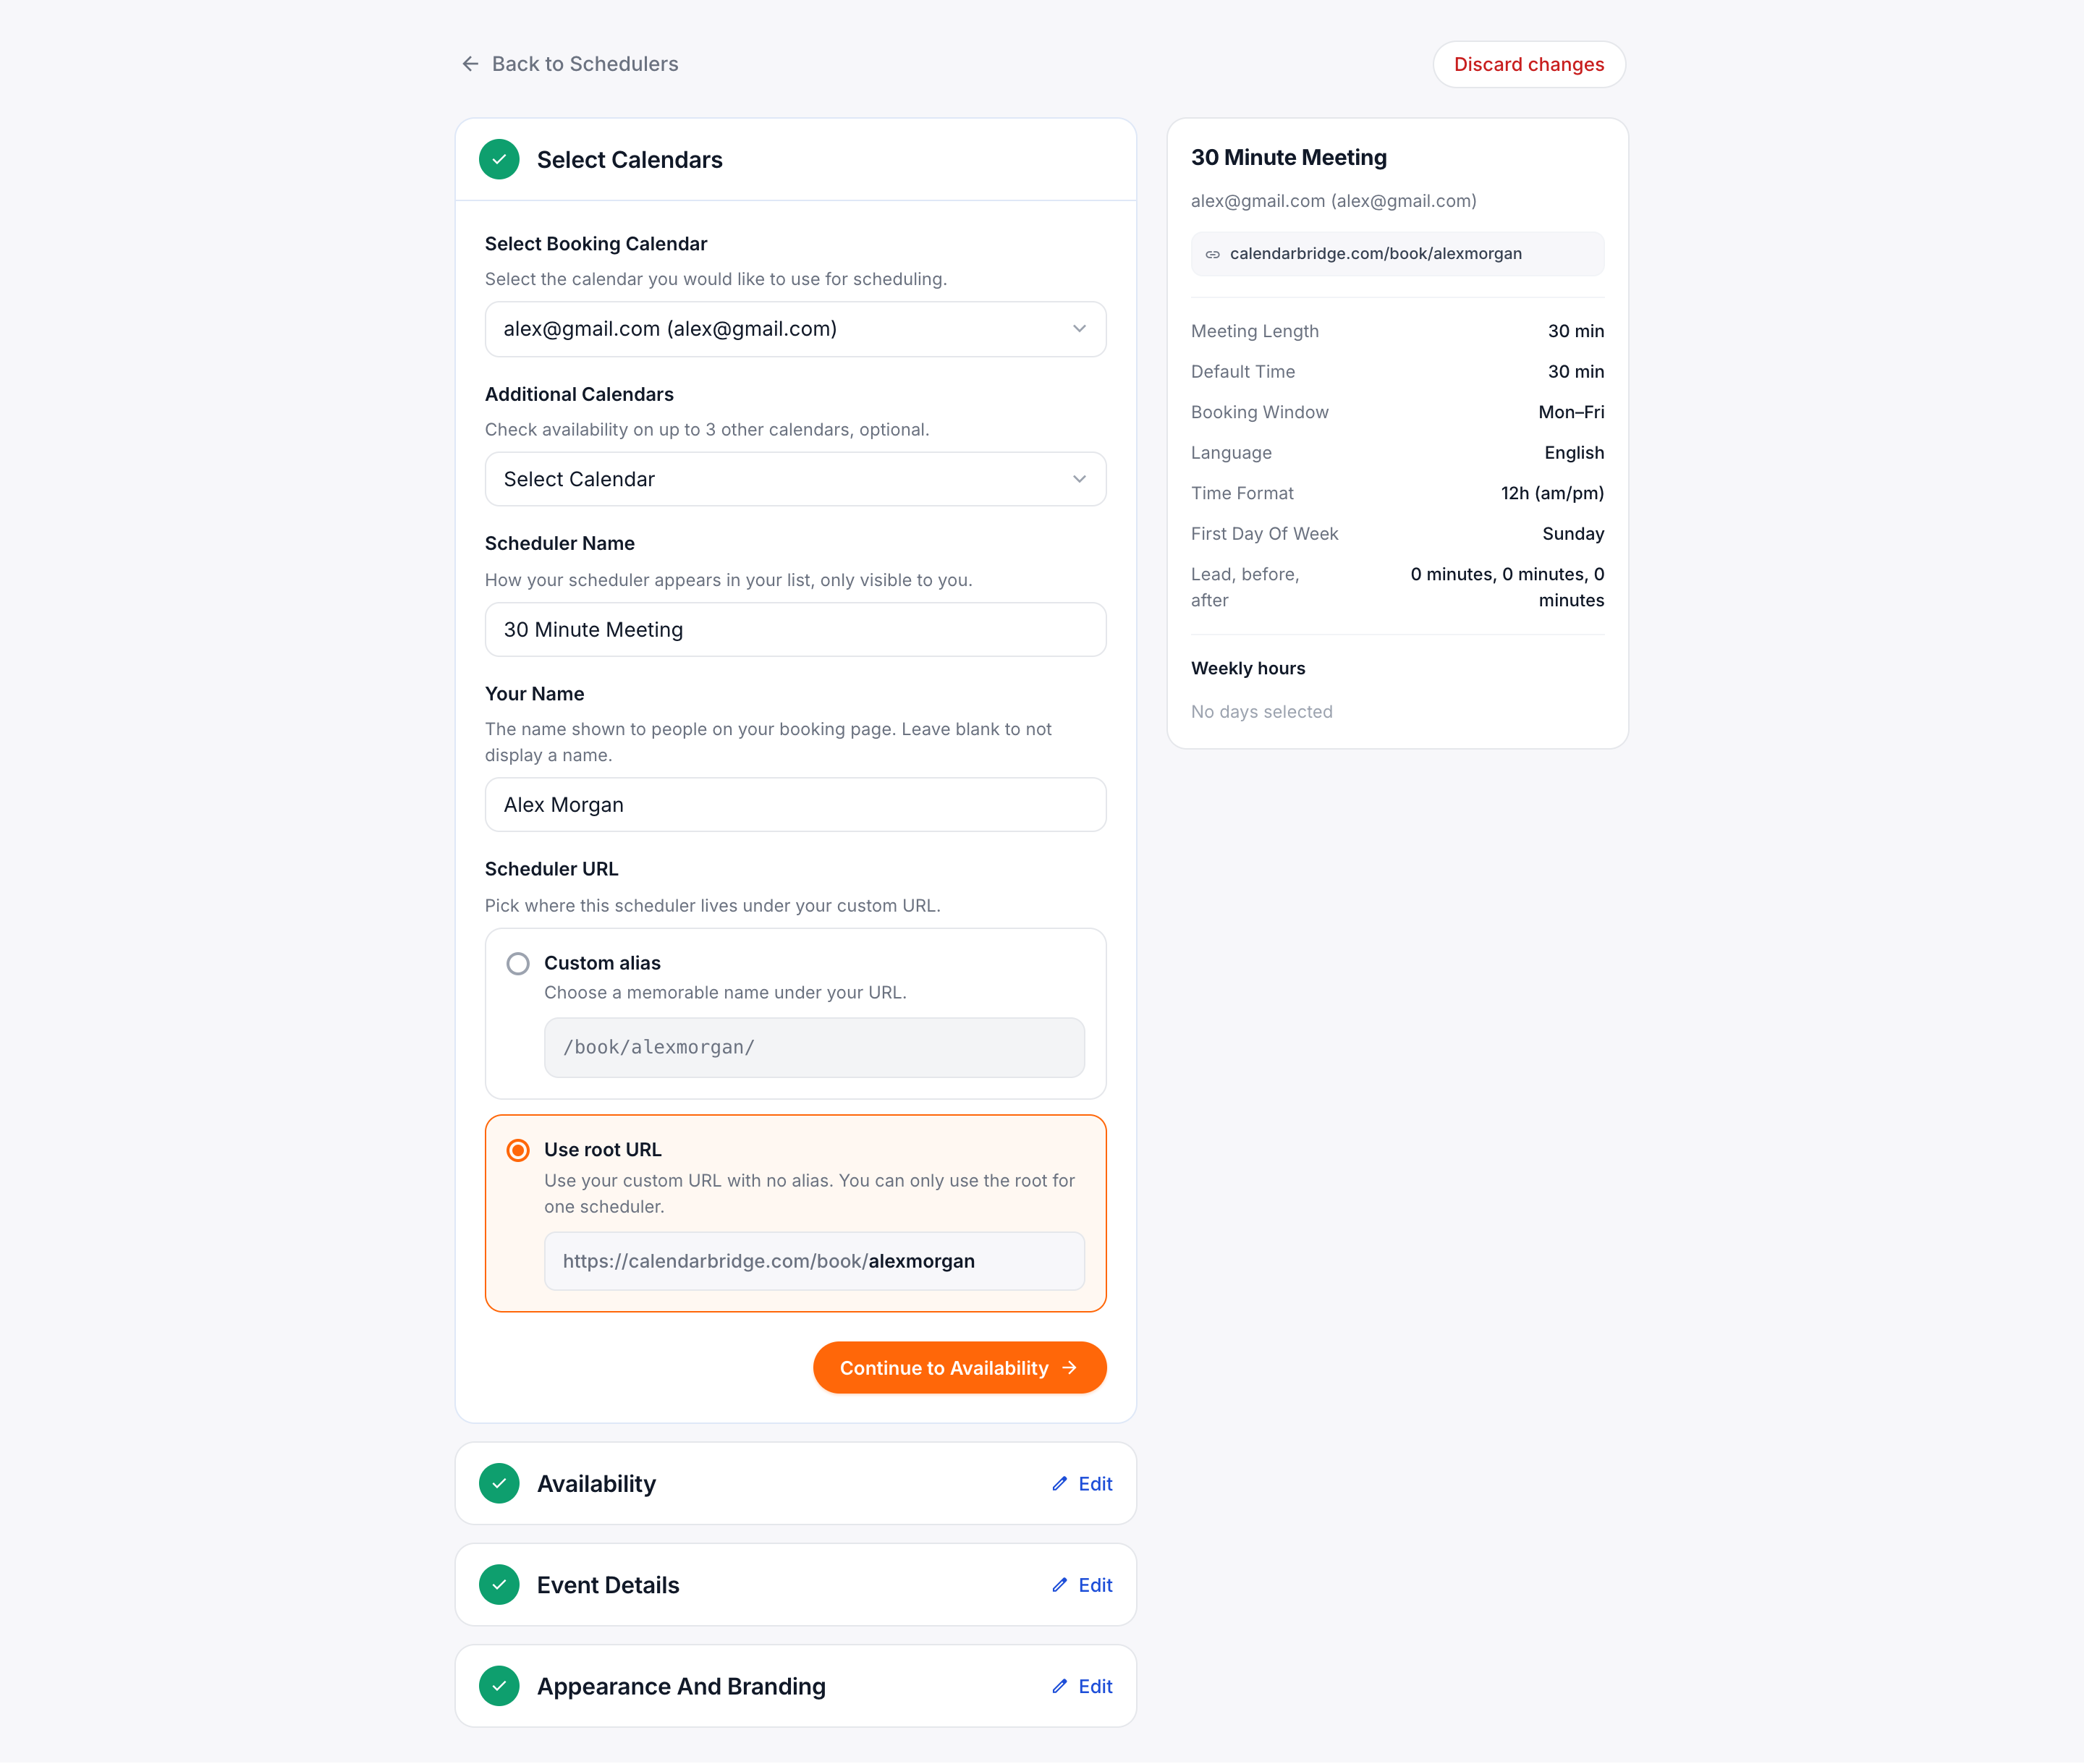
Back on the main Schedulers screen, each card carries the three management actions you’ll reach for most often.
| Action | How to trigger | What it does |
|---|---|---|
| Edit | Edit in the footer, or ⋯ → Edit in the header menu | Reopens the six-step builder for this scheduler. Every step is marked done; click any step header to jump straight into the section you want to change. |
| Clone | ⋯ → Clone in the header menu | Duplicates the scheduler with a new URL slug — useful as a starting point for variants (e.g. a 15-minute version of a 30-minute call). |
| Delete | ⋯ → Delete in the header menu | Permanently removes the scheduler and disables its public URL. Existing bookings on your calendar are preserved; only future bookings against that URL are blocked. |
| Expand details | More / Less in the footer | Reveals the full configuration summary — length, window, language, time format, first day, lead and buffer values, questions, conferencing, extra calendars, and the weekly working-hours grid — without leaving the list. |
| Copy link | Copy in the URL row | Copies the public booking URL to the clipboard. |
| Embed code | Embed in the URL row | Opens the iframe snippet modal for adding the scheduler to a website. |
The empty state
If you delete every scheduler, the card collapses to an illustrated empty state with a Create your first scheduler button — the same flow as + New Scheduler, just a more prominent prompt when the grid is empty.
Workflows: reminder & follow-up emails
Step 5 of the scheduler editor automates what happens around a booked meeting. It’s entirely optional — leave it empty and the scheduler behaves exactly as before — and it’s configured per scheduler, so a sales link can nag and a support link can stay quiet.
Reminder emails
Add up to two reminders, each sent a chosen interval before the meeting starts (15 minutes through 1 week). For each one you pick the audience — the person who booked, you, or everyone on the meeting — and write the subject and message. Reminders whose send time has already passed for a last-minute booking are skipped rather than sent late.
Follow-up email
Add one follow-up, sent from immediately after the meeting ends up to a week later. Useful for a feedback link, next steps, or a “book the next one” prompt.
Placeholders
Subjects and messages accept {invitee_name}, {invitee_email}, {my_name}, {my_email}, {subject}, {start_time}, {end_time}, {meeting_link}, {manage_link}, and {scheduler_name}.
Payments: charge for bookings
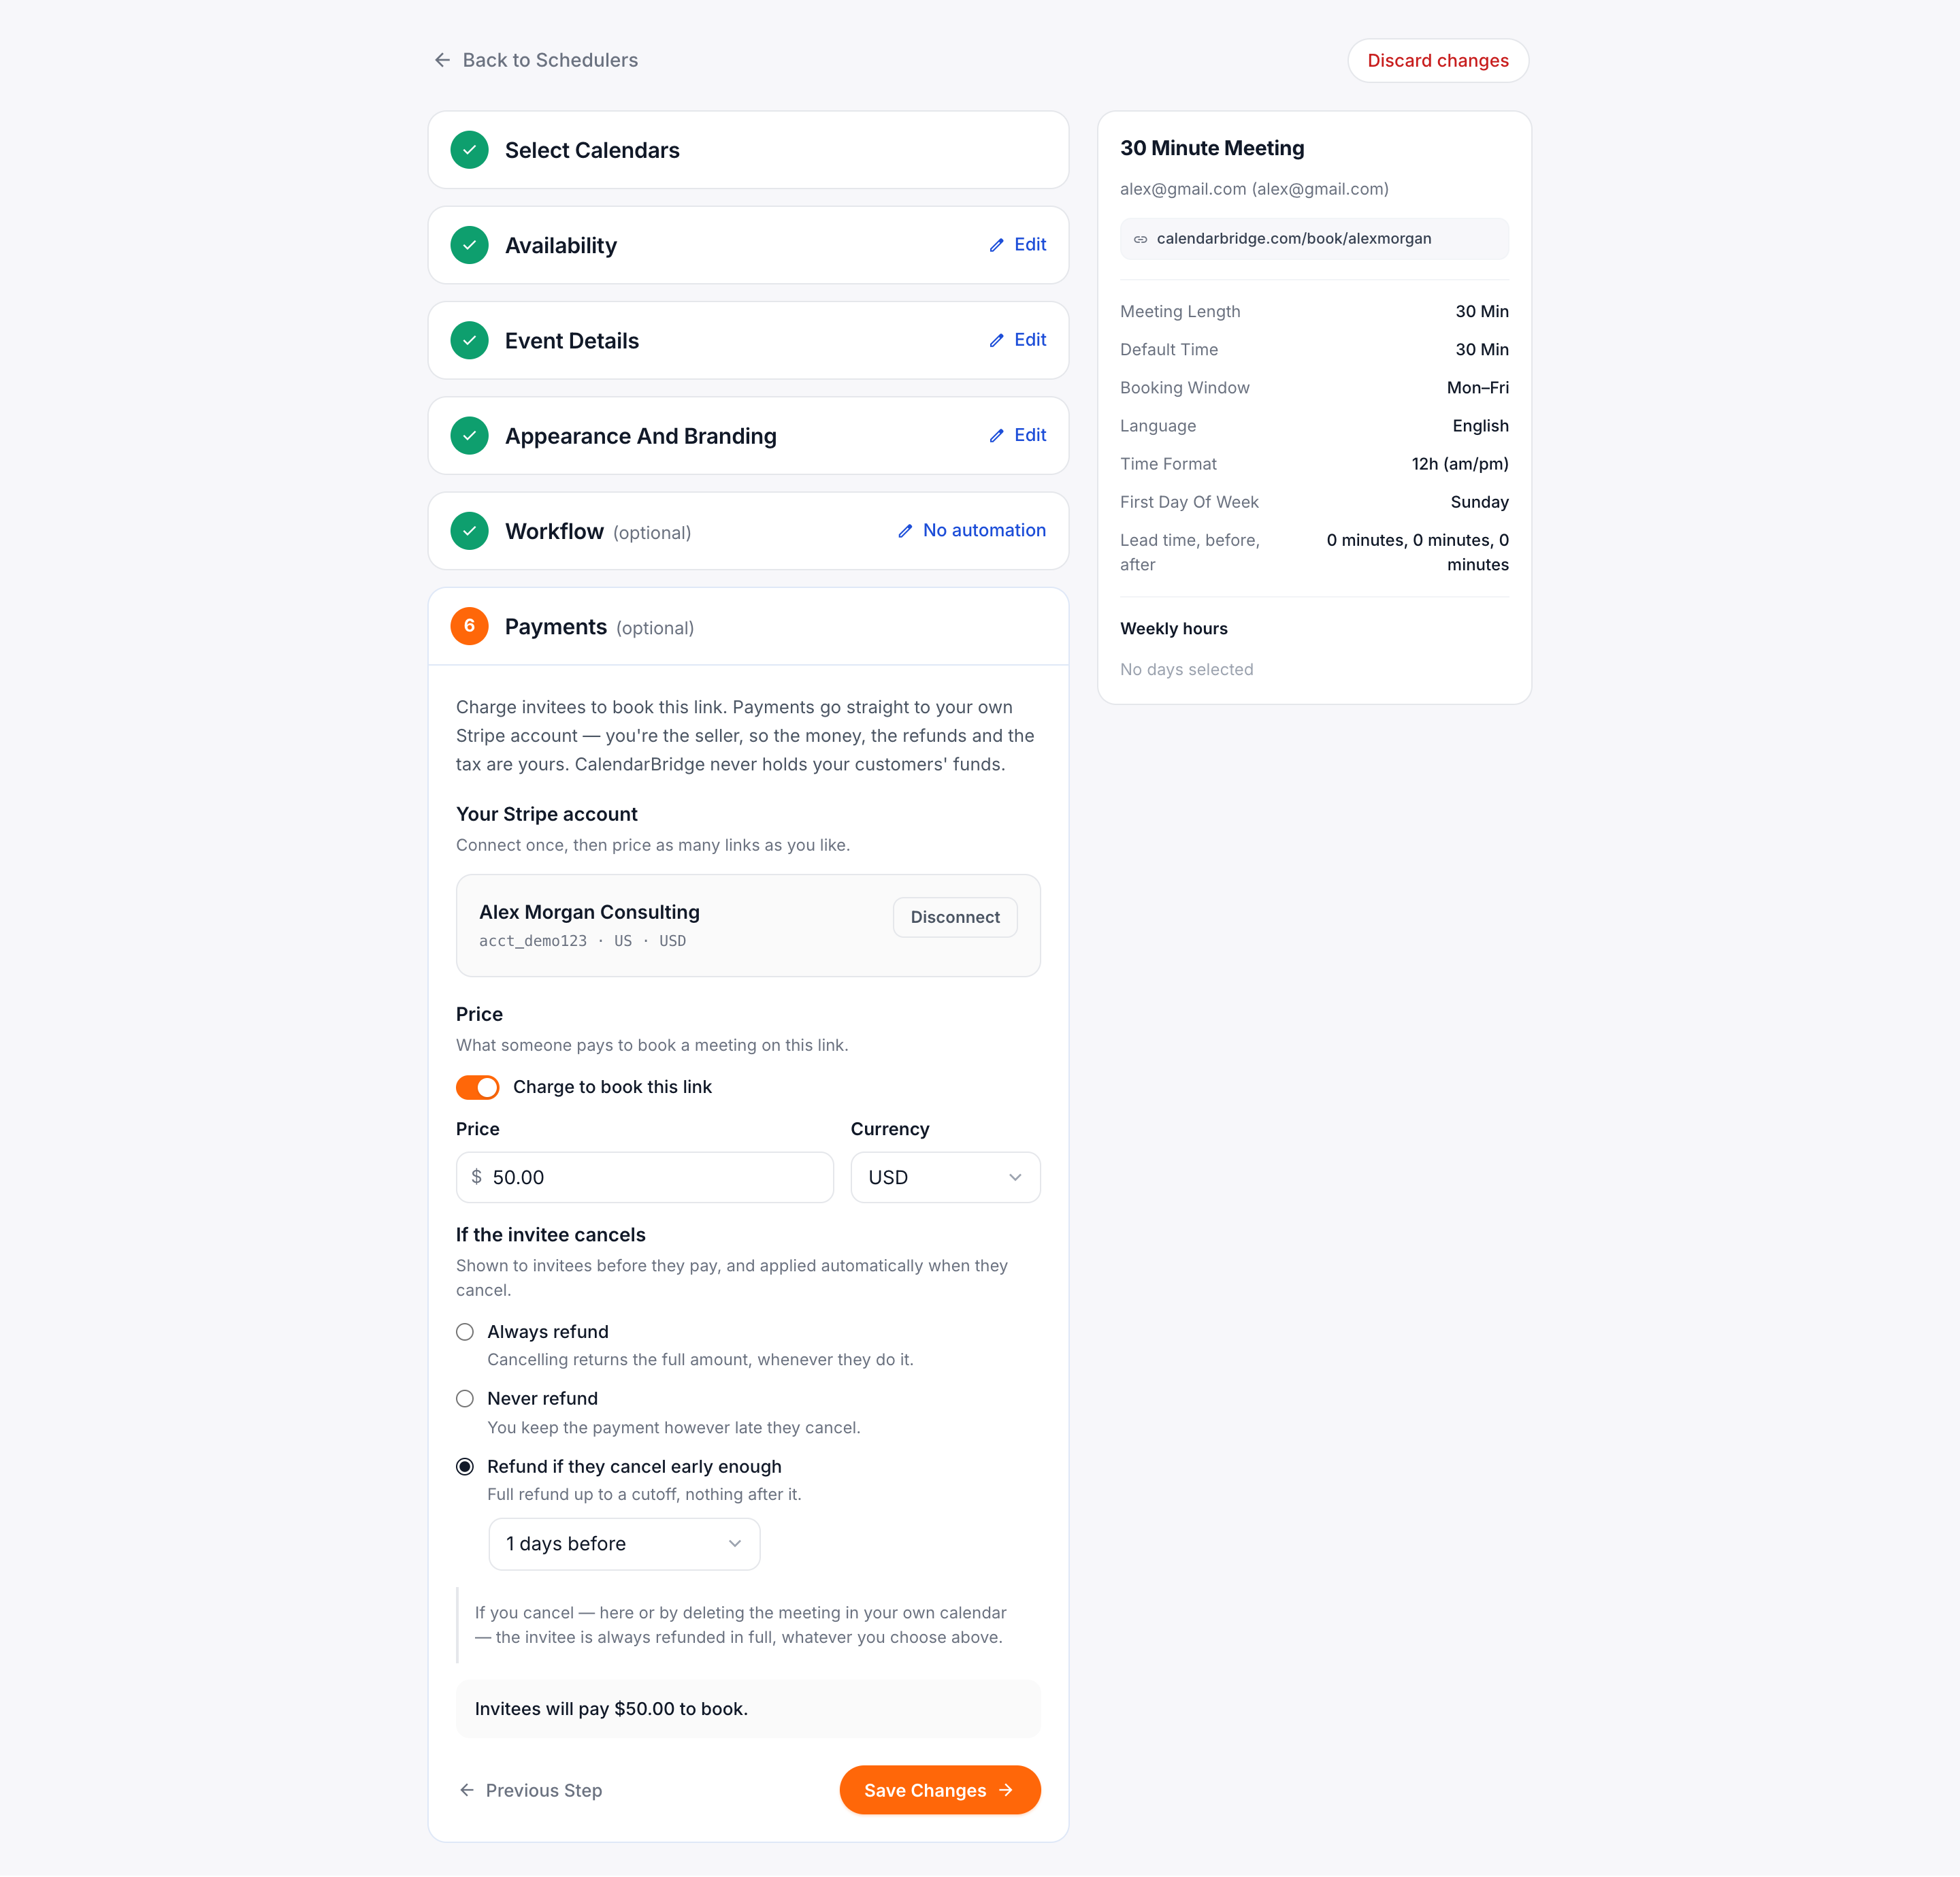
Step 6 of the scheduler editor lets you charge for the meetings people book through a link. It is optional and set per scheduler, so a paid consultation link and a free intro-call link can sit side by side. You connect your own Stripe account, so payments go straight to you. CalendarBridge never holds the money and takes no cut of it; Stripe’s usual processing fee applies.
Connect Stripe
Click Connect Stripe. Stripe opens in a new tab where you sign in to an existing account or create one, and when the connection finishes you land back in the editor where you left off. A brand-new Stripe account can connect before Stripe has finished verifying it; until then you can connect but not switch pricing on.
Price and refund policy
Turn on Charge to book this link, then set the amount and currency. If the link offers more than one meeting length, each length can have its own price. Then pick what happens when the person who booked cancels: Always refund, Never refund, or Refund if they cancel early enough (full refund up to a cutoff you choose). The policy is shown before they pay and applied automatically. If you cancel, they always get a full refund.
What the person booking sees
The price appears on the booking form. After choosing a time they go to a secure Stripe payment page, and the meeting is only created once the payment succeeds. Which payment methods are offered (cards, Apple Pay, PayPal, and so on) is controlled in your Stripe dashboard, not in CalendarBridge.
Combined booking links
To let someone book time with several of you at once, join your booking handles with a +:
calendarbridge.com/book/frank+chad— each person’s default scheduler.calendarbridge.com/book/frank_sales+chad_sales— a specific scheduler each, writtenhandle_scheduler.calendarbridge.com/book/frank+chad_sales— mix and match.calendarbridge.com/book/frank+chad+fa— first available: a slot needs only one free host, and the first free person in the link takes it.calendarbridge.com/book/frank+chad+rr— round robin: same, but bookings rotate so whoever has waited longest goes next.
Click Build a combined link in the top-right of the Schedulers card to assemble one without typing the URL by hand: pick your scheduler, add up to four teammates by handle, then copy the finished link. Give it a name and hit Save and it’s kept in your personal settings, so you can copy or edit it again from the same dialog on any device.
How it behaves
Without a mode token the link is collective:
- Only times that work for everyone are offered — the overlap of all weekly availabilities, minus everyone’s busy time.
- Meeting length, buffers, minimum notice, booking window, timezone, questions, and branding come from the first scheduler in the link.
- The booking is written to the first person’s calendar; everyone else is added as an attendee, so it lands on their calendars as one shared event.
- Availability is re-checked for all hosts at the moment of booking, so a slot that filled up in the meantime is rejected instead of double-booked.
- Reschedule and cancel work as usual and update the meeting for everybody at once.
The booking page for any combined link shows every host’s avatar stacked together, with all of their names beside it.
With +fa or +rr the link books one host per meeting instead: a slot is offered if any host is free, the booking page says “Booking with one of”, and the meeting is created on the chosen host’s calendar alone with their scheduler’s settings. The confirmation tells the booker who they got.