Configuring Single Sign-On (SAML & OIDC)
CalendarBridge lets organization administrators enable single sign-on so your users sign in to CalendarBridge with the same identity provider they already use for everything else. This guide covers both supported protocols, the exact service-provider values to give your identity provider, attribute mappings, testing, and troubleshooting.
Single sign-on at a glance
Single sign-on (SSO) lets your team authenticate to CalendarBridge through your organization's identity provider (IdP) instead of a separate CalendarBridge password. When SSO is enforced, every user on your verified domain is redirected to your IdP to sign in, and access can be granted or revoked centrally.
- Protocols supported: SAML 2.0 (SP-initiated) and OpenID Connect (OIDC) / OAuth 2.0 Authorization Code flow.
- CalendarBridge edition: SSO and SCIM are available on CalendarBridge Group (Organization) plans. They are configured from the Manage Organization portal by an organization administrator. See Group Account License Types and Licensing below.
- Architecture: CalendarBridge is a multi-tenant SaaS application. SSO is configured per verified domain, so each customer owns and controls their own identity provider connection. CalendarBridge fetches and trusts only the IdP metadata/certificate you provide for your domain.
Supported identity providers
CalendarBridge works with any standards-compliant SAML 2.0 or OIDC identity provider. The Manage Organization portal includes built-in, step-by-step setup guides for the following:
| Identity provider | SAML 2.0 | OpenID Connect | Provider documentation |
|---|---|---|---|
| Microsoft Entra ID (Azure AD) | Yes | Yes | Configure SSO in Entra ID |
| Okta | Yes | Yes | Create a SAML/OIDC app in Okta |
| Google Workspace | Yes | — | Set up a custom SAML app |
| JumpCloud | Yes | — | SSO with a custom SAML app |
| Any other SAML 2.0 / OIDC IdP | Yes | Yes | Use the generic values in this article. |
Licensing
SSO and SCIM provisioning are included with CalendarBridge Group (Organization) subscriptions. There is no separate add-on charge from CalendarBridge to enable SSO. Note that some identity providers gate their provisioning/SCIM features behind specific editions — for example, Google Workspace auto-provisioning requires Enterprise Standard, Enterprise Plus, or Education Plus. Microsoft Entra ID automatic user provisioning requires a Microsoft Entra ID P1 or P2 license in your tenant.
Who can configure SSO (role-based access)
Only a CalendarBridge organization administrator can view or change SSO and SCIM settings. Regular members never see these controls. To manage SSO you must:
- Be an administrator of the group account (see Overview of the Group Admin Portal), and
- Have at least one verified domain on the account. SSO is bound to a verified domain — see Connecting Authorized Domains.
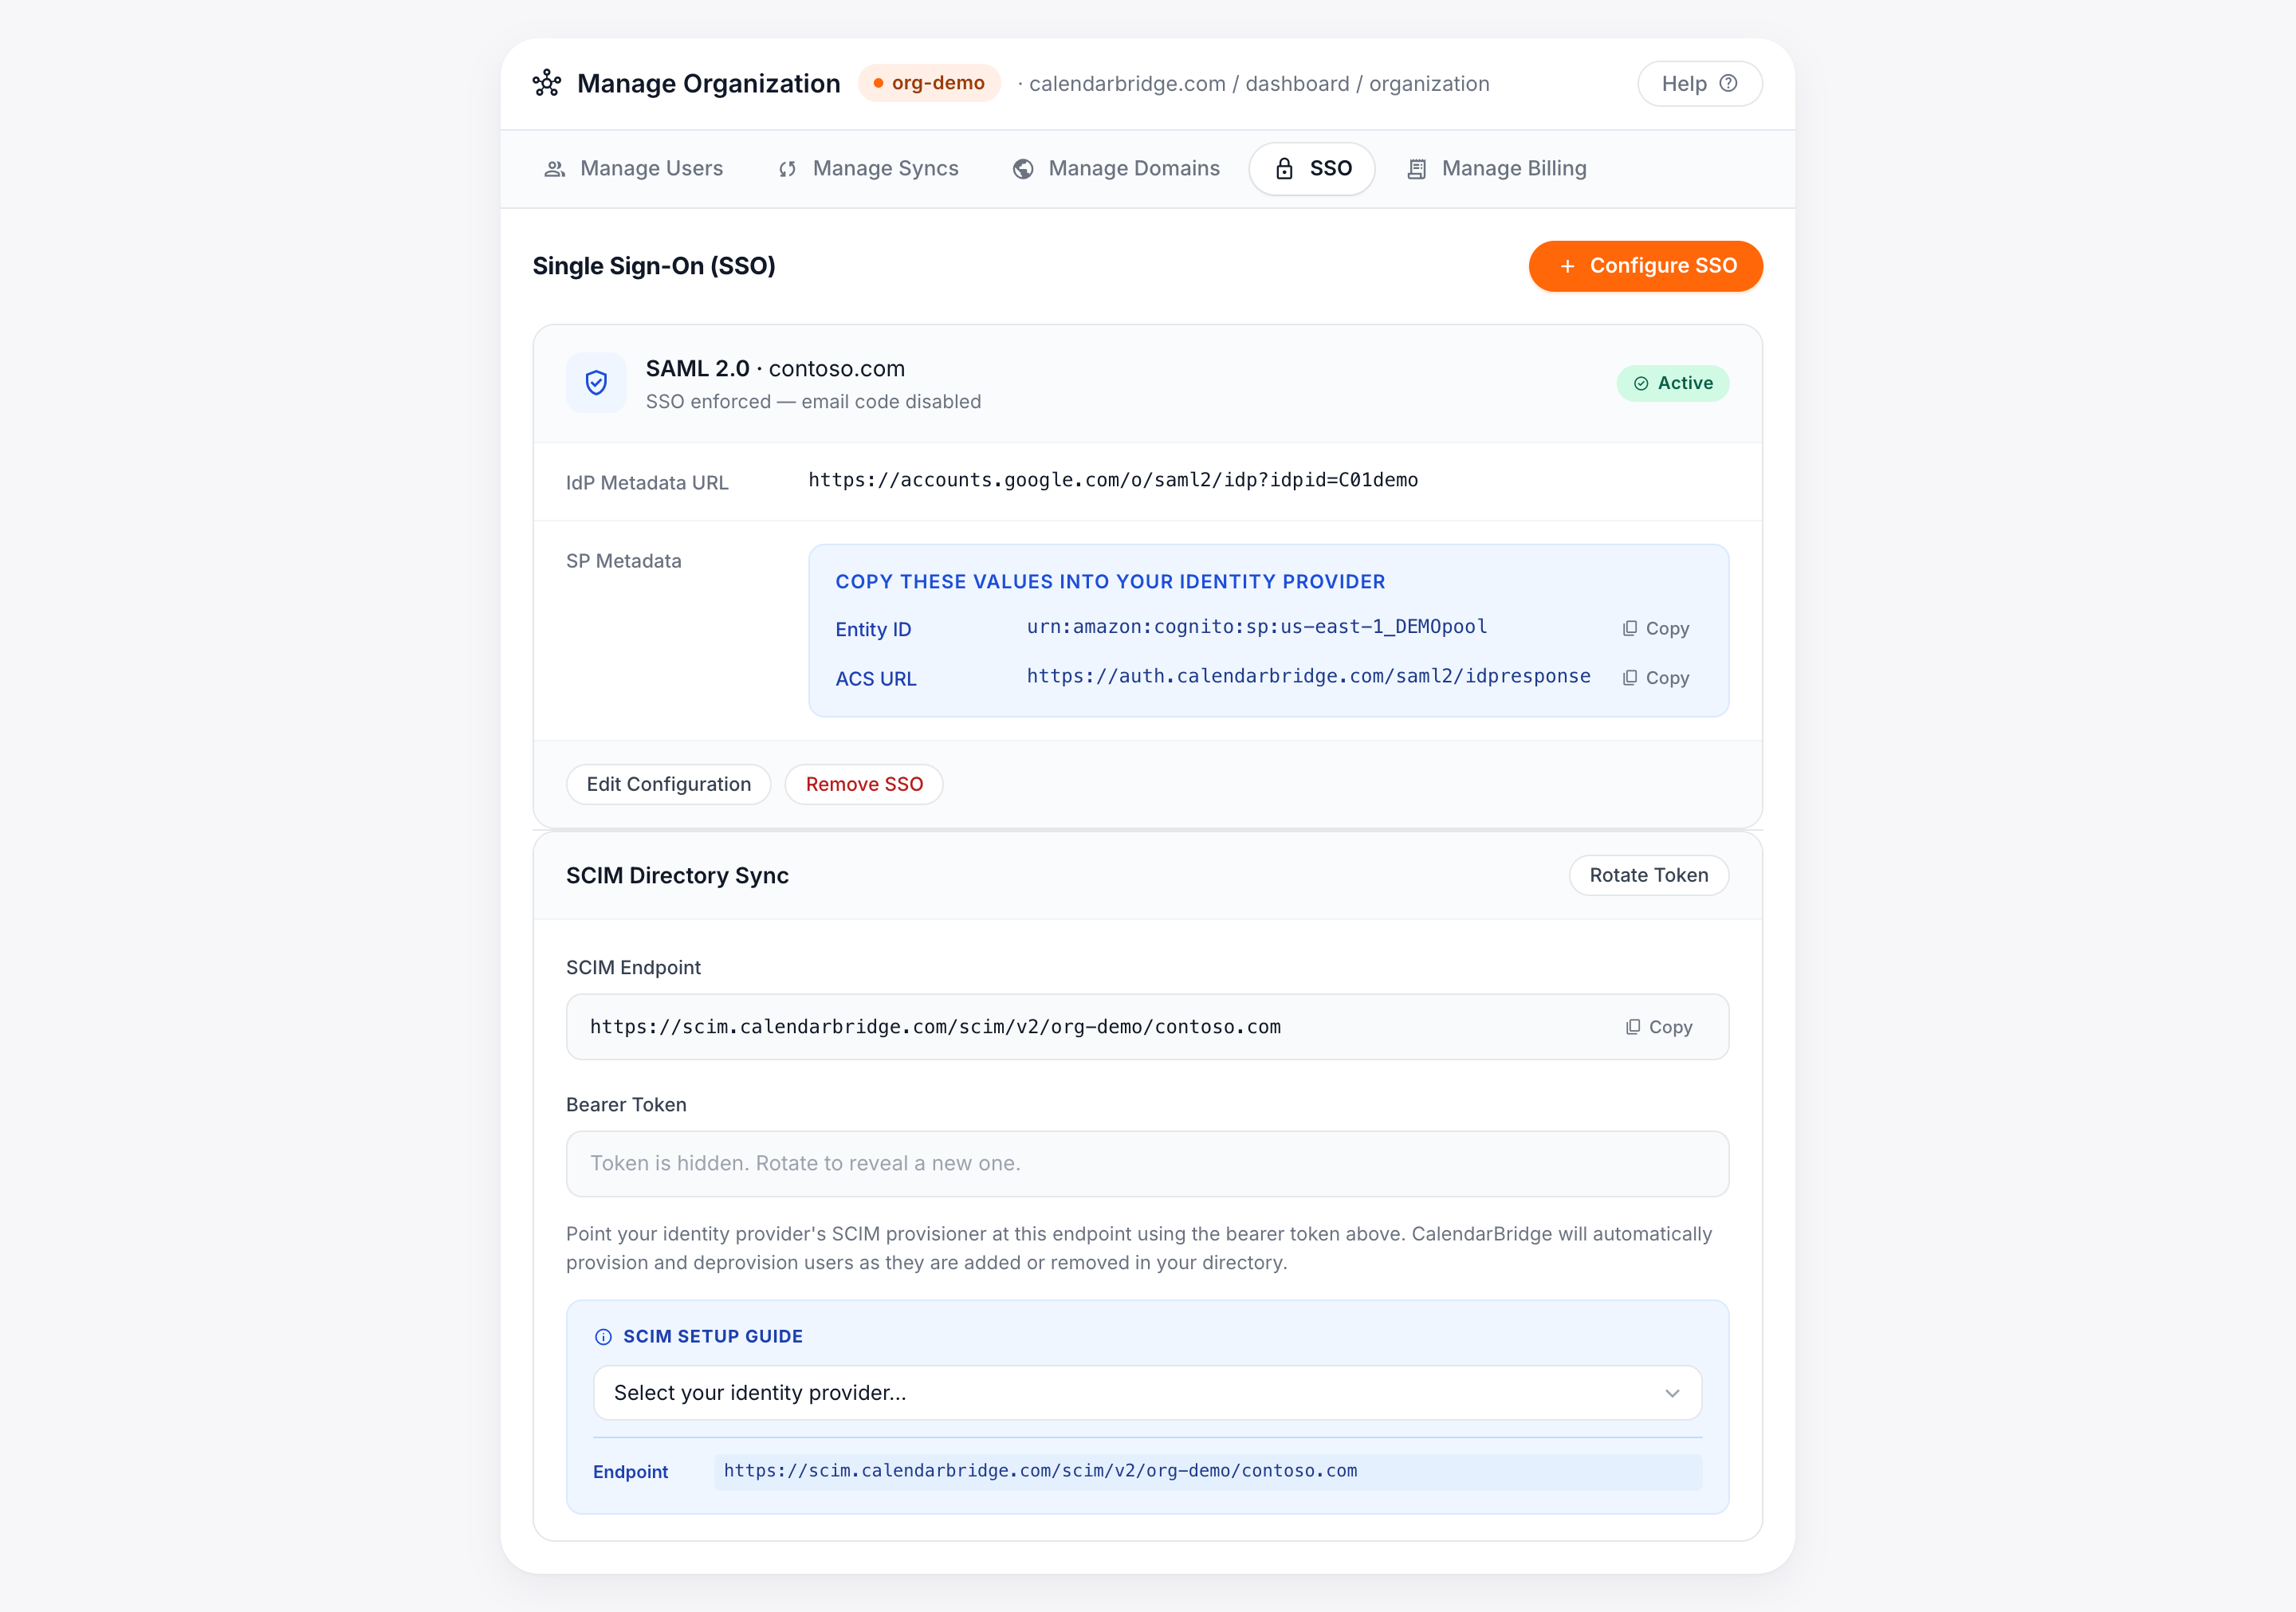
Open the Single Sign-On tab
-
Open the Manage Organization portal
From your CalendarBridge dashboard, click Manage your Organization, or go directly to calendarbridge.com/dashboard/organization.
-
Select the Single Sign-On tab
Choose the Single Sign-On tab. If you have not configured SSO yet, you will see a Configure SSO button.
-
Click Configure SSO
Choose your protocol (SAML or OIDC), assign the verified domain this configuration applies to, and select your identity provider to reveal an inline, provider-specific setup guide.
Configuring SAML 2.0
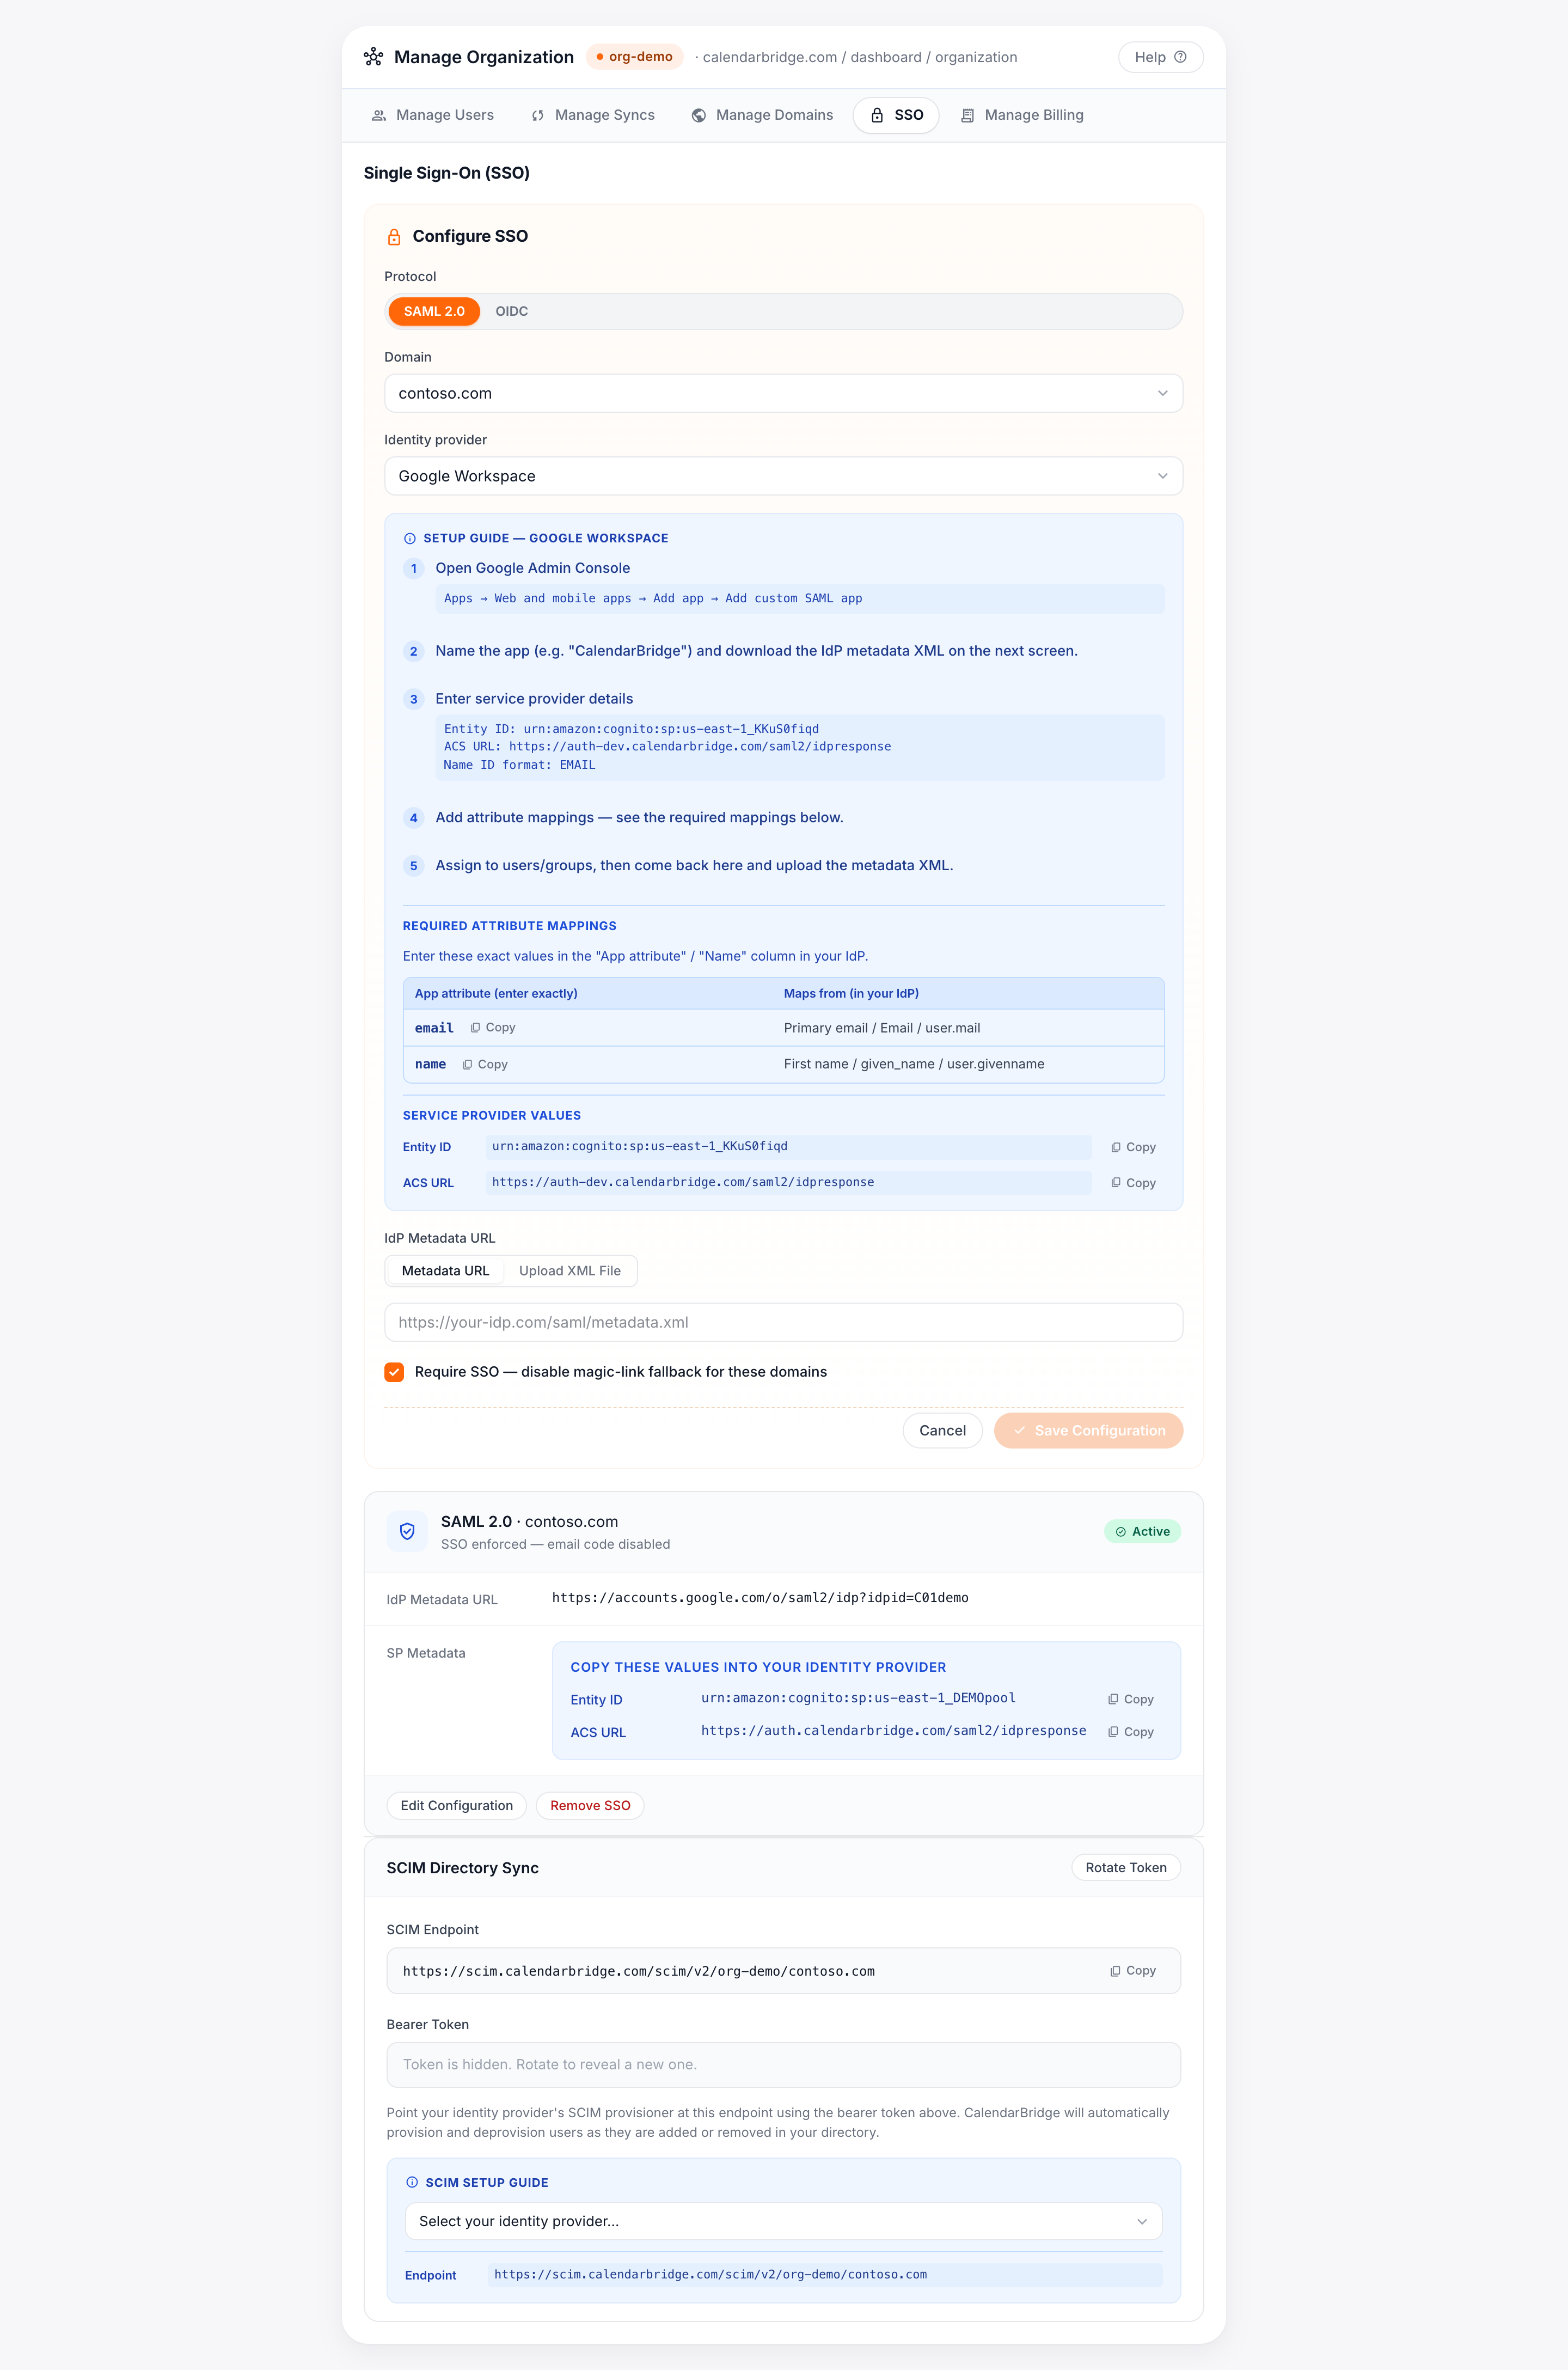
SAML setup is a two-way exchange: you give CalendarBridge's service provider (SP) values to your IdP, and you give CalendarBridge your IdP's metadata in return.
Service provider values to enter in your IdP
These are the values you paste into your identity provider when creating the CalendarBridge application. The exact, ready-to-copy values for your account are shown with Copy buttons in the Single Sign-On tab — always copy them from the portal rather than typing them by hand.
| Field (label varies by IdP) | Value |
|---|---|
| Entity ID / Audience URI / SP Entity ID | urn:amazon:cognito:sp:<your-pool-id> — copy the exact value from the SSO tab. |
| ACS URL / Reply URL / Single sign-on URL | https://<your-CalendarBridge-auth-domain>/saml2/idpresponse — copy the exact value from the SSO tab. |
| Name ID format | EmailAddress (persistent email) |
| Binding | HTTP-POST for the assertion; HTTP-Redirect for the request. |
Required attribute mappings
Map these claims in your IdP. Enter the App attribute name exactly as shown — these are also listed with copy buttons in the portal.
| App attribute (enter exactly) | Maps from (in your IdP) |
|---|---|
email | Primary email / Email / user.mail |
name | First name / given name / user.givenname |
Microsoft Entra ID (Azure AD) — SAML
-
Create the application
In the Microsoft Entra admin center, go to Enterprise applications → New application → Create your own application → "Integrate any other application you don't find in the gallery."
-
Open Single sign-on → SAML
In Basic SAML Configuration, enter:
- Identifier (Entity ID): the Entity ID from the CalendarBridge SSO tab.
- Reply URL (ACS): the ACS URL from the CalendarBridge SSO tab.
-
Configure attributes & claims
Add the
emailandnameclaims from the attribute mappings above, and set the Name ID to the user's email. -
Copy the App Federation Metadata URL
Under SAML Signing Certificate, copy the App Federation Metadata URL (it ends in
/federationmetadata/2007-06/federationmetadata.xml). Using the URL — rather than uploading a static XML file — lets CalendarBridge pick up certificate rotations automatically. -
Assign users, then finish in CalendarBridge
Assign the users or groups who should have access, then return to the CalendarBridge SSO tab, paste the metadata URL, and save.
Okta, Google Workspace, JumpCloud & others — SAML
The flow is the same for every IdP: create a custom SAML app, paste in the service-provider values, add the attribute mappings, then give CalendarBridge the IdP metadata. The portal shows the precise menu paths for Okta, Google Workspace, and JumpCloud when you select that provider. You can provide the IdP metadata two ways in the CalendarBridge SSO tab:
- Metadata URL (recommended) — paste the IdP's federation metadata URL; CalendarBridge re-fetches it so certificate rotations are picked up automatically.
- Metadata XML — upload the IdP metadata
.xmlfile if your provider does not publish a URL.
Configuring OpenID Connect (OIDC)
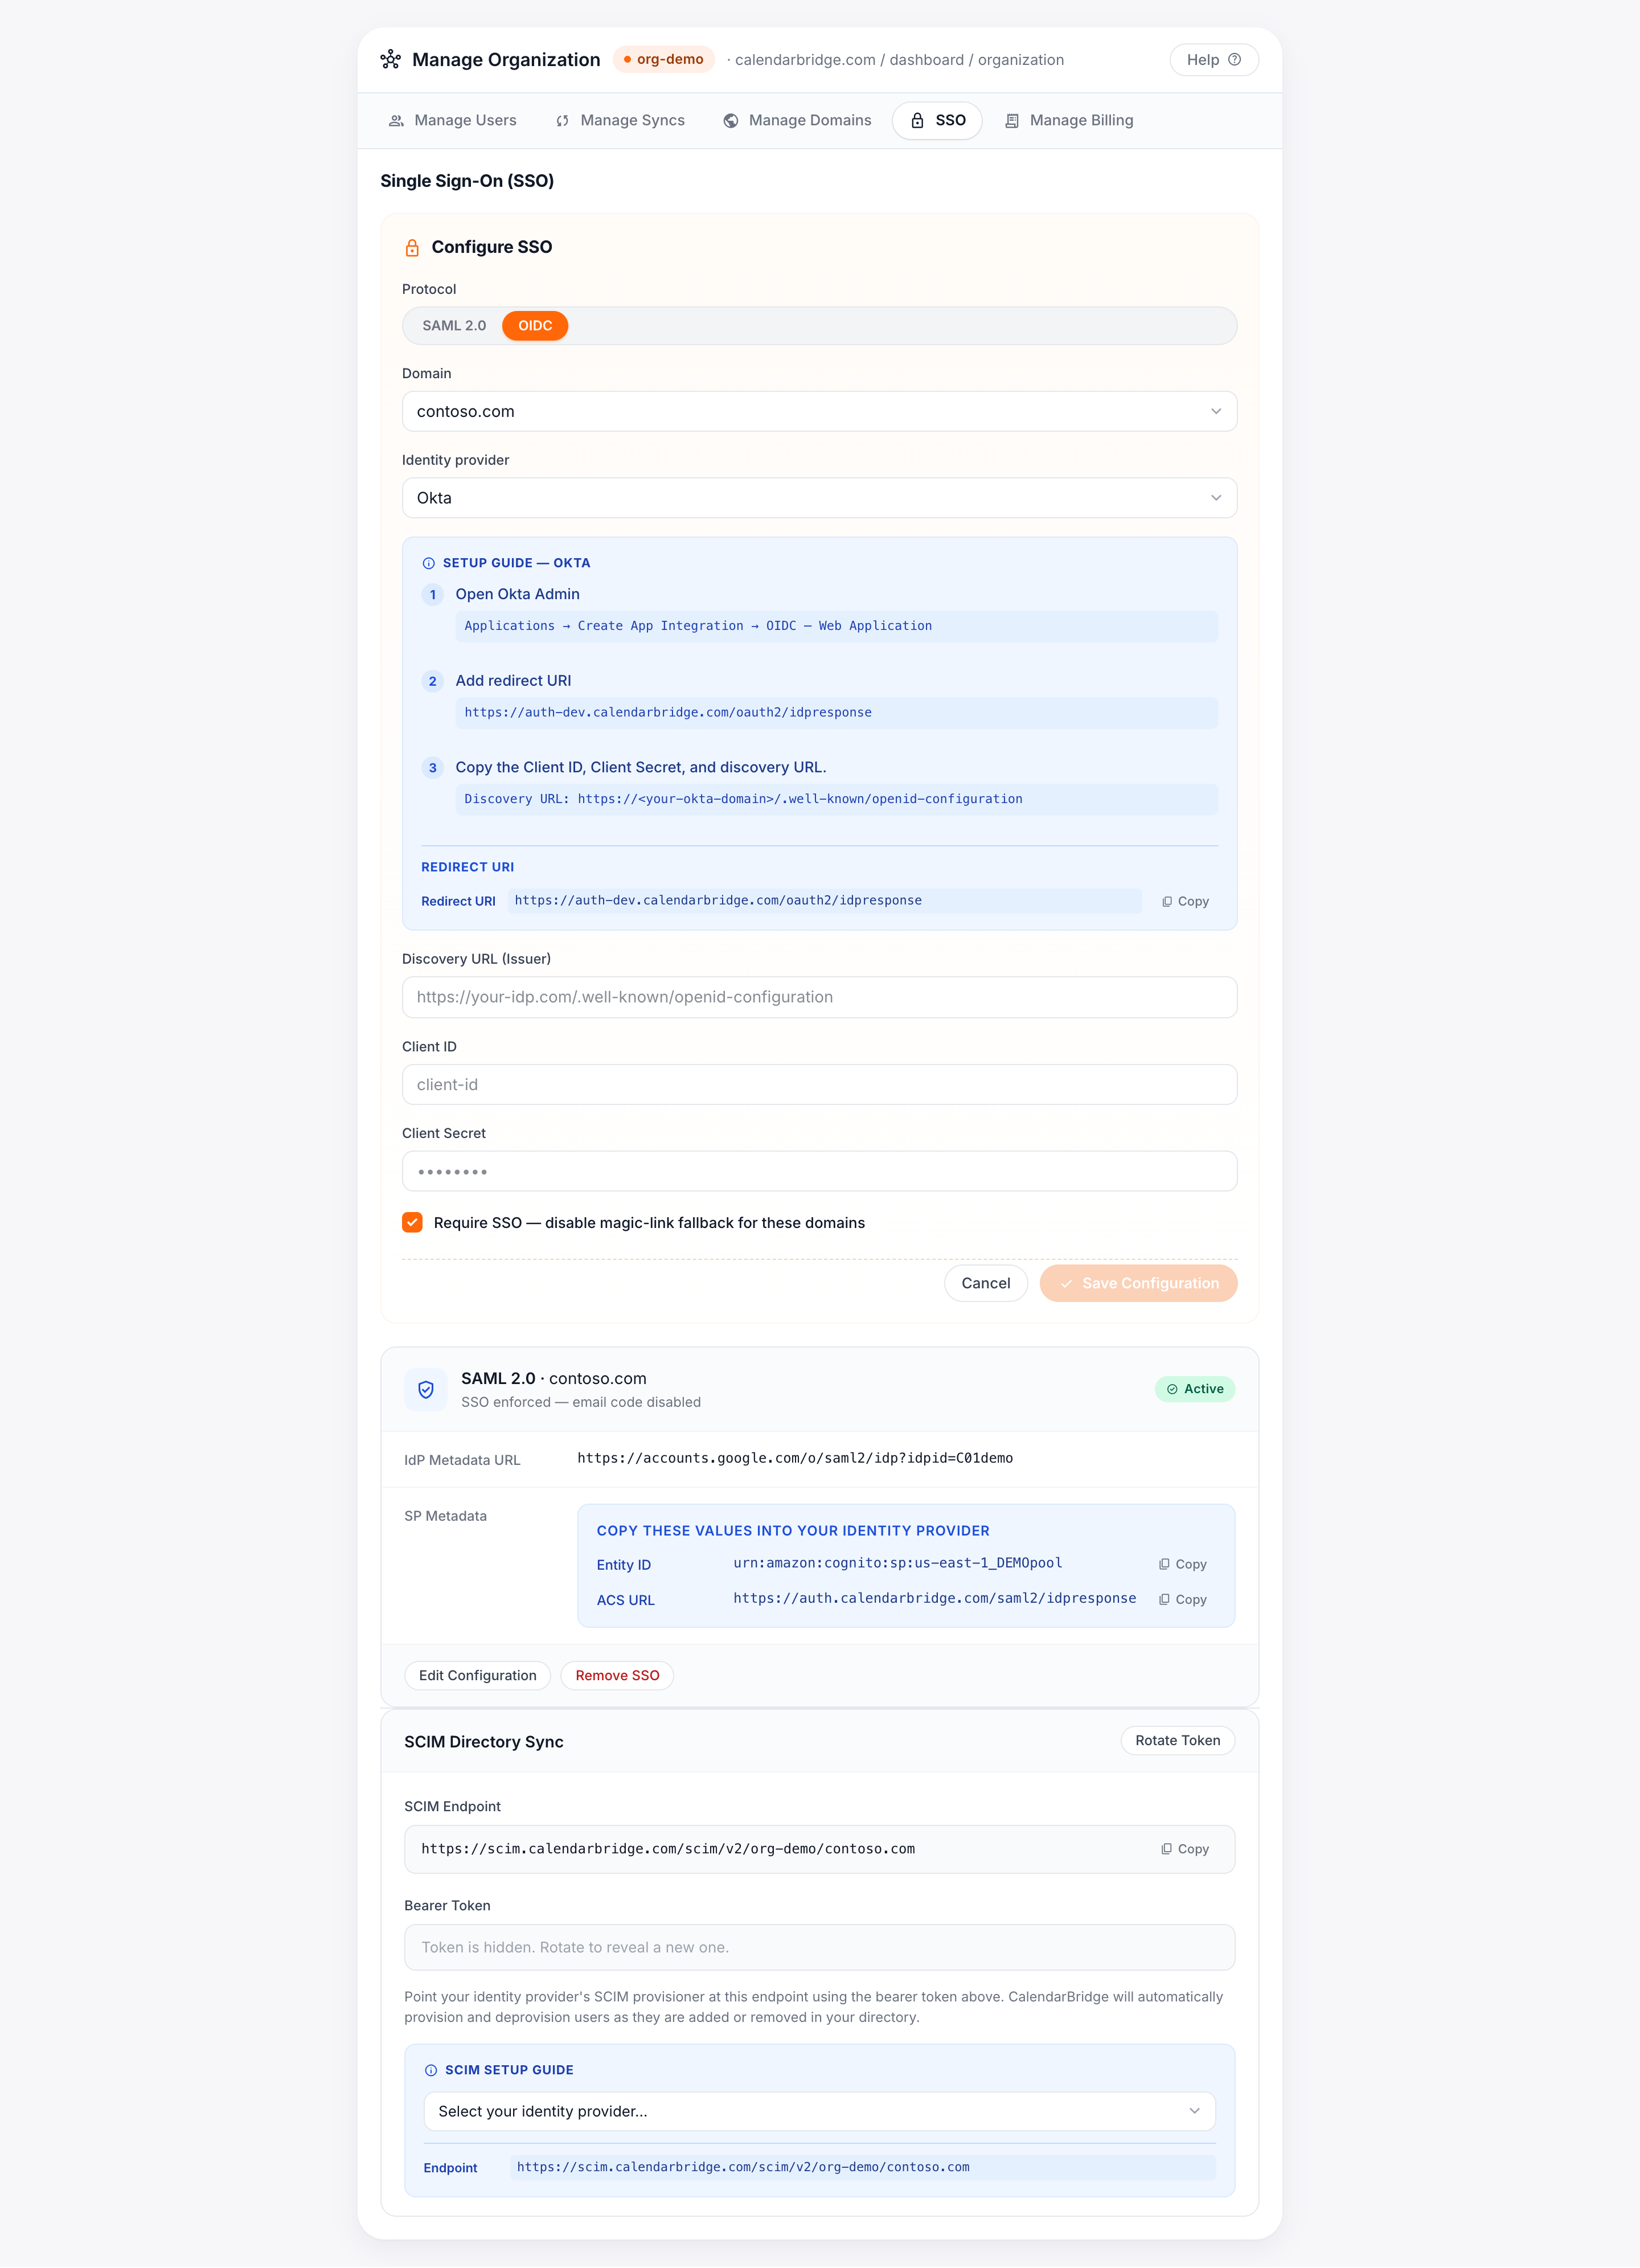
For IdPs you would rather connect over OIDC/OAuth 2.0, CalendarBridge uses the Authorization Code flow. You will create a Web application in your IdP and give CalendarBridge three values.
Redirect URI to enter in your IdP
| Field | Value |
|---|---|
| Redirect URI / Sign-in redirect URI (platform: Web) | https://<your-CalendarBridge-auth-domain>/oauth2/idpresponse — copy the exact value from the SSO tab. |
Values to enter in CalendarBridge
| CalendarBridge field | Where to find it in your IdP |
|---|---|
| Discovery URL | Your IdP's OpenID configuration document, e.g. https://<your-idp>/.well-known/openid-configuration. |
| Client ID | From the app registration you created. |
| Client Secret | A secret you generate in the app registration. |
Permissions (scopes) requested and why
CalendarBridge requests only the minimum, standard OIDC scopes needed to identify the signing-in user. It does not request access to mail, files, or calendar data through the SSO connection.
| Scope | Why it is requested (business justification) |
|---|---|
openid | Required to perform OpenID Connect authentication and receive an ID token. |
email | Used as the user's unique identifier to match them to your CalendarBridge organization and verified domain. |
profile | Reads basic profile (given name) to populate the user's display name on first sign-in. |
Microsoft Entra ID — OIDC
-
Register the application
In the Microsoft Entra admin center, go to App registrations → New registration.
-
Add the redirect URI
Add a Web platform redirect URI set to the CalendarBridge OIDC redirect URI shown in the SSO tab.
-
Create a client secret
Under Certificates & secrets → New client secret, create a secret and copy its value immediately.
-
Copy the discovery (metadata) URL
From Overview → Endpoints, copy the OpenID Connect metadata document URL. Paste the discovery URL, client ID, and client secret into the CalendarBridge SSO tab and save.
Enforcing SSO for your domain
By default, enabling SSO makes it available to users on the domain. Tick Enforce SSO in the setup form to require it: every user on that verified domain must then sign in through your IdP, and direct password sign-in is disabled for them.
Testing with pilot users
-
Confirm the configuration is Active
After saving, the configuration card shows a status badge. Wait for it to read Active. A Pending badge means CalendarBridge has not yet validated the IdP metadata; an Error badge shows the reason inline.
-
Assign a pilot user in your IdP
Assign one or two test users to the CalendarBridge app in your IdP, but leave enforcement off for now.
-
Sign in through SSO
Have the pilot user sign in to CalendarBridge using your organization's email/domain. They should be redirected to your IdP and returned to CalendarBridge signed in. Confirm their name and email populated correctly.
-
Roll out
Once the pilot succeeds, assign the rest of your users and, if desired, turn on Enforce SSO.
Troubleshooting
If the configuration card shows an Error status, the message displayed on the card explains the specific failure. Common cases:
| Symptom / message | Likely cause & fix |
|---|---|
| Status stuck on Pending or "could not fetch metadata" | The metadata URL is unreachable or returned non-XML. Verify the URL loads in a browser, or switch to uploading the metadata XML file. |
| "Invalid signature" / "certificate" error | The IdP's signing certificate rotated and the stored metadata is stale. Re-save using the IdP metadata URL (recommended) so rotations are picked up automatically, or re-upload the current XML. |
| "Audience" / "Issuer" mismatch | The Entity ID / Audience URI in your IdP does not exactly match the value from the SSO tab. Re-copy it from the portal. |
| User signs in but name/email is blank or rejected | The email and name attribute mappings are missing or misnamed. Re-check the required attribute mappings — names are case-sensitive. |
| "AADSTS50105" / user not assigned (Entra ID) | The user is not assigned to the CalendarBridge enterprise app in Entra ID. Assign the user or their group. |
| Redirect/Reply URL mismatch | The ACS URL (SAML) or Redirect URI (OIDC) in your IdP does not match the value in the SSO tab. Re-copy the exact value. |
Getting help
If you are stuck after checking the error message on the configuration card and the troubleshooting table above, contact CalendarBridge support. Include your organization's domain, the protocol (SAML/OIDC), your identity provider, and the exact status message shown on the card.
- Contact CalendarBridge Support
- Configuring SCIM Directory Sync (Provisioning) — automate user creation and deactivation once SSO is active.